1. Introduction
This manual provides detailed instructions for the Waveshare Industrial Modbus RTU 8-Channel Relay Module. This module is designed for industrial control applications, offering reliable relay switching via an RS485 interface using the Modbus RTU protocol. It features multiple isolation protection circuits for enhanced safety and stability.
Les principales caractéristiques comprennent :
- Configurable device address (1-255) for multi-device cascading on an RS485 bus.
- Flash-on, flash-off function for timed relay activation.
- Onboard unibody power supply isolation for stable isolated voltage.
- Onboard unibody magnetic isolation for signal integrity, high reliability, and strong anti-interference.
- TVS embarqué (Vol transitoiretage Suppressor) for surge and transient spike voltage suppression, providing lightning protection and anti-electrostatic capabilities.
- Onboard optocoupler isolation to prevent interference from external high-voltage circuits.
- Reverse-proof circuit to protect against accidental damage from incorrect power connection.
- High-quality relays with a contact rating of ≤10A 250VAC/30VDC.
- Rail-mounted ABS plastic enclosure for easy installation and safe use.
- Three LEDs indicating MCU status and signal transceiving status.
2. Contenu du colis
The standard package for the Waveshare Industrial Modbus RTU 8-Channel Relay Module includes the following items:
- Module relais 8 canaux Waveshare Modbus RTU
- Power adapter (may vary by region)

Image 2.1: The image displays the Waveshare Modbus RTU 8-Channel Relay Module along with a power adapter and a USB to RS485 converter (converter not included with the module).
3. Matériel terminéview
The Modbus RTU 8-Channel Relay Module is designed with robust components and protection circuits. Understanding its internal structure is crucial for proper use and troubleshooting.

Image 3.1 : Cette image fournit un aperçu détaillé view of the module's internal components, highlighting the high-quality relays, optocoupler isolation, magnetic signal isolation, power supply isolation, TVS lightning & ESD protection, and thickened tracks for large current.
3.1. Composants clés
- High Quality Relay: Ensures reliable switching for connected devices.
- Isolation de l'optocoupleur : Provides electrical isolation between control and load circuits.
- Magnetic Signal Isolation: Enhances signal integrity and anti-interference capabilities.
- Isolation de l'alimentation électrique : Isolates the power supply for stability and safety.
- TVS Lightning & ESD Protection: Protège contre le voltage surges and electrostatic discharge.
- Thickened Track for Large Current: Designed to handle higher current loads safely.
3.2. Conception du boîtier
The module is housed in a rail-mounted ABS plastic enclosure, facilitating easy installation in industrial environments and ensuring safe operation.

Image 3.2: The image shows the module's rail-mounted ABS plastic enclosure, designed for easy and secure installation.
4. Installation
Follow these steps to set up your Waveshare Industrial Modbus RTU 8-Channel Relay Module.
4.1. Connexion électrique
- Connect the provided power adapter to the DC 5V input terminal of the relay module. Ensure the polarity is correct to prevent damage.
- Verify that the power LED indicator on the module illuminates, indicating successful power-on.
4.2. RS485 Communication Setup
The module communicates via RS485. Multiple devices can be cascaded on the RS485 bus. If communication distance is long, RS485 repeaters may be necessary.
- Connect the RS485 A+, B-, and GND terminals of the module to your RS485 master device (e.g., a computer with a USB to RS485 converter, or a PLC).
- Ensure correct wiring: A+ to A+, B- to B-, and GND to GND.
- For multiple modules, connect them in a daisy-chain configuration as shown in the diagram below.

Image 4.1: This diagram illustrates how to connect multiple Modbus RTU relay modules in a daisy-chain configuration using an RS485 bus, typically connected to a USB to RS485 converter.
4.3. Device Address Configuration
Each module on the RS485 bus must have a unique device address, configurable from 1 to 255. Refer to the Modbus RTU protocol documentation for your specific software or controller to set the device address.
5. Mode d'emploi
The Waveshare Modbus RTU 8-Channel Relay Module operates using the standard Modbus RTU protocol over an RS485 interface. This section outlines how to control the relays.
5.1. Modbus RTU Protocol
The module responds to standard Modbus RTU commands. You will typically use Modbus function codes to read coil status, write single coils, or write multiple coils to control the relays. Consult the Modbus RTU specification for detailed command structures.
5.2. Relay Control
Each of the 8 channels corresponds to a relay. Relays can be individually controlled (turned ON/OFF) using Modbus commands. The module also supports a flash-on, flash-off function, allowing you to activate a relay for a specified duration and then automatically deactivate it.
5.3. Indicateurs LED
- Voyant LED STA (État) : Keeps flashing when the MCU is working normally.
- LED TXD (Transmission) : Lights up when the module is sending data.
- LED RXD (Réception) : Lights up when the module is receiving data.
6. Relay Connection
The module's relays have a contact rating of ≤10A 250VAC/30VDC. This allows direct control of various AC and DC devices. Always ensure that the connected load does not exceed the relay's maximum current and voltage évaluations.
6.1. AC 220V Device Connection
For connecting AC 220V devices, ensure proper insulation and safety precautions. Connect the AC load to the COM (Common) and NO (Normally Open) terminals of the desired relay channel.
6.2. DC 30V Device Connection
For connecting DC devices up to 30V, connect the DC load to the COM (Common) and NO (Normally Open) terminals of the desired relay channel. Ensure correct polarity for DC loads.

Image 6.1: This diagram illustrates how to connect both AC 220V and DC 30V devices to the relay module. It shows wiring for a light bulb (AC) and a motor (DC) using the COM and NO terminals, with the module powered by DC 5V.
7. Applications
The Waveshare Industrial Modbus RTU 8-Channel Relay Module is versatile and suitable for a wide range of applications:
- Contrôle industriel : Valve control, pump station control, and unattended industrial control systems.
- Maison intelligente: Controlling appliances like air conditioners, access control systems, purifiers, and water heaters.
- Agriculture intelligente : Controlling door curtain motors, air blowers, and other agricultural equipment.
- Élevage et agriculture : Controlling ventilators, lighting, water supply systems, and feeding systems.
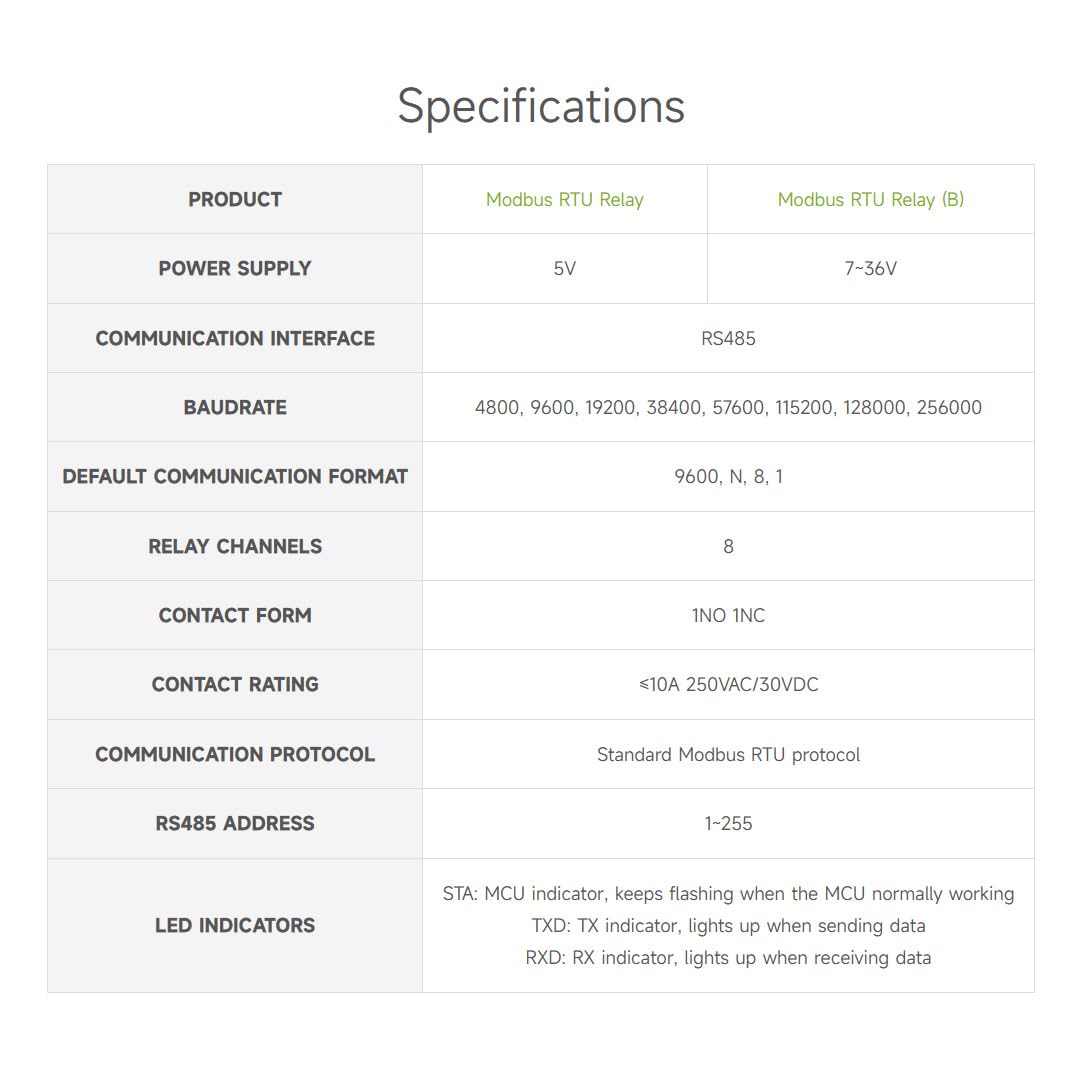
Image 7.1: This image displays four common application areas for the relay module: Industrial Control, Smart Home, Intelligent Agriculture, and Breeding & Farming, showing examples of equipment that can be controlled.
8. Spécifications
Detailed technical specifications for the Modbus RTU Relay Module:
| Fonctionnalité | Modbus RTU Relay | Modbus RTU Relay (B) |
|---|---|---|
| Alimentation électrique | 5V | 7-36V |
| Interface de communication | RS485 | |
| Baudrate | 4800, 9600, 19200, 38400, 57600, 115200, 128000, 256000 | |
| Format de communication par défaut | 9600 8, N, 1, XNUMX | |
| Canaux relais | 8 | |
| Formulaire de contact | 1NO 1NF | |
| Contacter Notation | ≤10A 250VAC/30VDC | |
| Protocole de communication | Protocole Modbus RTU standard | |
| Adresse RS485 | 1-255 | |
| Indicateurs LED | STA: MCU indicator, keeps flashing when the MCU normally working TXD: TX indicator, lights up when sending data RXD: RX indicator, lights up when receiving data | |
9. Entretien
The Waveshare Industrial Modbus RTU 8-Channel Relay Module is designed for robust and reliable operation with minimal maintenance. To ensure longevity and optimal performance:
- Garder propre: Periodically clean the exterior of the module with a soft, dry cloth. Avoid using harsh chemicals or abrasive materials.
- Conditions environnementales : Operate the module within its specified temperature and humidity ranges. Avoid exposure to excessive dust, moisture, or corrosive environments.
- Intégrité de la connexion : Regularly check all wiring connections (power, RS485, and relay loads) to ensure they are secure and free from corrosion or damage.
- Mises à jour du micrologiciel : Check the official Waveshare webConsultez ce site pour toute mise à jour du micrologiciel disponible susceptible d'améliorer les performances ou de résoudre des problèmes. Suivez attentivement les instructions de mise à jour.
10. Dépannage
If you encounter issues with your Waveshare Industrial Modbus RTU 8-Channel Relay Module, refer to the following troubleshooting tips:
- Le module ne s'allume pas :
- Assurez-vous que l'adaptateur secteur est correctement branché et fournit la tension spécifiée.tage (5V pour ce modèle).
- Check the power outlet and cable for functionality.
- Verify the power LED indicator. If it's off, there might be a power issue.
- No RS485 Communication:
- Verify RS485 wiring: A+ to A+, B- to B-, and GND to GND.
- Check the baud rate, data bits, parity, and stop bits settings in your Modbus master software. These must match the module's default or configured settings (e.g., 9600, N, 8, 1).
- Ensure the module's RS485 device address is unique and correctly configured in your master software.
- Observe the TXD and RXD LEDs. If they are not flashing during communication attempts, check wiring and software settings.
- For long distances or multiple devices, consider adding RS485 terminators or repeaters.
- Relais non activés :
- Confirm that the module is powered on and communicating correctly (check communication LEDs).
- Verify the Modbus commands sent to activate the specific relay channels.
- Check the wiring of the load connected to the relay. Ensure the load's power supply is active and within the relay's contact rating.
- Vérifiez que la charge elle-même est fonctionnelle.
- Fonctionnement intermittent :
- Check for loose connections on power, RS485, and relay terminals.
- Assurez-vous que l'environnement d'exploitation est stable et exempt de perturbations électriques excessives ou de fluctuations de température.
- Verify that the power supply is stable and sufficient for both the module and the connected loads.
11. Dimensions du contour
The physical dimensions of the Waveshare Industrial Modbus RTU 8-Channel Relay Module are provided below for installation planning.

Image 11.1: This image provides detailed measurements of the module, including its length (145mm), width (90mm), and height (40mm), along with other specific dimensions for mounting.
12. Garantie et assistance
Waveshare products are designed for quality and reliability. For specific warranty information, please refer to the warranty policy provided with your purchase or visit the official Waveshare website. For technical support, documentation, and additional resources, please visit the Waveshare support portal or contact their customer service directly.
Official Waveshare Website: www.waveshare.com


