Introduction
The Perel EDIN305N is a 230V 16A 3600W DIN-rail mount digital weekly timer designed for indoor use. This device allows for precise, programmable control of electrical circuits, enabling automatic switching ON and OFF of connected appliances or lighting systems over a weekly cycle. It features a clear digital display and multiple programming options to suit various scheduling needs.
Précautions de sécurité
AVERTISSEMENT: Electrical installation should only be performed by a qualified electrician. Incorrect wiring can lead to electric shock, fire, or damage to the device and connected equipment. Always disconnect power at the main circuit breaker before installation or maintenance.
- Ensure the power supply matches the device's specifications (230V~50Hz).
- Ne pas dépasser la capacité de charge maximale de 16 A / 3600 W.
- This device is designed for indoor use only. Avoid exposure to moisture, dust, or extreme temperatures.
- N’essayez pas d’ouvrir ou de réparer l’appareil vous-même. Confiez toute réparation à un personnel qualifié.
- Tenir hors de portée des enfants.
Produit terminéview
The Perel EDIN305N digital timer consists of a main body with a digital display, control buttons, and terminal blocks for electrical connections. A transparent cover protects the display and buttons.
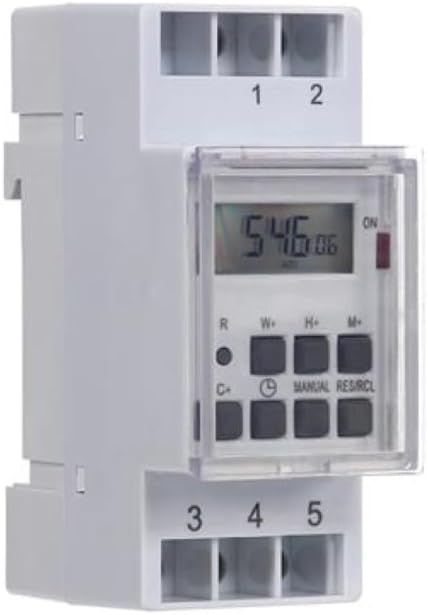
Figure 1 : Devant view of the Perel EDIN305N Digital Weekly Timer. The image displays the LCD screen, control buttons (R, W+, H+, M+, C+, Clock, Manual, RES/RCL), and numbered terminal blocks (1, 2 at the top, 3, 4, 5 at the bottom).
Boutons de contrôle :
- R: Reset button (recessed).
- W+ : Weekday setting.
- H+ : Réglage de l'heure.
- M+ : Minute setting.
- C+: Clear program.
- Icône d'horloge: Used to set current time and day, and to exit programming mode.
- MANUEL: Manual override for ON/AUTO/OFF modes.
- RES/RCL: Reset/Recall program.
Borniers :
- 1, 2: Power supply input (N, L).
- 3, 4, 5 : Output terminals for controlled circuit (Common, Normally Open, Normally Closed).
Spécifications techniques
| Paramètre | Valeur |
|---|---|
| Numéro de modèle | EDIN305N |
| Voltage | 230 V à 50 Hz |
| Courant max. | 16A |
| Puissance max. | 3600 W |
| Nombre de paramètres | 7 (programmes MARCHE/ARRÊT) |
| Type de montage | DIN-Rail |
| Dimensions (L x l x H) | 2.36 x 3.54 x 1.57 pouces (60 x 90 x 40 mm) |
| Poids | 0.12 kg (4.2 onces) |
| Matériel | Plastique |
| Couleur | Blanc |
| Piles requises | No (internal battery for memory backup) |
Installation
1. Montage
The Perel EDIN305N is designed for DIN-rail mounting. Securely attach the timer to a standard 35mm DIN-rail within an electrical enclosure. Ensure sufficient space for wiring and ventilation.
2. Câblage
IMPORTANT: Ensure power is disconnected at the main circuit breaker before proceeding with wiring. Follow local electrical codes and regulations.
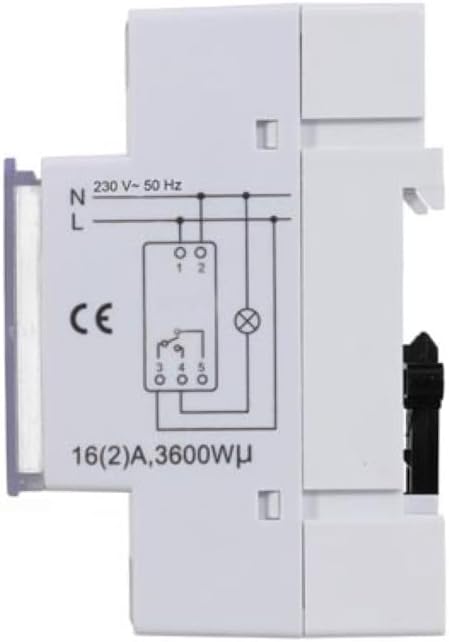
Figure 2 : Côté view of the Perel EDIN305N Digital Weekly Timer showing the electrical wiring diagram. It illustrates connections for Neutral (N), Live (L), and the output contacts (1, 2, 3, 4, 5) for controlling a load.
Refer to the wiring diagram (Figure 2) and the terminal block labels on the device:
- Connect the Neutral (N) wire of your 230V AC supply to terminal 1.
- Connect the Live (L) wire of your 230V AC supply to terminal 2.
- For the controlled circuit:
- Terminal 3: Common contact for the relay output.
- Terminal 4: Normally Open (NO) contact. The circuit connected here will be ON when the timer is active.
- Terminal 5: Normally Closed (NC) contact. The circuit connected here will be OFF when the timer is active.
- Connect the load (e.g., light, appliance) between the Live (L) supply and either terminal 4 (for NO operation) or terminal 5 (for NC operation), with terminal 3 connected to the Live (L) supply. Alternatively, connect the load between terminal 4 or 5 and the Neutral (N) supply, with terminal 3 connected to the Live (L) supply. Consult a qualified electrician for specific load wiring configurations.
Configuration initiale et fonctionnement
1. Mise sous tension et réinitialisation
After wiring and restoring power, the display will illuminate. If the display is blank or shows erratic characters, press the recessed R (Reset) button using a pointed non-metallic object (e.g., a pen tip). This will clear all settings and restore default values.
2. Réglage de l'heure et de la date actuelles
- Appuyez et maintenez enfoncé le Icône d'horloge bouton.
- Tout en tenant le Icône d'horloge bouton, appuyez sur W+ to set the current day of the week (1=Monday, 7=Sunday).
- Tout en tenant le Icône d'horloge bouton, appuyez sur H+ pour régler l'heure actuelle (0-23).
- Tout en tenant le Icône d'horloge bouton, appuyez sur M+ pour régler la minute actuelle (0-59).
- Relâchez le Icône d'horloge bouton. La date et l'heure sont maintenant réglées.
3. Programmation des cycles MARCHE/ARRÊT
La minuterie prend en charge jusqu'à 7 programmes marche/arrêt. Chaque programme comprend une durée de marche et une durée d'arrêt.
- Appuyez sur le Icône d'horloge Appuyez une fois sur le bouton pour accéder au mode de programmation. L'écran affichera « 1 ON ».
- Presse W+ to select the day(s) for this program. You can choose a single day, a block of days (e.g., Mon-Fri), or all days.
- Presse H+ to set the ON hour for program 1.
- Presse M+ to set the ON minute for program 1.
- Appuyez sur le Icône d'horloge Appuyez à nouveau sur le bouton. L'écran affichera « 1 OFF ».
- Repeat steps 2-4 to set the OFF day(s), hour, and minute for program 1.
- To set additional programs (2-7), press the Icône d'horloge button to cycle through "2 ON", "2 OFF", etc., and repeat the setting process.
- Après avoir configuré tous les programmes souhaités, appuyez sur MANUEL bouton pour quitter le mode programmation et revenir à l'affichage de l'heure actuelle.
4. Commande manuelle
Appuyez sur le MANUEL Appuyez plusieurs fois sur le bouton pour faire défiler les modes de fonctionnement :
- SUR: La sortie est activée en permanence, remplaçant tous les programmes.
- VOITURE: La minuterie fonctionne selon les cycles MARCHE/ARRÊT programmés.
- OFF: La sortie est constamment désactivée, annulant tous les programmes.
Assurez-vous que la minuterie est réglée sur AUTO pour un fonctionnement programmé.
5. Clearing Programs
To clear a specific program:
- Enter programming mode by pressing the Icône d'horloge button until the desired program number (e.g., "3 ON") is displayed.
- Appuyez sur le C+ button. This will clear both the ON and OFF times for that specific program.
- Repeat for other programs as needed.
- Presse MANUEL pour quitter le mode de programmation.
To clear all programs and reset the device, use the recessed R Bouton (Réinitialiser).
Entretien
- Nettoyez l'appareil avec un chiffon doux et sec. N'utilisez pas de nettoyants abrasifs ni de solvants.
- Ensure the transparent cover is closed to protect the display and buttons from dust and splashes.
- Regularly check electrical connections for tightness, especially in high-vibration environments.
Dépannage
| Problème | Cause possible | Solution |
|---|---|---|
| L'affichage est vide. | Pas d'alimentation électrique ; batterie interne déchargée. | Check power connections (terminals 1 & 2). Ensure main power is ON. If power is present, press the R (Reset) button. The internal battery recharges when connected to power. |
| La minuterie ne s'allume/s'éteint pas comme prévu. | Incorrect program settings; timer in manual ON/OFF mode. | Verify program settings (time, day, ON/OFF). Ensure the timer is in AUTO mode en appuyant sur la MANUEL bouton. |
| Connected appliance not receiving power. | Incorrect wiring; appliance fault; timer fault. | Check wiring according to Figure 2. Test the appliance directly. If wiring and appliance are fine, the timer may be faulty. |
| Buttons unresponsive or display erratic. | Software glitch; low internal battery. | Appuyez sur le bouton encastré R (Reset) button. Ensure the timer has been connected to power for at least 24 hours to fully charge the internal battery. |
Élimination
Do not dispose of this product with general household waste. This electronic device contains materials that can be recycled. Please dispose of it at a designated collection point for electrical and electronic equipment waste, in accordance with local regulations.
Garantie et assistance
Perel products are manufactured to high quality standards. For warranty information, technical support, or service inquiries, please refer to the documentation provided with your purchase or contact your local Perel distributor or retailer. Please have your model number (EDIN305N) and purchase details ready when contacting support.


