Introduction
This manual provides comprehensive instructions for the setup, operation, and maintenance of your Geemarc CL595 Amplified Corded Telephone. Designed for ease of use, particularly for seniors and individuals with moderate to severe hearing loss, the CL595 features amplified sound, large buttons, and specialized functions like photo memory keys and an SOS emergency call system. Please read this manual thoroughly to ensure proper use and to maximize the benefits of your telephone.
1. Installation
Follow these steps to set up your Geemarc CL595 telephone:
- Déballage: Carefully remove all components from the packaging. Ensure you have the telephone base, handset, coiled handset cord, telephone line cord, and power adapter.
- Installation de la batterie : The telephone requires 3 AAA batteries (not included) for certain functions like memory retention during power outages. Open the battery compartment on the underside of the base and insert the batteries, observing polarity.
- Connectez le combiné : Branchez une extrémité du cordon spiralé du combiné dans le combiné et l'autre extrémité dans le port prévu à cet effet sur le côté gauche de la base du téléphone.
- Connectez la ligne téléphonique : Plug one end of the telephone line cord into the "LINE" port on the back of the telephone base and the other end into your wall telephone jack.
- Connectez l'adaptateur secteur : Plug the power adapter into the "DC IN" port on the back of the telephone base, then plug the adapter into a standard electrical outlet.
- Mise sous tension initiale : The telephone display should light up. Follow any on-screen prompts to set the date, time, and language.

Illustration 1 : Avant view of the Geemarc CL595 telephone, showing the handset, large keypad, display, and photo memory buttons. This illustrates the overall design and key user interface elements.
2. Mode d'emploi
This section details the various functions and how to operate your CL595 telephone.
2.1 Fonctions d'appel de base
- Passer un appel : Lift the handset, wait for a dial tone, then dial the desired number using the large keypad.
- Recevoir un appel : Lorsque le téléphone sonne, décrochez pour répondre.
- Terminer un appel : Place the handset back on the base.
- Haut-parleur: Appuyez sur le CONFÉRENCIER button to activate the speakerphone function. Press it again to deactivate.
2.2 Amplified Volume and Hearing Aid Compatibility
- Reception Volume: The telephone offers 6 levels of reception amplification. Adjust the volume during a call using the dedicated volume buttons.
- Fonction boost : Appuyez sur le SOS/AMPLIFIER button during a call to instantly amplify the reception volume by up to 50dB. Press again to return to normal volume.
- Volume de la sonnerie : The powerful ringer can reach up to 80dB. Adjust the ringer volume using the settings menu.
- Compatibilité des aides auditives : If you use hearing aids, switch them to the "T" position for optimal sound quality during calls.
2.3 Clés mémoire photo
The CL595 features three customizable photo memory keys (M1, M2, M3) for quick dialing of frequently called numbers.
- Programmation:
- Décrochez le combiné.
- Appuyez sur le MAGASIN button (if available, or refer to specific menu instructions).
- Composez le numéro de téléphone que vous souhaitez enregistrer.
- Press the desired photo memory key (M1, M2, or M3).
- Raccrochez le combiné.
- Passer un appel : Simply lift the handset and press the desired photo memory key (M1, M2, or M3) to dial the stored number.
- Customizing Photos: Lift the transparent cover on each photo key, insert a small photo of the contact, and replace the cover.
2.4 Répondeur
The integrated answering machine can record up to 30 minutes of messages.
- Accéder aux messages : Press the dedicated answering machine button on the base to play back messages.
- Lecture lente : If a message is spoken too quickly, activate the "slow playback" function (refer to the menu for specific steps) to listen at a reduced speed.
2.5 Fonction d'urgence SOS
Le rouge SOS button on the base activates an emergency call sequence.
- Numéros de programmation SOS :
- Access the SOS settings in the telephone menu.
- Program up to four emergency contact numbers in the desired calling order.
- Activation de SOS : Appuyez sur le rouge SOS button on the base. The telephone will automatically dial the pre-programmed numbers one after another until a connection is made.
2.6 VIP Directory and Call Blocking
- VIP Directory: You can store up to 50 trusted numbers in a special "VIP" directory. The telephone can be configured to only accept incoming calls from numbers listed in this directory.
- Blocage d'appel : The CL595 allows you to block up to 100 unwanted numbers. Access the call blocking settings in the menu to add numbers to the block list.
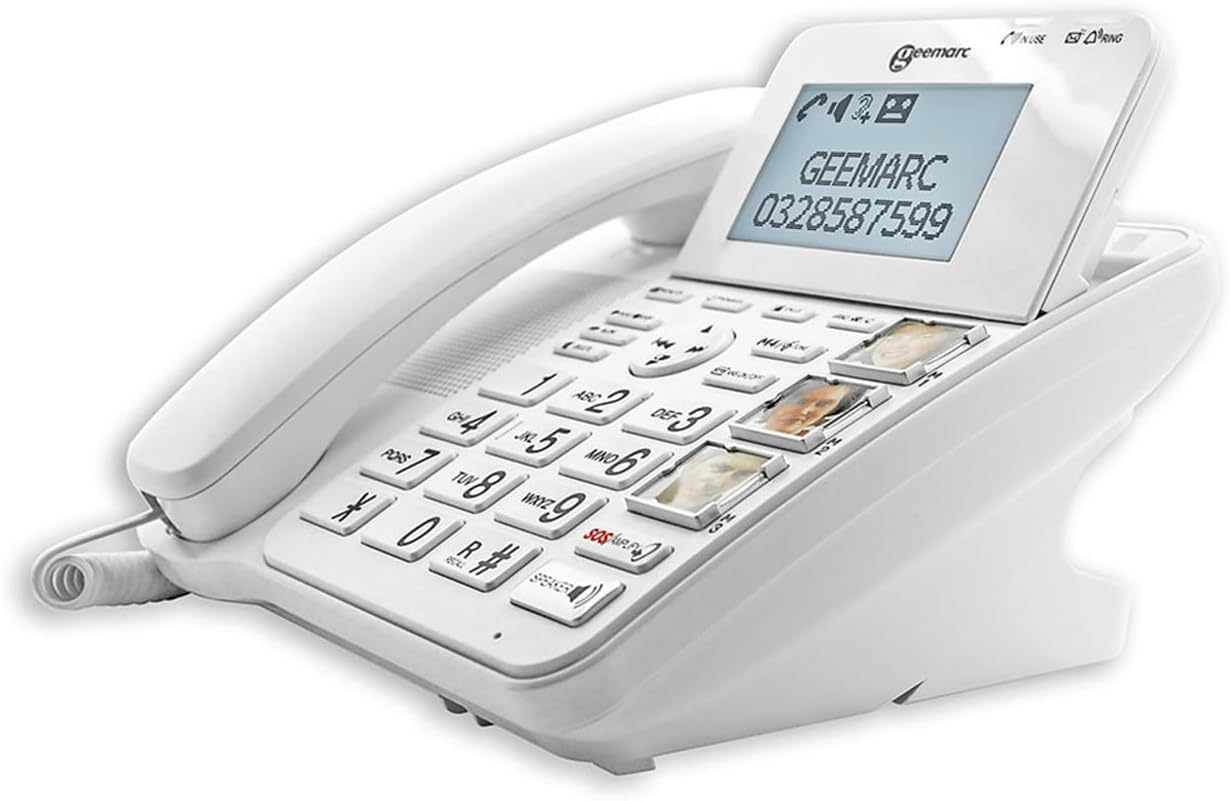
Image 2 : Inclinée view of the Geemarc CL595, highlighting the large, well-spaced buttons, the digital display, and the three photo memory keys. This image demonstrates the user-friendly interface for dialing and accessing features.
3. Entretien
Un entretien régulier garantit la longévité et les performances optimales de votre téléphone.
- Nettoyage: Utilisez un chiffon doux et sec.amp cloth to clean the telephone's exterior. Do not use abrasive cleaners or solvents. Ensure no liquid enters the telephone's openings.
- Remplacement de la batterie : If the telephone uses AAA batteries for backup, replace them periodically (e.g., annually) or if the low battery indicator appears.
- Stockage: Store the telephone in a cool, dry place away from direct sunlight and extreme temperatures when not in use for extended periods.
4. Dépannage
If you encounter issues with your Geemarc CL595, refer to the following common problems and solutions:
| Problème | Cause possible | Solution |
|---|---|---|
| Pas de tonalité | Le cordon de la ligne téléphonique est débranché ou défectueux. | Vérifiez que le cordon téléphonique est bien branché au téléphone et à la prise murale. Si possible, faites un essai avec un autre téléphone. |
| Je n'entends pas mon interlocuteur. | Volume settings are too low; handset or line cord issue. | Adjust reception volume using the dedicated buttons or activate the Boost function. Check handset cord connection. |
| Le téléphone ne sonne pas | Le volume de la sonnerie est désactivé ou trop faible. | Check ringer volume settings in the menu. Ensure "Do Not Disturb" or similar features are not active. |
| L'affichage est vide | Power adapter is disconnected or power outage. | Ensure the power adapter is securely connected to the phone and a working electrical outlet. Check household power. |
If the problem persists after trying these solutions, please contact Geemarc customer support for further assistance.
5. Spécifications
- Modèle: CL595
- Taper: Téléphone filaire
- Dimensions (L x l x H) : 19 x 20 x 27 cm (environ)
- Poids: 1 kilogramme
- Source d'alimentation : Câble électrique
- Piles : 3 x AAA (for backup, not included)
- Taille de l'écran : 5 inches (display)
- Réception Amplification : Up to +50dB (with Boost function)
- Volume de la sonnerie : Jusqu'à 80 dB
- Compatibilité des aides auditives : Yes (T-position)
- Répondeur automatique: Numérique, jusqu'à 30 minutes d'enregistrement
- Photo Memory Keys: 3 touches mémoire directes
- VIP Directory Capacity: Jusqu'à 50 numéros
- Capacité de blocage des appels : Jusqu'à 100 numéros
- Appareils compatibles : Réseau téléphonique commuté public (RTCP)
- Fabricant: Geemarc Telecom
- Pays d'origine : Chine
6. Garantie et assistance
Garantie: The Geemarc CL595 typically comes with a 1-year parts availability guarantee. For specific warranty terms and conditions, please refer to the documentation provided with your purchase or contact your retailer.
Assistance clientèle : For technical assistance, troubleshooting beyond this manual, or warranty inquiries, please contact Geemarc customer service. Contact details can usually be found on the manufacturer's website ou dans l'emballage de votre produit.