1. Introduction
The Portkeys HS7T II is a high-brightness 7-inch DSLR camera field monitor designed for professional videography and filmmaking. It features a 1920x1200 resolution display with 1200 Nits brightness, ensuring clear visibility even in daylight conditions. The monitor supports 4K HDMI and 3G-SDI inputs and outputs without delay, offering robust connectivity. Built with a durable CNC metal frame and tempered glass panel, it is engineered for reliability in various production environments. Advanced monitoring tools such as 3D LUT, Histogram, Peaking, False Color, and Audio Levels Meters are integrated to assist with precise image control.

Figure 1: Portkeys HS7T II 7-inch field monitor with high brightness display.
2. Contenu de la boîte
Vérifiez que tous les éléments énumérés ci-dessous sont inclus dans votre colis :
- 1 × HS7T Monitor
- 1 × D-TAP B ANTO - 4 PIN Aerial Cable
- 1 × chiffon de nettoyage
- 1 × USB drive
- 1 × Black gift box
3. Installation
3.1 Alimentation du moniteur
The HS7T II monitor offers flexible power options to suit various shooting scenarios:
- V-Mount Batteries: Connect a V-mount battery via the provided D-TAP B ANTO - 4 PIN Aerial Cable.
- Batteries de la série NP-F : The monitor features dual swappable battery plates compatible with NP-F series batteries for extended operation.
- Dummy Battery Support: Utilize a dummy battery to power your camera directly from the monitor, simplifying your power setup.

Figure 2: Dual battery plates for uninterrupted power supply.
3.2 Connexion des sources vidéo
The monitor supports both HDMI and 3G-SDI connections:
- Entrée/sortie HDMI : Connect your camera or other video source using a 4K HDMI cable to the HDMI IN port. The HDMI OUT port allows for signal pass-through to another display.
- 3G-SDI Input/Output: For professional setups, use the 3G-SDI IN port for camera connection and 3G-SDI OUT for signal pass-through.

Figure 3: Rear panel with HDMI and 3G-SDI input/output ports.
3.3 Installation du moniteur
The HS7T II features a NATO sliding mounting bracket for secure and flexible attachment to camera rigs or stands.
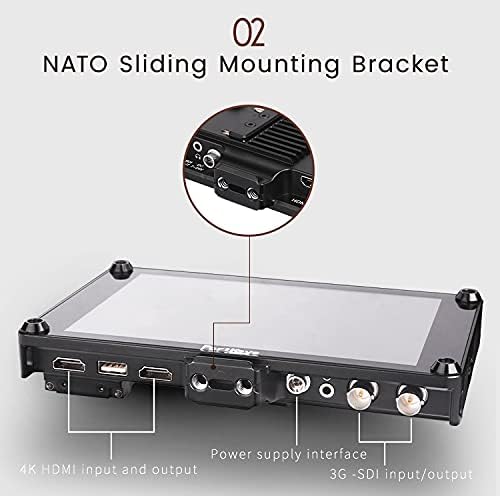
Figure 4: NATO sliding mounting bracket for versatile attachment.
4. Fonctionnement
4.1 Navigation de base
Utilisez le MENU, EXIT, et SAISIR buttons located on the top of the monitor to navigate through settings and switch between input sources. Customizable function buttons (F1-F4) allow quick access to frequently used features.
4.2 Fonctions d'affichage
- Haute luminosité: The 1200 Nit screen ensures excellent visibility outdoors and in bright conditions.
- Haute résolution: A 1920x1200 resolution provides sharp and detailed images for critical focus.
- Contraste élevé : A 1200:1 contrast ratio delivers rich blacks and vibrant colors.
4.3 Outils de surveillance avancés
The HS7T II integrates a suite of professional monitoring tools:
- Prise en charge des LUT 3D : Store up to 20 sets of 3D LUT files for accurate color grading and previewing log footage.
- Audio Levels Meters: Monitor audio input levels to prevent clipping and ensure optimal sound recording.
- Histogramme : Visualize the tonal distribution of your image to prevent overexposure or underexposure.
- Aspect Ratio Guides: Overlay various aspect ratio guides for precise framing.
- Pic : A new peaking algorithm enhances focus assist, making focus more precise.
- DSLR Scaling & Zooming: Adjust image scaling and zoom for detailed inspection of your footage.
- Fausse couleur: Use false color to evaluate exposure levels across your image.
- Pixel à Pixel: View the image at its native resolution for critical focus and detail checking.

Figure 5: Enhanced peaking feature for accurate focus.
4.4 Wireless Video Transmission Integration
The HS7T II is designed to integrate with wireless video transmission systems like Claymore. When connected, the monitor can function as a wireless receiver, streamlining your setup and reducing cable clutter. The monitor can also power compatible wireless transmitters.
Video 1: Demonstrating the Portkeys HS7T II display and its integration with wireless video transmission. This video highlights the monitor's features and connectivity options in a practical setting.

Figure 6: Monitor compatible with wireless video transmission systems.
5. Entretien
- Nettoyage: Use the provided cleaning cloth or a soft, lint-free cloth to gently wipe the screen and body. Avoid abrasive materials or harsh chemicals.
- Stockage: When not in use, store the monitor in a protective case to prevent scratches and damage.
- Conditions environnementales : Avoid exposing the monitor to extreme temperatures, high humidity, or direct sunlight for prolonged periods.
- Protection physique : The CNC metal frame and tempered glass panel offer robust protection, but care should still be taken to avoid drops or impacts.

Figure 7: Rugged CNC metal construction with cooling holes for durability.
6. Dépannage
If you encounter issues with your Portkeys HS7T II monitor, refer to the following common problems and solutions:
- Monitor Does Not Power On:
- Assurez-vous que les piles sont complètement chargées et correctement insérées.
- Verify that the D-TAP cable is securely connected to both the monitor and the power source.
- If using a dummy battery, confirm it is properly connected and the external power source is active.
- Aucun signal vidéo :
- Check that the HDMI or SDI cable is securely connected to both the camera/source and the monitor.
- Confirm the camera's video output settings match the monitor's input capabilities (e.g., resolution, frame rate).
- Ensure the correct input source (HDMI or SDI) is selected on the monitor.
- Dummy NP Battery Not Providing Power:
- Verify that the monitor itself is powered on and receiving sufficient power.
- Ensure the dummy battery is correctly seated in its slot.
- Test with a different dummy battery or external device if possible to isolate the issue.
- Battery Slots Not Locking Securely:
- Ensure batteries are inserted correctly and fully engaged.
- Si le problème persiste, contactez le support client pour obtenir de l'aide.
- Image Quality Issues (e.g., blue dot, screen pushes in):
- Inspect the screen for any physical damage.
- If these issues are present upon initial use, it may indicate a manufacturing defect. Refer to the warranty section for replacement or repair options.
7. Spécifications
| Fonctionnalité | Détail |
|---|---|
| Dimensions du produit | 7.5 x 4.9 x 0.8 pouces |
| Poids de l'article | 12.3 onces |
| Numéro de modèle | HS7T |
| Taille de l'écran | 7 pouces |
| Résolution | 1920 x 1200 Pixels (2K DCI 1080p) |
| Luminosité de l'image | Nits 1200 |
| Rapport de contraste | 1200:1 |
| Rapport hauteur/largeur | 1.60:1 |
| Voltage | 24 volts |
| Nombre total de ports USB | 1 |
| Connectivité | HDMI, 3G-SDI |
| Surface de l'écran | Brillant |
| Fabricant | Portoloins |
| Première date disponible | 24er août 2018 |
8. Garantie et assistance
The Portkeys HS7T II monitor comes with a Garantie d'un an from the date of purchase. This warranty covers manufacturing defects and issues arising from normal use. If you encounter any problems or require technical assistance, please contact Portkeys customer support. Free technical support is available to assist you with any operational or technical queries.
For support, please visit the official Portkeys website ou consultez les informations de contact fournies dans l'emballage de votre produit.


