1. Introduction
Thank you for choosing the Zerone LP-838 Small Power Amplifier. This manual provides essential information for the safe and efficient operation of your device. Please read these instructions thoroughly before use and retain them for future reference.
2. Produit terminéview
2.1 Principales caractéristiques
- Conception compacte et portable.
- RCA and 3.5mm audio input compatibility.
- High-power audio amplifier chip for 2.1 channel output.
- Adjustable Treble, Bass, and Volume controls.
- Durable all-aluminum alloy shell for electromagnetic interference reduction.
2.2 Identification des composants
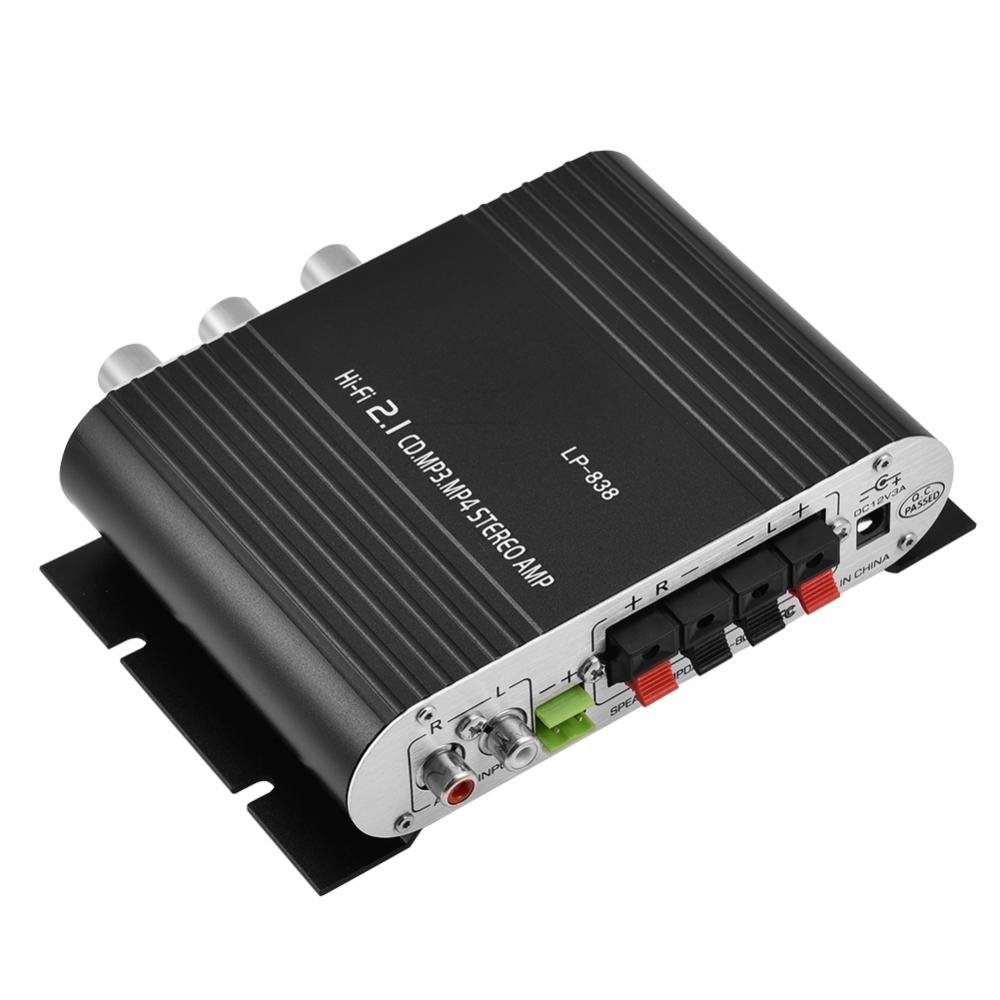
Figure 1 : Commandes et entrées du panneau avant
This image displays the front panel of the LP-838 amplifier. From left to right, it features a power switch, a bass volume knob, a 3.5mm MP3 input jack, and three rotary knobs for Treble, Bass, and Master Volume control. The unit also supports RCA audio input, as indicated by the text overlay.
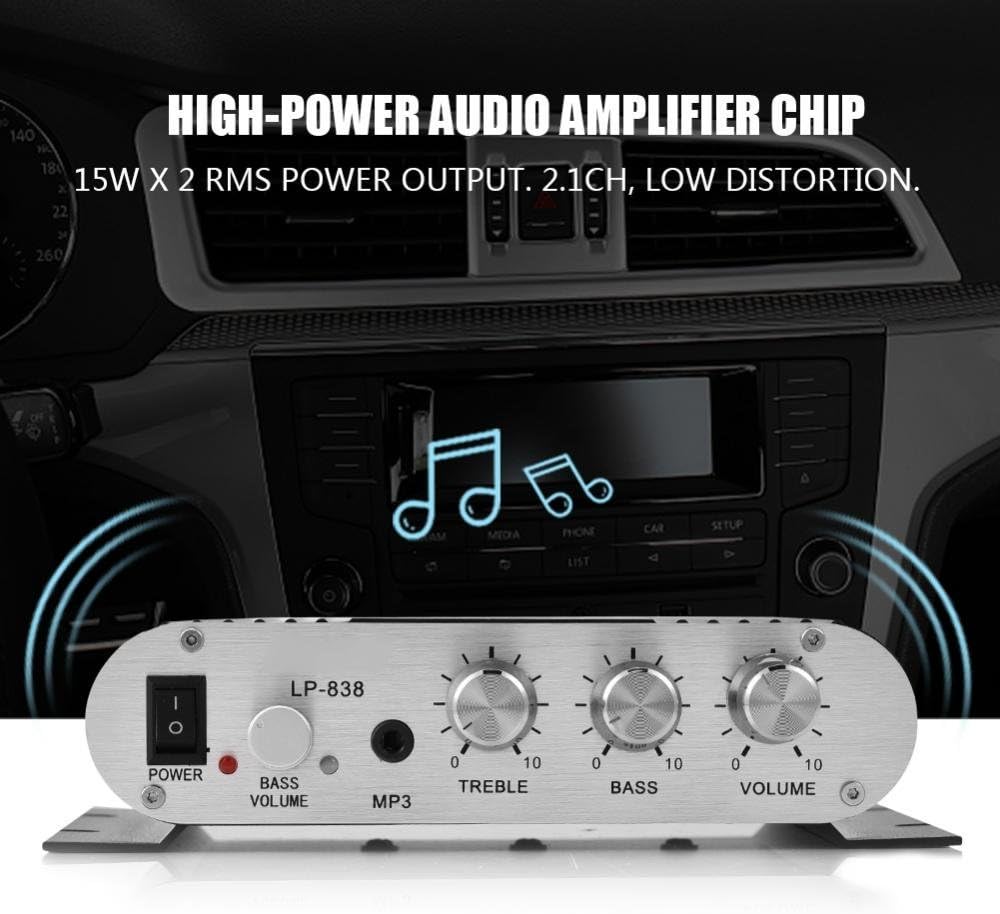
Figure 2 : Connexions du panneau arrière
This image shows the rear panel of the LP-838 amplifier. On the left are the RCA audio input jacks (red for right, white for left). In the center are the spring-clip speaker terminals for connecting left and right speakers. On the right is the DC 12V/3A power input jack and a 'Q.C. PASSED' stamp, indicating quality control.
Panneau avant :
- Interrupteur: Bascule le amplificateur marche/arrêt.
- BASS VOLUME Knob: Ajuste le niveau des basses de la sortie audio.
- Entrée MP3 : 3.5mm jack for connecting portable audio devices.
- Bouton TREBLE : Ajuste la réponse en haute fréquence.
- Bouton BASS : Ajuste la réponse en basses fréquences.
- Bouton VOLUME : Contrôle le volume de sortie global.
Panneau arrière:
- AUDIO INPUT (RCA): Red and white RCA jacks for connecting audio sources (e.g., DVD players, computers).
- SPEAKER OUTPUTS (+R -R +L -L): Spring-clip terminals for connecting passive speakers. Ensure correct polarity (+ to + and - to -).
- Entrée CC 12 V/3 A : Power input jack for connecting the external power adapter (not included).
3. Installation
- Connecter les haut-parleurs : Connect your passive speakers to the SPEAKER OUTPUT terminals on the rear panel. Ensure the positive (+) terminal of the ampL'amplificateur se connecte à la borne positive (+) du haut-parleur et à la borne négative (-) du ampL'amplificateur se connecte à la borne négative (-) du haut-parleur. ampL'amplificateur prend en charge les haut-parleurs ayant une impédance de 4 à 8 ohms.
- Connecter la source audio :
- For RCA input: Connect your audio source (e.g., CD player, TV, computer) to the RCA AUDIO INPUT jacks on the rear panel using an RCA cable.
- For 3.5mm input: Connect your portable audio device (e.g., smartphone, MP3 player) to the MP3 input jack on the front panel using a 3.5mm audio cable.
- Connecter l'alimentation : Connect a compatible DC 12V/3A power adapter (not included) to the DC 12V/3A input jack on the rear panel. Plug the power adapter into a wall outlet.
Important: Ensure all connections are secure before powering on the amplifier.
4. Mode d'emploi
- Mise sous tension : Mettez l'interrupteur POWER situé sur le panneau avant sur la position « ON ». Le voyant d'alimentation s'allumera.
- Sélectionnez Entrée : Le amplifier automatically uses the active input. If both RCA and 3.5mm inputs are connected, the 3.5mm input may take precedence.
- Régler le volume : Start with the VOLUME knob set to a low level. Begin playing audio from your source, then slowly increase the VOLUME knob to your desired listening level.
- Régler la tonalité : Use the TREBLE and BASS knobs to fine-tune the high and low frequencies according to your preference. The BASS VOLUME knob provides additional control over the bass output.
- Éteindre: When finished, turn the VOLUME knob down to its minimum setting, then flip the POWER switch to the 'OFF' position.
5. Entretien
- Nettoyage: Utilisez un chiffon doux et sec pour nettoyer l'extérieur du ampNettoyant. Ne pas utiliser de nettoyants liquides ni de solvants.
- Ventilation: Assurez-vous que amplifier is placed in a well-ventilated area to prevent overheating. Do not block the ventilation slots.
- Stockage: Lorsque l'appareil n'est pas utilisé pendant une période prolongée, débranchez l'adaptateur secteur et rangez-le. ampConserver l'amplificateur dans un endroit frais et sec.
6. Dépannage
| Problème | Cause possible | Solution |
|---|---|---|
| Pas de courant | Adaptateur secteur non connecté ou défectueux ; interrupteur d’alimentation éteint. | Ensure power adapter is securely connected and functional. Flip power switch to ON. |
| Pas de sortie audio | Incorrect audio input connection; speaker wires loose or incorrect polarity; volume too low; audio source issue. | Check audio input cables and connections. Verify speaker wire connections and polarity. Increase volume. Test audio source with another device. |
| Son déformé | Volume too high; incorrect tone settings; faulty audio source or cable. | Reduce volume. Adjust Treble and Bass knobs. Test with a different audio source or cable. |
| Bruit de bourdonnement ou de bourdonnement | Ground loop issue; interference from other electronics; faulty cables. | Assurez-vous que tous les composants sont correctement mis à la terre. Déplacez amplifier away from other electronic devices. Try different audio cables. |
7. Spécifications
- Marque: Zéro un
- Numéro de modèle : Zeroneq8ae3d902g-02 (LP-838)
- Voltage: 14.4 Volts (en fonctionnement)
- Nombre de canaux : 2
- Impédance du haut-parleur : 4-8 Ohms
- Type de montage : Montage en surface
- Poids de l'article : 7.8 onces
- ASIN: B07DM4QJGX
- Code à barres : 763741184919
- Date de mise en ligne sur Amazon : 4 juillet 2019
8. Informations sur la garantie
For specific warranty terms and conditions, please refer to the documentation provided at the time of purchase or contact your retailer. Warranty coverage typically includes defects in materials and workmanship under normal use.
9. Assistance
If you encounter issues that cannot be resolved using the troubleshooting guide, please contact the retailer or manufacturer for assistance. Provide your product model number (LP-838) and a detailed description of the problem when seeking support.


