Introduction
Thank you for choosing the Activa Mastercook CALIFORNIA Gas Grill. This manual provides essential information for the safe assembly, operation, maintenance, and troubleshooting of your new gas grill. Please read these instructions carefully before using the appliance and retain them for future reference.
The Activa Mastercook CALIFORNIA Gas Grill is designed for outdoor use, offering a convenient and efficient way to prepare grilled dishes. It features a robust design with three main burners and a side burner for versatile cooking, along with an integrated thermometer for optimal temperature control and wheels for easy mobility.

Image : Avant view of the Activa Mastercook CALIFORNIA Gas Grill with the lid and cabinet doors open, showcasing the cooking grates, side burner, and internal storage.
Consignes de sécurité
AVERTISSEMENT: Le non-respect de ces consignes de sécurité peut entraîner des blessures graves, voire la mort.
- Ce barbecue est destiné à un usage extérieur uniquement. Ne pas utiliser à l'intérieur ou dans des espaces clos.
- Lisez toutes les instructions avant l'assemblage et l'utilisation.
- Gardez les enfants et les animaux domestiques éloignés du gril en tout temps.
- Ne stockez pas et n’utilisez pas d’essence ou d’autres liquides ou vapeurs inflammables à proximité de cet appareil ou de tout autre appareil.
- Veillez toujours à assurer une ventilation adéquate.
- Check for gas leaks before each use. Use a soapy water solution; never use an open flame.
- Ne laissez pas le gril sans surveillance pendant son utilisation.
- Ensure the gas cylinder is stored upright and secured.
- Portez des gants de protection lorsque vous manipulez des composants chauds.
- Veillez à ce que la zone autour du barbecue soit dégagée et exempte de matériaux combustibles.
Contenu du colis
Before beginning assembly, ensure all parts are present and undamaged. The main components included with your Activa Mastercook CALIFORNIA Gas Grill are:
- Gas Grill Unit (main body with burners and side burner)
- Cast Iron Grate (50x37 cm)
- Thermometer (integrated into the lid)
- Burner Covers / Heat Diffusers
- Étagères latérales
- Des roues pour la mobilité
- Assembly Hardware and Tools (may vary)
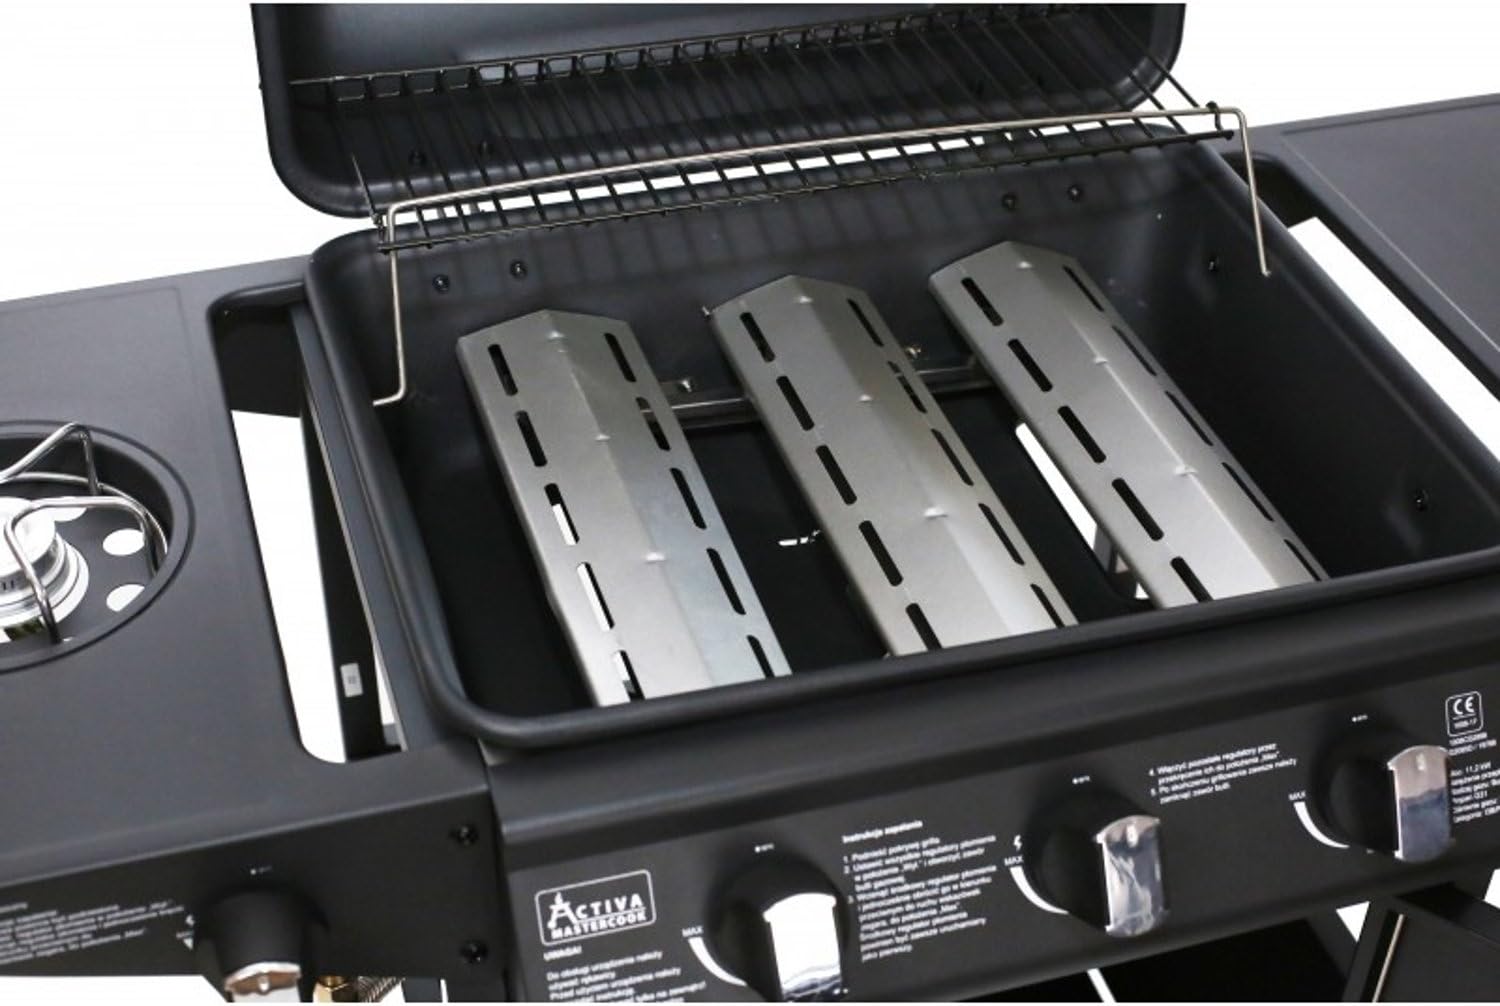
Image : Intérieur view of the grill, highlighting the cast iron cooking grates and the stainless steel burner covers.
Configuration et assemblage
Assembly is required for this gas grill. Follow the detailed instructions provided in the separate assembly manual for step-by-step guidance. Ensure all connections are secure and leak-free before first use.
Étapes clés de l'assemblage :
- Déballage: Retirez soigneusement tous les composants de l'emballage.
- Assemblage de base : Assemblez le cadre principal et fixez les roues.
- Installation de l'armoire : Mount the cabinet panels and doors.
- Positionnement du corps de la grille : Secure the main grill body onto the assembled base.
- Side Shelves and Side Burner: Attach the side shelves and connect the side burner gas line.
- Composants internes : Place burner covers and cooking grates inside the grill.
- Raccordement au gaz : Connect the gas regulator and hose to the grill's inlet and to a suitable gas cylinder (not included). Ensure the connection is tight.
- Test d'étanchéité : Perform a leak test on all gas connections using a soapy water solution. Bubbles indicate a leak. Tighten connections or replace parts as necessary.

Image : détaillée view of the control panel with burner knobs and the integrated side burner, illustrating the components involved in gas connection and operation.
Mode d'emploi
Avant la première utilisation :
Burn off any manufacturing residues by operating the grill on high for 15-20 minutes with the lid closed. Allow to cool completely before cleaning.
Allumer les brûleurs principaux :
- Assurez-vous que la vanne de la bouteille de gaz est complètement ouverte.
- Ouvrez le couvercle du gril.
- Push and turn one main burner control knob to the HAUT position.
- Press the electronic igniter button (if available) or use a long match/lighter through the lighting hole.
- Once lit, release the control knob.
- If the burner does not light within 5 seconds, turn the knob to DÉSACTIVÉ, wait 5 minutes for gas to dissipate, and repeat the process.
- Répétez l'opération pour les autres brûleurs principaux, si nécessaire.
- Adjust heat by turning the control knobs between FAIBLE et HAUT.
Lighting the Side Burner:
- Ouvrez le couvercle du brûleur latéral.
- Push and turn the side burner control knob to the HAUT position.
- Press the electronic igniter button or use a long match/lighter.
- Once lit, release the control knob.
- Adjust heat as required.

Image : détaillée view of the side burner, ready for use with a pot or pan.
Arrêt du barbecue :
- Turn all burner control knobs to the DÉSACTIVÉ position.
- Fermez complètement la vanne de la bouteille de gaz.
- Allow the grill to cool down completely before cleaning or covering.
Entretien
Un nettoyage et un entretien réguliers prolongeront la durée de vie de votre barbecue et garantiront son fonctionnement en toute sécurité.
Nettoyage des grilles de cuisson :
- After each use, while the grates are still warm, brush off food residue with a grill brush.
- For deeper cleaning, remove the grates once cooled and wash with warm soapy water. Rinse thoroughly and dry.
Cleaning Burner Covers and Burners:
- Periodically remove burner covers and clean off any accumulated grease or food particles.
- Inspect burner ports for blockages. Use a wire brush or paper clip to clear any debris.

Image: Close-up of the grill interior, showing the burner covers and the igniter mechanism, which require regular cleaning.
Gestion des graisses :
- Regularly check and empty the grease tray/cup located beneath the grill.
- Clean the grease tray with warm soapy water.

Image: The grease collection cup, designed to catch drippings, shown hanging below the grill body.
Nettoyage extérieur :
- Essuyez les surfaces extérieures avec une publicitéamp chiffon et détergent doux.
- Évitez les nettoyants abrasifs qui peuvent endommager la finition.
Stockage:
- Lorsqu'il n'est pas utilisé, rangez le barbecue dans un endroit sec et protégé.
- Disconnect the gas cylinder and store it outdoors in a well-ventilated area, away from direct sunlight and heat sources.
- Use a grill cover to protect the appliance from weather elements.

Image: The Activa Mastercook CALIFORNIA Gas Grill with its lid and cabinet doors closed, demonstrating its compact form for storage.
Dépannage
Si vous rencontrez des problèmes avec votre barbecue, consultez les problèmes courants et leurs solutions ci-dessous :
| Problème | Cause possible | Solution |
|---|---|---|
| Le brûleur ne s'allume pas |
|
|
| Low flame, uneven heat |
|
|
| Odeur de gaz |
|
|
Si les problèmes persistent après avoir essayé ces solutions, contactez le service client.
Caractéristiques
| Marque | ACTIVATION |
| Nom du modèle | CALIFORNIE |
| Numéro de modèle (ASIN) | B07CC42VMQ |
| Type de carburant | Gaz |
| Brûleurs principaux | 3 x Stainless Steel Cone Burners (2.9 kW each) |
| Brûleur latéral | 1 x Side Burner (2.5 kW) |
| Cooking Grate Material | Fonte |
| Cooking Grate Dimensions | 50 x 37 cm |
| Matériaux de construction | Durable steel sheet (painted with high-temperature varnish), Stainless Steel |
| Couleur | Noir |
| Caractéristiques spéciales | Integrated Thermometer, Wheels for mobility |
| Assemblage requis | Oui |
Garantie et assistance
Information regarding specific warranty terms and conditions for the Activa Mastercook CALIFORNIA Gas Grill was not provided in the product data. Please refer to the documentation included with your purchase or contact Activa customer service directly for warranty details and support inquiries.
For spare parts availability, the provided information states "Information indisponible sur les pièces détachées". Please contact the manufacturer or your retailer for assistance with spare parts.


