Introduction
This manual provides instructions for the proper setup, operation, and maintenance of your Oneal OMX-6 6-Channel Audio Mixer. Please read this manual thoroughly before using the device to ensure optimal performance and safety.
The Oneal OMX-6 is a compact mixing console designed for versatile audio applications. It features 6 input channels plus an auxiliary input, 3-band equalization, and balanced microphone/line inputs, offering flexibility for various audio configurations.
Consignes de sécurité importantes
- Lisez ces instructions.
- Conservez ces instructions.
- Tenez compte de tous les avertissements.
- Suivez toutes les instructions.
- N’utilisez pas cet appareil à proximité de l’eau.
- Nettoyer uniquement avec un chiffon sec.
- Ne pas obstruer les ouvertures de ventilation. Procéder à l'installation conformément aux instructions du fabricant.
- Ne pas installer à proximité de sources de chaleur telles que radiateurs, bouches de chauffage, poêles ou autres appareils (y compris amp(échangeurs thermiques) qui produisent de la chaleur.
- Ne contrecarrez pas la fonction de sécurité de la fiche polarisée ou de mise à la terre. Une fiche polarisée possède deux broches, l'une étant plus large que l'autre. Une fiche de mise à la terre possède deux broches et une troisième broche de mise à la terre. La broche large ou la troisième broche sont fournies pour votre sécurité. Si la fiche fournie ne s'adapte pas à votre prise, consultez un électricien pour remplacer la prise obsolète.
- Protégez le cordon d’alimentation pour éviter qu’il ne soit piétiné ou pincé, en particulier au niveau des fiches, des prises de courant et du point de sortie de l’appareil.
- Utilisez uniquement les accessoires spécifiés par le fabricant.
- Débranchez cet appareil en cas d’orage ou lorsqu’il n’est pas utilisé pendant de longues périodes.
- Confiez toute réparation à un technicien qualifié. Une réparation est nécessaire lorsque l'appareil a été endommagé de quelque façon que ce soit, par exemple si le cordon d'alimentation ou la prise sont endommagés, si du liquide a été renversé ou si des objets sont tombés à l'intérieur de l'appareil, si l'appareil a été exposé à la pluie ou à l'humidité, s'il ne fonctionne pas normalement ou s'il est tombé.
Guide d'installation
1. Déballage et inspection
Carefully remove the mixer from its packaging. Inspect the unit for any signs of damage during transit. Retain the packaging for future transport or storage.
2. Connexion électrique
Connect the power cord to the AC IN port on the rear panel of the mixer. Ensure the power switch is in the OFF position before connecting to a power outlet. This mixer supports a wide voltagla gamme de 120-240V.

Figure 1: Rear panel connections, including the AC IN port and power switch.
3. Connexions d'entrée audio
The OMX-6 features 6 channels with balanced microphone (XLR) and line (1/4" TRS) inputs, plus an additional auxiliary input.
- Entrées microphone: Connect microphones to the XLR inputs (MIC) on each channel.
- Entrées de ligne : Connect instruments or other line-level devices to the 1/4" TRS inputs (LINE) on each channel.
- Entrée auxiliaire : Use the dedicated auxiliary input for connecting CD players, DVD players, or MP3 devices.
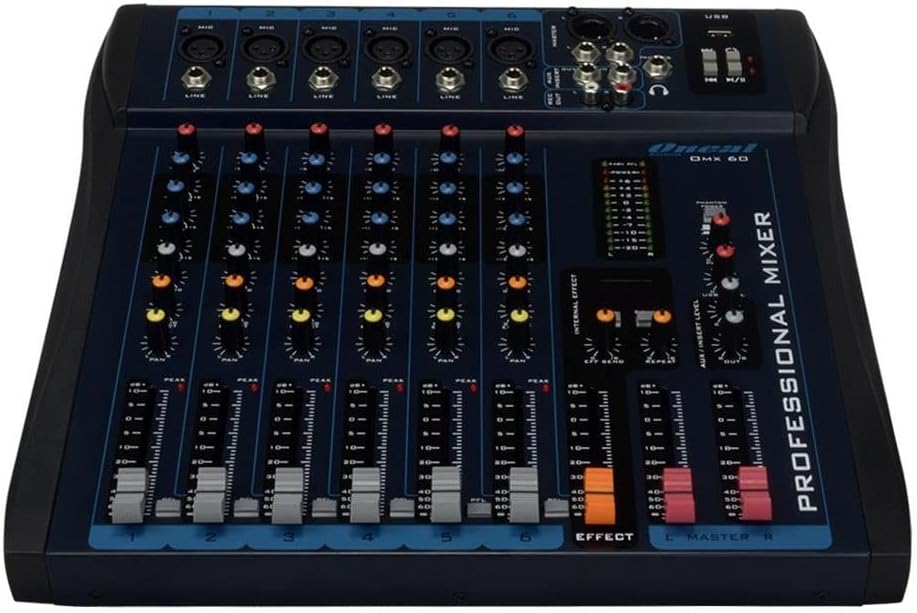
Figure 2: Front panel showing microphone and line inputs for each channel.
4. Connexions de sortie audio
Connect your main speakers or recording devices to the master output ports. The mixer also includes a headphone output for monitoring.
Mode d'emploi
1. Mise sous tension
After all connections are made, switch the power button to the ON position. The power indicator light should illuminate.
2. Commandes des canaux
Chacun des 6 canaux comporte les commandes suivantes :
- GAIN: Adjusts the input sensitivity for the microphone or line input. Start with the GAIN knob fully counter-clockwise and gradually increase until the PEAK LED flashes only occasionally.
- HIGH, MID, LOW (3-Band EQ): Adjusts the treble, midrange, and bass frequencies for the respective channel.
- AUX: Controls the level of the channel signal sent to the auxiliary output for external effects or monitor mixes.
- LA POÊLE: Adjusts the stereo position of the channel signal (left to right).
- Fader de niveau : Contrôle le niveau de sortie global du canal.
- PFL (Écoute pré-fader) : Activates pre-fader monitoring for the channel through headphones.
- LED DE PIC : Indicates when the input signal is too high, potentially causing distortion. Reduce GAIN if this LED lights up frequently.
3. Equalization Turbo Loud
Le Turbo Loud button provides an instant enhancement to the equalization, offering a more pronounced sound profile. Experiment with this feature to suit your audio needs.
4. Master Section Controls
The master section controls the overall output of the mixer:
- MASTER L/R Faders: Control the main stereo output level.
- INDICATEUR DE NIVEAU: Displays the output level of the main mix. Aim for levels around 0 dB during normal operation, avoiding consistent peaking into the red.
- TÉLÉPHONES: Headphone output jack and level control for monitoring.
- Lecture/enregistrement USB : If equipped, use the USB port for connecting a USB drive for playback or for connecting to a computer for recording. Refer to specific USB instructions if applicable.
5. Internal Effects (if applicable)
If your model includes internal effects, use the dedicated controls (e.g., EFFECT, REPEAT, SEND) to apply and adjust effects to your mix. The AUX/INSERT LEVEL control may also be used for external effects loops.
Entretien
Nettoyage
Wipe the mixer with a soft, dry cloth. Do not use liquid cleaners or aerosols. Ensure the unit is powered off and unplugged before cleaning.
Stockage
When not in use for extended periods, store the mixer in a cool, dry place, away from direct sunlight and extreme temperatures. Keep it covered to prevent dust accumulation.
Dépannage
Pas de sortie audio
- Check all power connections and ensure the mixer is powered on.
- Verify that the MASTER L/R faders are raised.
- Ensure individual channel LEVEL faders are raised and GAIN is set appropriately.
- Check connections to speakers or amplificateurs.
- Confirm that input sources are active and sending a signal.
Son déformé
- Reduce the GAIN on individual channels if the PEAK LED is frequently lighting up.
- Lower the MASTER L/R faders if the main level meter is consistently in the red.
- Check input cables for damage or improper connection.
Bourdonnement ou bruit
- Assurez-vous que tous les câbles sont correctement blindés et connectés.
- Check for ground loops. Try connecting all audio equipment to the same power outlet or power conditioner.
- Éloignez les câbles audio des câbles d'alimentation.
Caractéristiques
| Fonctionnalité | Détail |
|---|---|
| Marque | Oneal |
| Modèle | OMX-6 |
| Nombre de canaux | 6 + 1 Auxiliary |
| Entrée audio | 6 channels (microphones, line, CD/DVD/MP3) + 1 auxiliary |
| Égalisation | 3-Band (Low/Mid/Hi) per channel, Turbo Loud feature |
| Entrées micro | Balanced per channel |
| Entrées de ligne | Balanced per channel |
| Contrôle du moniteur | Individual per channel (MON/PFL) |
| Source d'énergie | Filaire électrique |
| Voltage | 120-240V |
| Consommation maximale | 7W |
| Dimensions du colis | 52 x 35 x 11 cm |
| Poids de l'article | 4.4 kg |
| ASIN | B079F662Y4 |
| EAN/GTIN | 7898584231223 7898934820107 |
Informations sur la garantie
This product comes with a standard manufacturer's warranty against manufacturing defects for 90 days from the date of purchase.
Veuillez conserver votre preuve d'achat pour toute réclamation au titre de la garantie. La garantie ne couvre pas les dommages causés par une mauvaise utilisation, un accident, des modifications non autorisées ou l'usure normale.
Assistance clientèle
For technical assistance, service, or warranty inquiries, please contact Oneal customer support through their official website ou centres de service agréés.
Website: www.oneal.com.br


