1. Introduction
This manual provides essential information for the safe and efficient operation of your InFocus IN112XV Presentation Projector. The IN112XV is designed for business presentations and educational use, offering a long lamp life, high brightness, and clear image quality.
- L étenduamp Vie: Enjoy over 15,000 hours of viewing.
- Haute luminosité: 3800 lumens for clear images in various lighting conditions.
- Rapport de contraste : 26000:1 for distinct whites and blacks.
- Flexible Viewment: Projects images from 28 inches to 300 inches diagonally.
- Connectivité : Features HDMI input and SVGA (800 x 600) resolution.
2. Contenu du colis
Vérifiez que tous les éléments énumérés ci-dessous sont inclus dans votre colis :
- InFocus IN112XV Projector
- Cordon d'alimentation
- Télécommande
- Câble VGA
- Documentation (ce manuel et autres guides)
3. Produit terminéview
Familiarize yourself with the components and controls of your InFocus IN112XV projector.
3.1 avant View
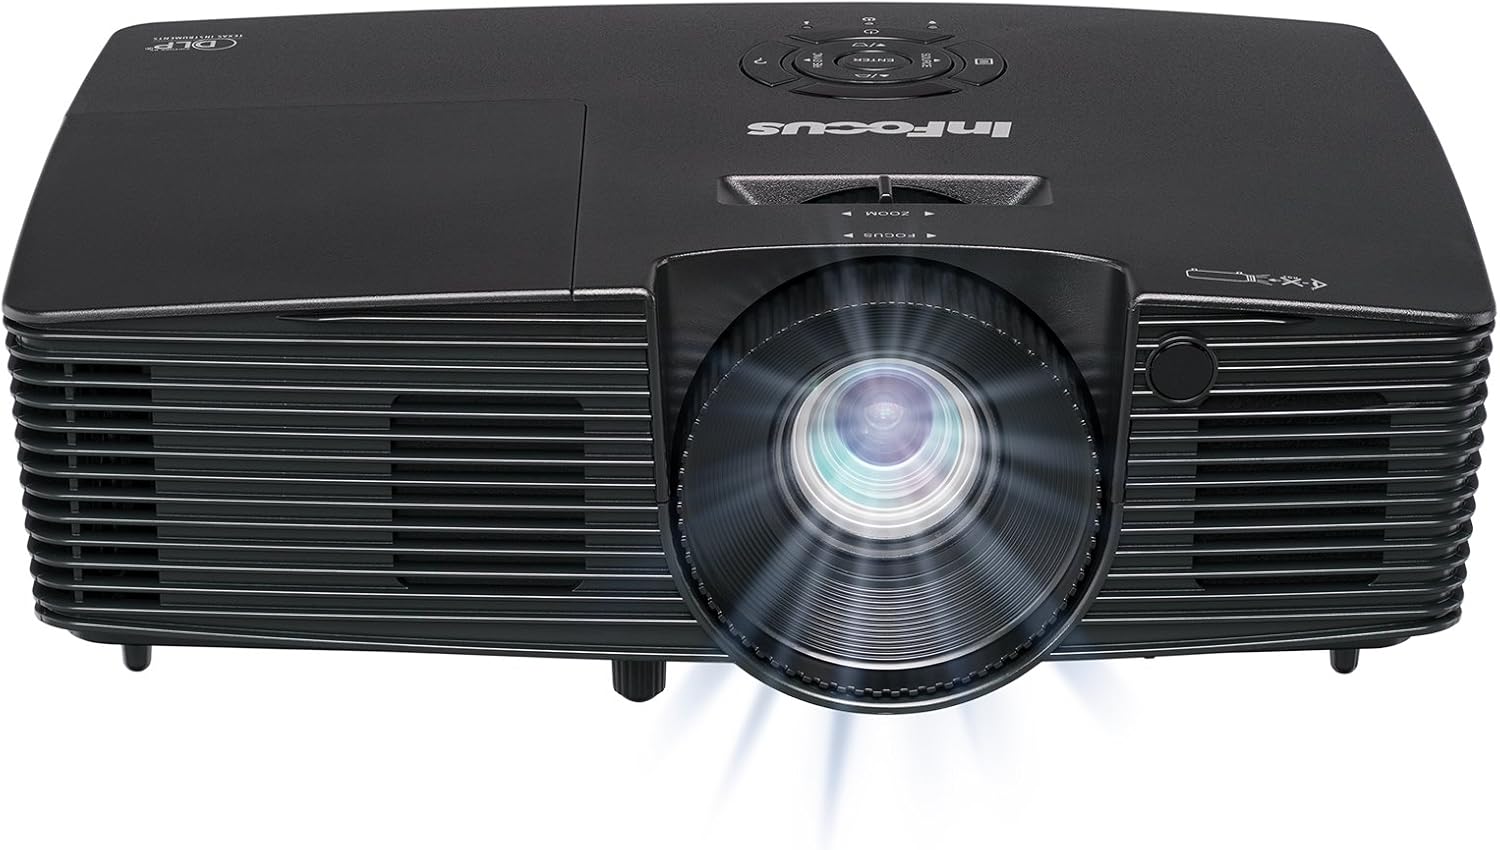
Image 3.1: Devant view of the InFocus IN112XV projector. This image highlights the main projection lens and the front ventilation grilles.
3.2 Haut View et Panneau de configuration

Image 3.2: Haut view of the InFocus IN112XV projector. The control panel is visible on the right, featuring buttons for power, source selection, menu navigation, keystone adjustment, and volume. The focus and zoom adjustment rings are located around the lens.
The control panel on the top of the projector allows for basic operation without the remote. Key buttons include:
- Pouvoir: Allume ou éteint le projecteur.
- Source: Parcourt les sources d'entrée disponibles.
- Menu: Permet d'accéder au menu d'affichage à l'écran (OSD).
- Entrer: Confirme les sélections effectuées dans le menu OSD.
- Touches directionnelles: Naviguez dans les options du menu et ajustez les paramètres.
- Re-Sync: Synchronizes the image.
3.3 Arrière View and Connection Ports

Image 3.3: Arrière view of the InFocus IN112XV projector. This image displays the available connection ports, including Video In, S-Video In, Computer In (VGA), HDMI, and the power input.
Le panneau arrière comporte différents ports pour connecter des périphériques externes :
- Entrée vidéo : For composite video sources.
- S-Video In: For S-Video sources.
- Computer In (VGA): For connecting to computers via VGA cable.
- HDMI: For digital video and audio sources.
- Service: À des fins d'entretien et de maintenance.
- Puissance d'entrée : Branche le cordon d'alimentation à une prise électrique.
Télécommande 3.4

Image 3.4: Remote control for the InFocus IN112XV projector. The remote provides full control over the projector's functions, including power, source selection, menu navigation, keystone correction, and volume.
The remote control offers convenient access to all projector functions. Ensure batteries are correctly installed.
4. Installation
4.1 Placement
Position the projector on a stable, flat surface or mount it securely. Ensure there is adequate space around the projector for ventilation.
4.2 Connexion d'alimentation
- Branchez le cordon d'alimentation au port d'entrée d'alimentation du projecteur.
- Branchez l'autre extrémité du cordon d'alimentation dans une prise électrique mise à la terre.
4.3 Connexion des sources d'entrée
The projector supports various input sources. Choose the appropriate cable for your device:
- HDMI: Connect an HDMI cable from your source device (e.g., laptop, media player) to the projector's HDMI port.
- VGA (Entrée ordinateur) : Connect a VGA cable from your computer to the projector's Computer In port. This is a plug-and-play connection.
- Video In / S-Video In: Use composite video or S-Video cables for older video sources.
- Appareils mobiles : To connect an iPad or smartphone, a LightCast Key (sold separately) is required.
5. Mode d'emploi
5.1 Mise sous/hors tension
- Pour allumer : Appuyez sur le Pouvoir button on the projector's control panel or the remote control. The power indicator light will change.
- Pour éteindre : Appuyez sur le Pouvoir button again. A confirmation message may appear. Press again to confirm shutdown. Allow the projector to cool down before unplugging.
5.2 Sélection d'une source d'entrée
After connecting your source device, select the correct input:
- Appuyez sur le Source button on the projector's control panel or the remote control to cycle through available inputs (HDMI, VGA, Video, S-Video).
- Alternatively, use the dedicated input buttons (HDMI, VGA, Video) on the remote control.
5.3 Réglage de la mise au point et du zoom
For a clear and appropriately sized image, adjust the lens rings:

Image 5.1: Manual Focus Adjustment. This image illustrates the effect of adjusting the focus ring, transforming a blurry projection into a clear and sharp image.
- Se concentrer: Faites pivoter le Se concentrer ring on the projector lens until the image appears sharp and clear.
- Zoom: Faites pivoter le Zoom ring on the projector lens to adjust the size of the projected image.
5.4 Correction trapézoïdale
If the projected image appears trapezoidal (wider at the top or bottom), use keystone correction to square it:
- Appuyez sur le Clé de voûte+ or Keystone- buttons on the remote control to adjust the image geometry.
5.5 Navigation dans les menus
Access the On-Screen Display (OSD) menu for advanced settings:
- Appuyez sur le Menu bouton sur la télécommande ou le panneau de commande.
- Utilisez les touches fléchées pour naviguer dans les options du menu.
- Presse Entrer pour sélectionner une option ou confirmer un paramètre.
- Presse Menu à nouveau pour quitter l'OSD.
6. Entretien
6.1 Lamp Vie
Le projecteur lamp has an estimated life of over 15,000 hours. When the lamp reaches the end of its life, the projector may display a warning message or the image brightness may significantly decrease. Refer to the full service manual for lamp replacement procedures if necessary.
6.2 Nettoyage
- Projecteur Casing: Utilisez un chiffon doux et sec pour essuyer l'extérieur du projecteur. N'utilisez pas de nettoyants abrasifs ni de solvants.
- Lentille: Gently clean the lens with a lens cleaning cloth and specialized lens cleaning solution. Avoid touching the lens surface with your fingers.
- Ouvertures de ventilation : Vérifiez et nettoyez régulièrement les ouvertures de ventilation pour assurer une bonne circulation de l'air et éviter la surchauffe. Utilisez une brosse douce ou de l'air comprimé pour enlever la poussière.
7. Dépannage
Cette section aborde les problèmes courants que vous pourriez rencontrer avec votre projecteur.
| Problème | Cause possible | Solution |
|---|---|---|
| Aucune image affichée |
|
|
| L'image est floue |
|
|
| L'image est trapézoïdale |
|
|
| Projector runs hot or smells of burning plastic |
|
|
| Pas de son |
|
|
Remarque importante : This projector is not recommended for high-definition movie viewing. While it can accept a 1080p input signal, it projects at its native SVGA (800 x 600) resolution.
8. Spécifications
| Fonctionnalité | Détail |
|---|---|
| Numéro de modèle | IN112XV |
| Technologie d'affichage | DLP |
| Résolution native | SVGA (800x600) |
| Luminosité | 3800 lumens |
| Rapport de contraste | 26000:1 |
| Lamp Vie | Jusqu'à 15,000 XNUMX heures |
| Connectivité | HDMI, VGA (Computer In), Video In, S-Video In |
| Dossier spécial | 3D-Ready |
| Utilisations recommandées | Commerce, Éducation |
| Dimensions du produit | 8.8 x 12.4 x 4 pouces |
| Poids de l'article | 5.5 livres |
9. Garantie et assistance
9.1 Informations sur la garantie
The InFocus IN112XV projector is backed by a Garantie de 2 ansCette garantie couvre les défauts de matériaux et de fabrication dans des conditions normales d'utilisation. Veuillez conserver votre preuve d'achat pour toute réclamation au titre de la garantie.
9.2 Assistance clientèle
For technical assistance, troubleshooting beyond this manual, or warranty service, please contact InFocus customer support. Contact information can typically be found on the official InFocus websur le site ou dans la documentation fournie avec votre produit.


