Introduction
Merci pour votre achatasing the allen + roth Wintonburg 9-Light Aged Bronze Chandelier. This manual provides essential information for the safe installation, operation, and maintenance of your new lighting fixture. Please read these instructions thoroughly before beginning installation and retain them for future reference.
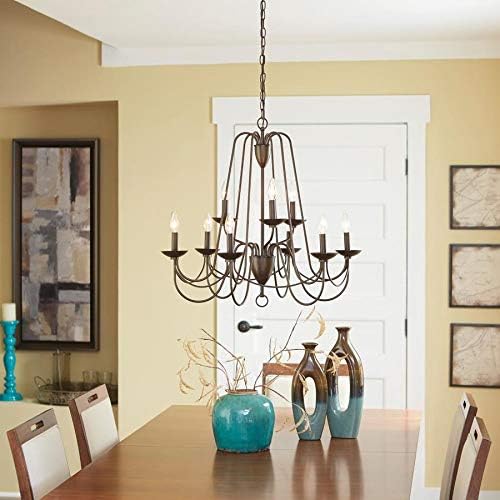
Image: The Wintonburg 9-Light Chandelier elegantly installed in a dining room setting, showcasing its aged bronze finish and nine faux candlestick lights.
Consignes de sécurité
AVERTISSEMENT: To avoid electric shock, always disconnect power at the main circuit breaker or fuse box before beginning installation or performing any maintenance. Ensure the fixture is properly grounded.
- Tous les raccordements électriques doivent être conformes aux codes et règlements locaux, ainsi qu'au Code national de l'électricité (NEC). Consultez un électricien qualifié si vous n'êtes pas familiarisé avec les raccordements électriques appropriés.
- Utilisez uniquement le type d'ampoule et l'eau spécifiés.tage pour éviter la surchauffe et les risques d'incendie potentiels.
- N’installez pas ce luminaire dans un endroit humide ou sec.amp locations. This fixture is rated for dry locations only.
- This product is ETL listed, indicating it has met minimum requirements of widely accepted product safety standards.
- Avertissement concernant la Proposition 65 de Californie : Ce produit peut contenir des produits chimiques reconnus par l'État de Californie pour causer le cancer, des malformations congénitales ou d'autres problèmes de reproduction.
Contenu du colis
Verify that all components are present before discarding packaging materials. If any parts are missing or damaged, do not attempt to assemble or install the fixture.
- Chandelier Fixture (A)
- Mounting Hardware Kit (B) - Includes mounting strap, screws, wire nuts, and ground screw.
- Adjustable Chain (C)
Note: Nine 60-watt max candelabra (E-12) base bulbs are required and sold separately.

Image : Une vue dégagée de face view of the Wintonburg 9-Light Chandelier, highlighting its aged bronze finish and the arrangement of its nine candlestick light bases.
Configuration et installation
- Couper l'alimentation : Before starting installation, ensure the power to the junction box is turned OFF at the circuit breaker or fuse box.
- Préparer le montage : Attach the mounting strap (part of Kit B) to the outlet box using the provided screws. Ensure the strap is securely fastened.
- Ajuster la longueur de la chaîne : Determine the desired hanging height for your chandelier. Use pliers to open and remove chain links as needed to achieve the correct length. The fixture is designed for adjustable height.
- Connexions de câblage :
- Connect the bare copper or green ground wire from the fixture to the ground wire from the outlet box using a wire nut.
- Raccordez le fil blanc du luminaire au fil blanc (neutre) de la boîte de sortie à l'aide d'un connecteur de fil.
- Raccordez le fil noir du luminaire au fil noir (chaud) de la boîte de sortie à l'aide d'un domino.
- Rentrez soigneusement tous les fils dans la boîte de sortie.
- Montage du support : Secure the canopy (part of the fixture) to the mounting strap, ensuring all wires are safely enclosed. The fixture is designed to be installed as an up-light only.
- Installez les ampoules : Screw nine 60-watt maximum candelabra (E-12) base bulbs into the sockets. B10 shape bulbs are recommended. Do not exceed the maximum wattage.
- Restaurer l'alimentation : Une fois l'installation terminée et toutes les connexions sécurisées, rétablissez le courant au niveau du disjoncteur.
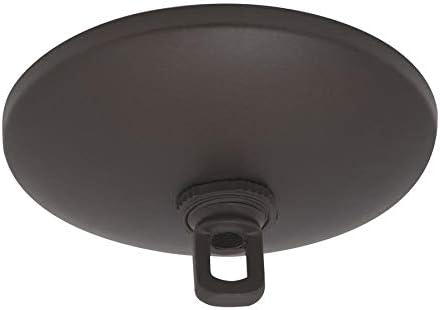
Image : Un gros plan view of the aged bronze ceiling canopy and mounting hardware, illustrating the component that attaches the chandelier to the ceiling junction box.
Mode d'emploi
The Wintonburg Chandelier is operated by a standard wall switch connected to the fixture's electrical circuit.
- Activation/désactivation : Use the wall switch to control the power to the chandelier.
- Caractéristique à intensité variable : This fixture is dimmable. To utilize the dimming function, ensure you have a compatible dimmer switch installed and are using dimmable candelabra (E-12) base bulbs.
Entretien
Un entretien régulier contribuera à préserver l'apparence et le bon fonctionnement de votre lustre.
- Nettoyage: To clean the fixture, turn off the power and wipe with a soft, dry cloth. Do not use abrasive cleaners, solvents, or polishes as they may damage the finish.
- Remplacement de l'ampoule : Before replacing bulbs, turn off the power to the fixture and allow bulbs to cool completely. Carefully unscrew the old bulb and replace it with a new 60-watt max candelabra (E-12) base bulb.

Image: A detailed close-up of the chandelier's faux candlestick lights, showing the E-12 base sockets where bulbs are installed.
Dépannage
Si vous rencontrez des problèmes avec votre lustre, consultez les problèmes courants et leurs solutions ci-dessous :
| Problème | Cause possible | Solution |
|---|---|---|
| La lumière ne s'allume pas. | Pas d'alimentation à l'appareil. Connexion de câblage desserrée. Ampoule défectueuse. | Vérifiez le disjoncteur ou le fusible. Assurez-vous que toutes les connexions filaires sont sécurisées. Remplacez l'ampoule. |
| La lumière clignote. | Ampoule lâche. Incompatible dimmer switch or non-dimmable bulbs. Connexion de câblage desserrée. | Serrer l'ampoule. Ensure dimmer switch is compatible and bulbs are dimmable. Vérifiez les connexions de câblage. |
Caractéristiques
| Marque: | Allen et Roth |
| Numéro de modèle : | B10091 |
| Dimensions (L x l x H) : | 27.95" x 27.95" x 26.02" |
| Poids de l'article : | 15.47 livres |
| Matériel: | Bronze, Glass |
| Finition: | Bronze vieilli |
| Nombre de sources lumineuses : | 9 |
| Type d'ampoule : | Candelabra (E-12) base |
| Forme d'ampoule recommandée : | B10 |
| Max Vattage par Ampoule : | 60 watts |
| Source d'alimentation : | Électrique avec fil |
| Caractéristiques spéciales : | Dimmable, Adjustable Height |
| Type de montage : | Ceiling Mount, Up-light only |
| Liste de sécurité : | Répertorié ETL |
| Code à barres : | 811874020915 |
Garantie et assistance
For warranty information, please refer to the documentation provided at the time of purchase or contact the retailer where the product was acquired. Specific warranty terms and conditions may vary.
For technical support or assistance with parts, please contact the manufacturer, allen + roth, or your retailer. Have your model number (B10091) and proof of purchase ready when contacting support.


