1. Introduction
Thank you for choosing the CELLO Quick Pop 300 2-Slice Automatic Pop-up Toaster. This appliance is designed for efficient and convenient toasting of bread slices. Featuring 7 browning levels, a cool-touch body, and a removable crumb tray, it ensures a safe and enjoyable user experience. Please read this manual thoroughly before use to ensure proper operation and maintenance.
2. Mesures de sécurité importantes
- Veuillez lire attentivement toutes les instructions avant d'utiliser le grille-pain.
- Ne touchez pas les surfaces chaudes. Utilisez les poignées ou les boutons.
- Pour éviter tout risque d'électrocution, ne plongez pas le cordon d'alimentation, les prises ou le grille-pain dans l'eau ou tout autre liquide.
- Une surveillance étroite est nécessaire lorsqu’un appareil est utilisé par ou à proximité d’enfants.
- Débranchez l'appareil de la prise lorsqu'il n'est pas utilisé et avant de le nettoyer. Laissez-le refroidir avant d'ajouter ou de retirer des pièces.
- N’utilisez pas d’appareil dont le cordon ou la fiche est endommagé, ou après un dysfonctionnement de l’appareil ou après qu’il a été endommagé de quelque manière que ce soit.
- L’utilisation d’accessoires non recommandés par le fabricant de l’appareil peut provoquer des blessures.
- Ne pas utiliser à l'extérieur.
- Ne laissez pas le cordon pendre du bord de la table ou du comptoir, ni toucher des surfaces chaudes.
- Ne pas placer sur ou à proximité d'un brûleur à gaz ou électrique chaud, ni dans un four chaud.
- Branchez toujours d'abord la fiche à l'appareil, puis branchez le cordon à la prise murale. Pour débrancher, mettez la commande sur « arrêt », puis retirez la fiche de la prise murale.
- N'utilisez pas l'appareil à d'autres fins que celles prévues.
- Les aliments de grande taille, les emballages en aluminium ou les ustensiles ne doivent pas être insérés dans un grille-pain car ils peuvent provoquer un incendie ou un risque d'électrocution.
- Un incendie peut se produire si les grille-pain sont recouverts ou touchent des matériaux inflammables, y compris des rideaux, des tentures, des murs, etc., lorsqu'ils fonctionnent.
- N’essayez pas de déloger les aliments lorsque le grille-pain est branché.
- Ne pas utiliser sans surveillance.
3. Produit terminéview
Familiarize yourself with the components of your CELLO Quick Pop 300 Toaster:
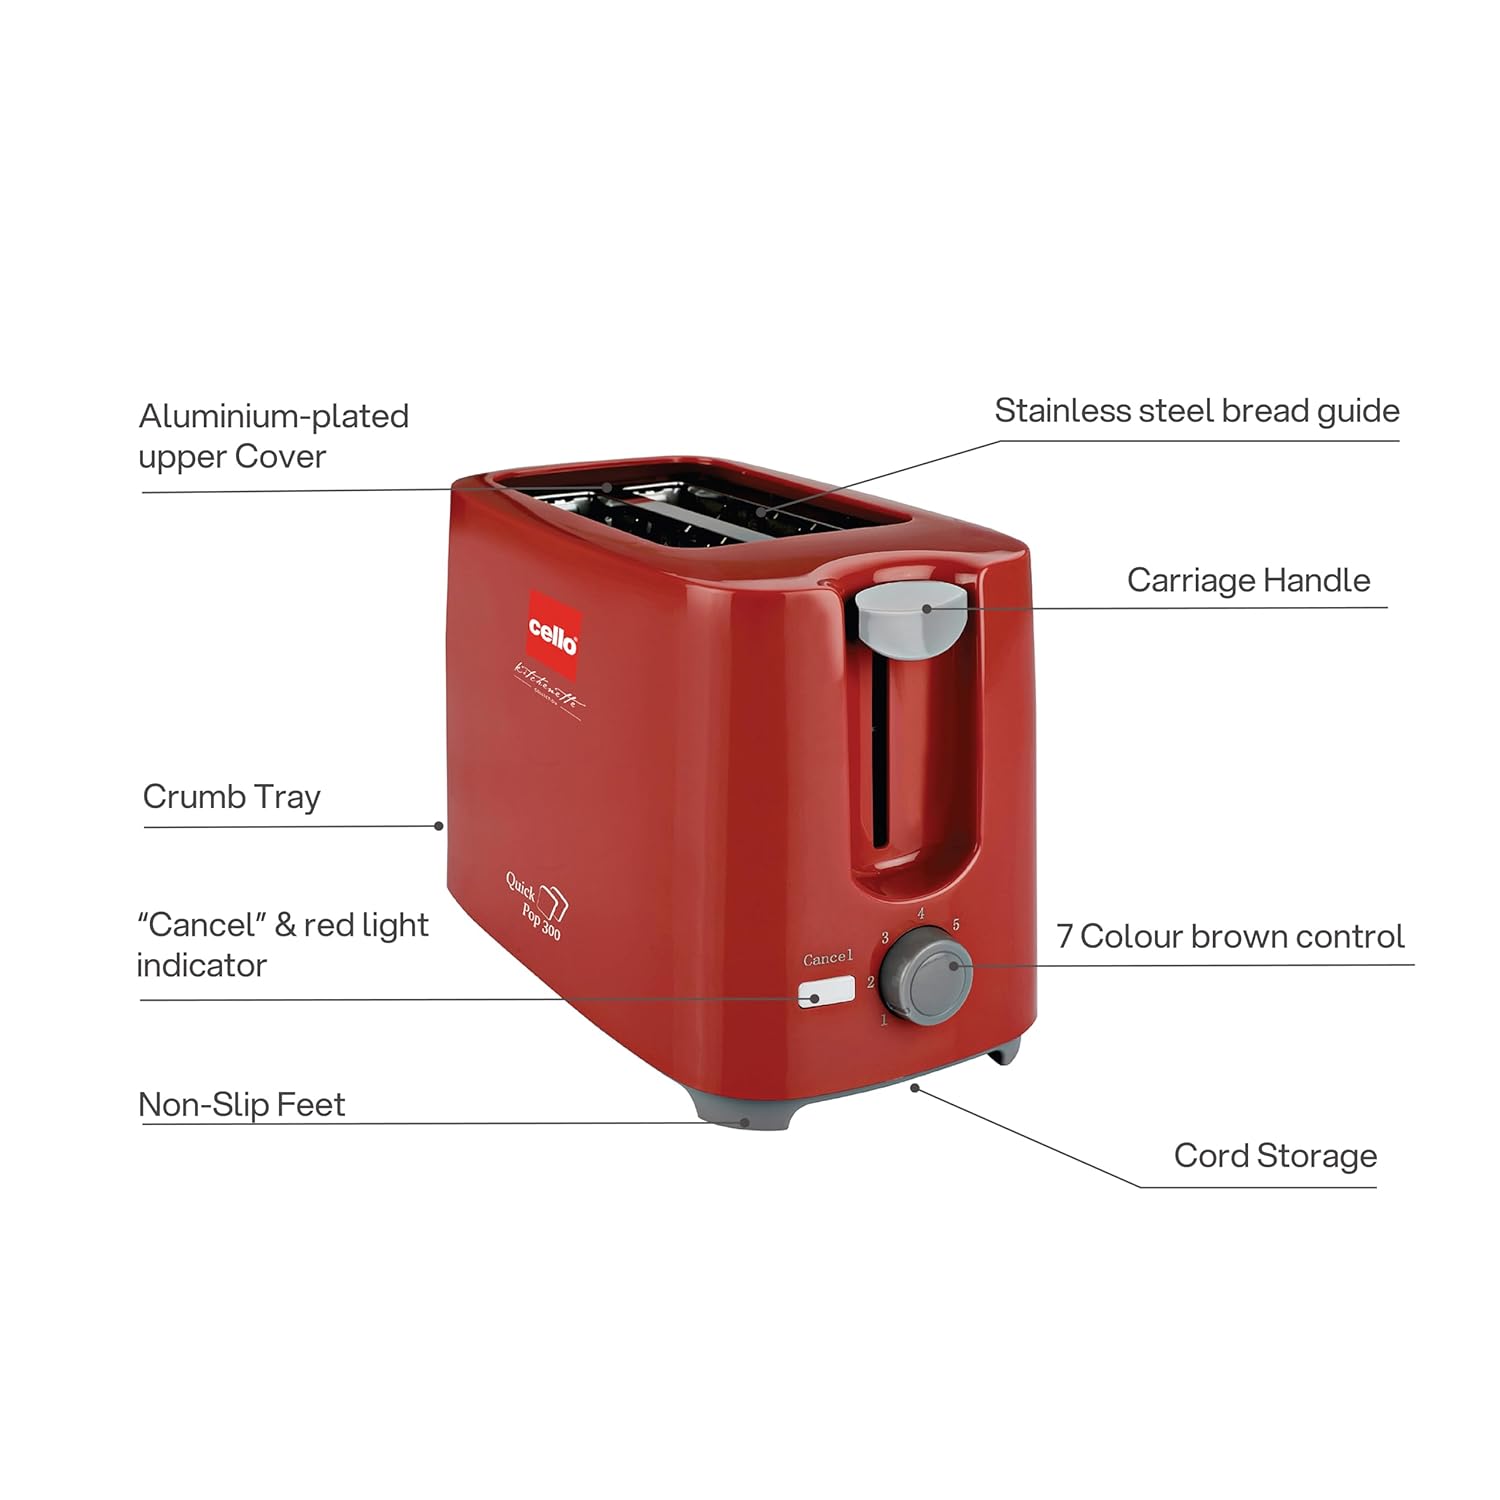
Figure 3.1 : Main components of the CELLO Quick Pop 300 Toaster.
- Aluminium-plated Upper Cover: Provides durability and a sleek finish.
- Stainless Steel Bread Guide: Ensures bread slices are centered for even toasting.
- Poignée de chariot : Utilisé pour abaisser et relever le pain dans les fentes du grille-pain.
- Plateau à miettes : Removable tray located at the bottom for easy cleaning of crumbs.
- "Cancel" & Red Light Indicator: Button to stop the toasting cycle and indicator light for operation.
- 7 Colour Brown Control: Dial to select desired browning level from 1 (lightest) to 7 (darkest).
- Pieds antidérapants : Provides stability and prevents the toaster from sliding on surfaces.
- Rangement du cordon : Integrated area at the base for neat storage of the power cord.

Figure 3.2 : Détaillé views of key features including the crumb tray, browning control, upper cover, carriage handle, cord storage, and non-slip feet.
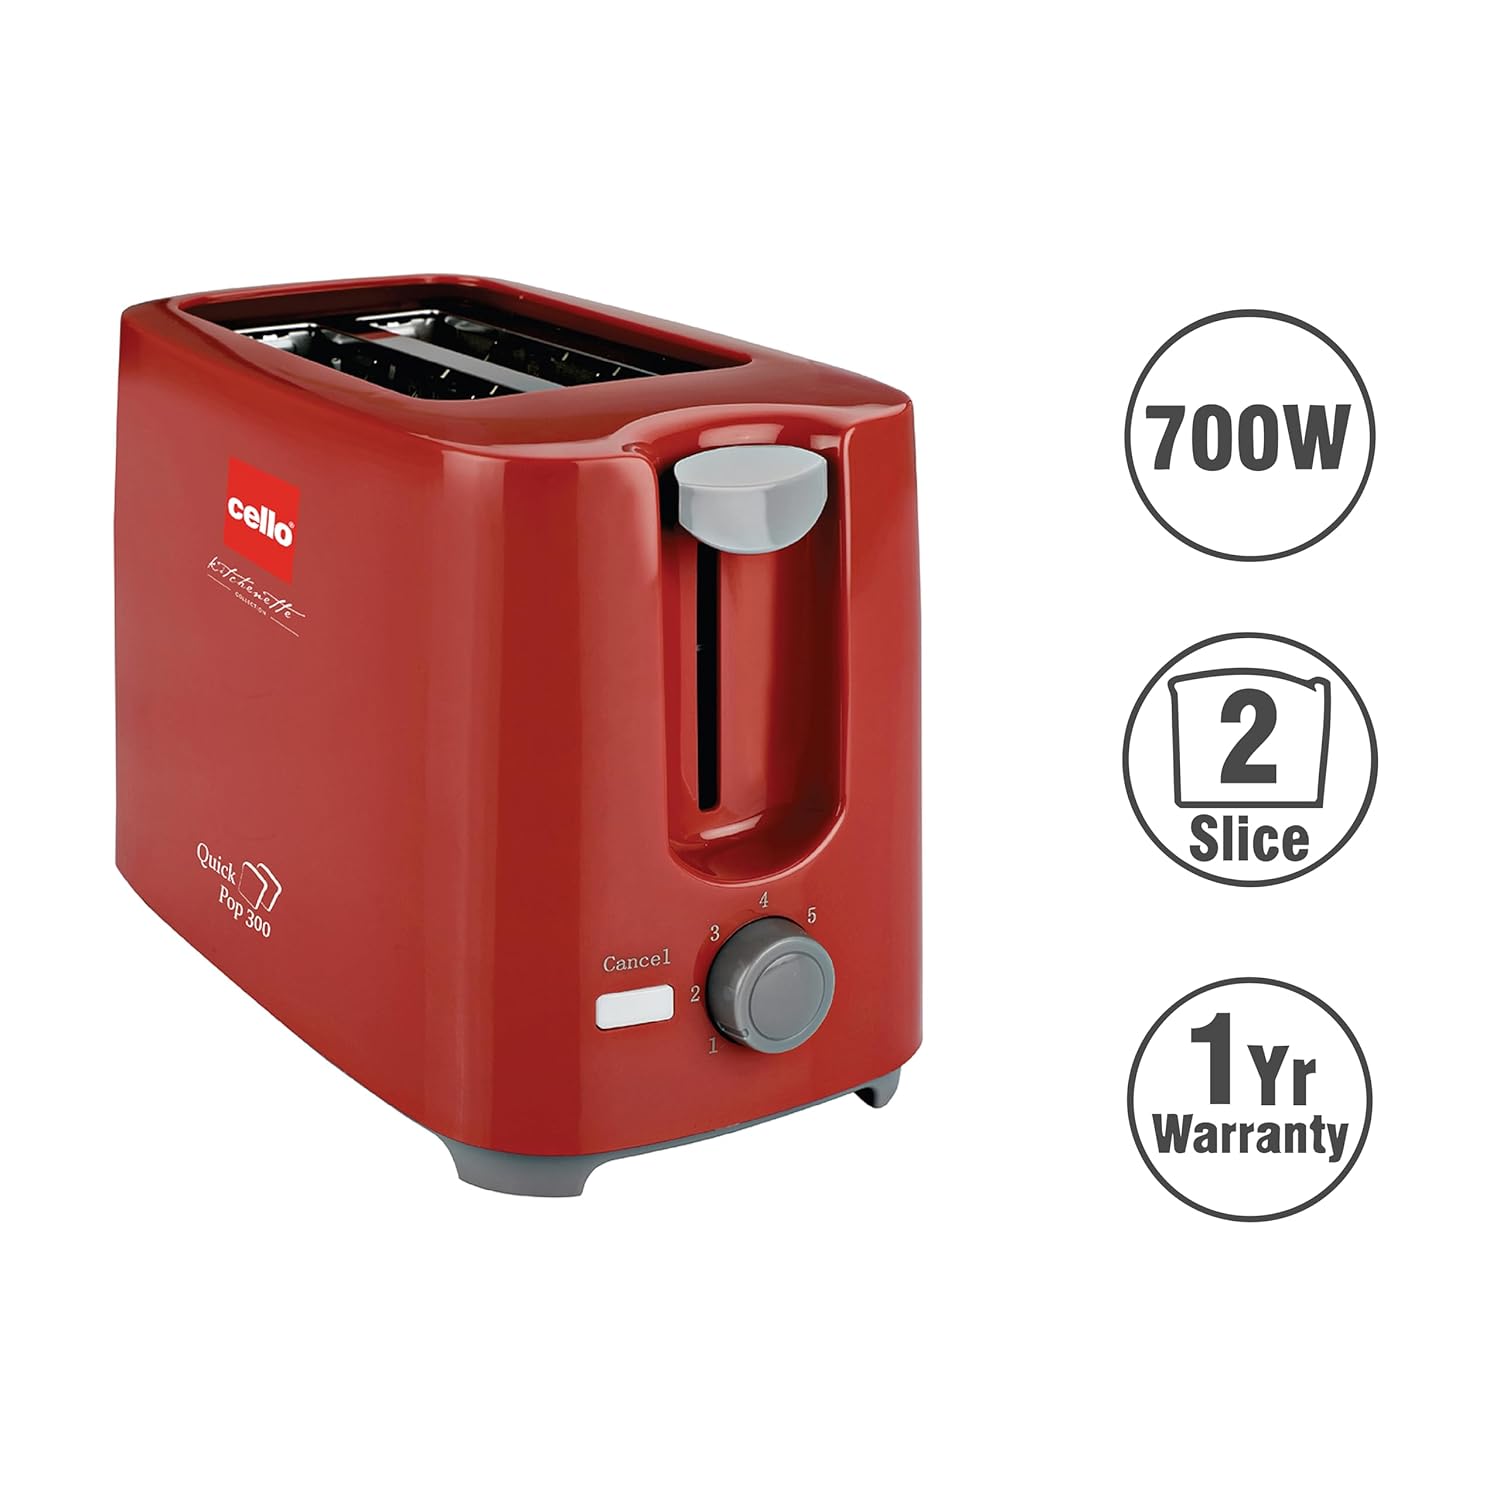
Figure 3.3 : The CELLO Quick Pop 300 Toaster, a 700W appliance with a 2-slice capacity, backed by a 1-year warranty.
4. Installation
- Unpack the Toaster: Carefully remove the toaster and all packaging materials from the box. Retain the user manual and warranty card.
- Placement: Placez le grille-pain sur une surface stable, plane et résistante à la chaleur, à l'écart des matériaux inflammables tels que les rideaux ou les murs. Assurez-vous qu'il y ait une ventilation adéquate autour de l'appareil.
- Utilisation initiale : Before first use, operate the toaster without bread for a few minutes on the highest browning setting (7) to burn off any manufacturing residues. A slight odor or smoke may be present; this is normal and will dissipate. Ensure the area is well-ventilated.
- Connexion électrique : Branchez le cordon d’alimentation sur une prise électrique adaptée.
Vidéo 4.1: Unboxing and initial setup of the CELLO Quick Pop 300 Toaster, demonstrating how to remove it from packaging and prepare for use. This video is provided by the seller.
5. Fonctionnement
- Insérer le pain : Place up to two slices of bread into the toasting slots. The stainless steel bread guide will automatically center the bread.
- Sélectionnez le niveau de brunissage : Tournez le 7 Colour Brown Control dial to your desired browning setting. Level 1 is for light toast, and Level 7 is for dark toast.
- Commencez à griller : Appuyez sur le Poignée de transport until it locks into place. The red light indicator will illuminate, signifying that the toasting cycle has begun.
- Automatic Pop-up: Once the selected browning level is achieved, the toast will automatically pop up, and the red light indicator will turn off.
- Fonction d'annulation : Pour interrompre le cycle de grillage à tout moment, appuyez sur le bouton. "Annuler" button. The carriage handle will immediately pop up, and the red light will turn off.
Vidéo 5.1: Un bref surview of the CELLO Quick Pop 300 Toaster's features, including the carriage handle, browning control, and crumb tray. This video is provided by the seller.
6. Nettoyage et entretien
Un nettoyage régulier garantit des performances optimales et prolonge la durée de vie de votre grille-pain.
- Débranchez et refroidissez : Débranchez toujours le grille-pain de la prise électrique et laissez-le refroidir complètement avant de le nettoyer.
- Vider le ramasse-miettes : Retirez le Removable Bread Crumbs Tray located at the bottom of the toaster. Dispose of the crumbs. Wipe the tray with a damp Essuyez soigneusement avec un chiffon avant de réinsérer.
- Nettoyage extérieur : Essuyez l'extérieur du grille-pain avec un chiffon doux et sec.amp Utilisez un chiffon. N’utilisez pas de nettoyants abrasifs ni de tampons à récurer métalliques, car ils pourraient rayer la surface.
- Nettoyage intérieur: Do not insert any objects into the toasting slots to clean them. If food gets stuck, unplug the toaster and carefully remove it once the appliance has cooled.
- Rangement du cordon : Utilize the integrated cord storage facility at the base of the toaster to keep the power cord neatly wrapped when not in use.
7. Dépannage
If you encounter any issues with your toaster, refer to the following common problems and solutions:
| Problème | Cause possible | Solution |
|---|---|---|
| Le grille-pain ne s'allume pas. | Not plugged in; power outlet malfunction; carriage handle not fully depressed. | Ensure the toaster is securely plugged into a working outlet. Press the carriage handle down until it locks. |
| Bread is not toasting or toasts unevenly. | Browning control set too low; bread slices too thick or thin; first use residue. | Adjust the browning control to a higher setting. Ensure bread fits properly in slots. Perform initial burn-off cycle if new. |
| Odeur de fumée ou de brûlé. | Crumbs in the toaster; food stuck in slots; initial use residue. | Unplug and let cool. Empty and clean the crumb tray. Carefully remove any stuck food. Ensure proper ventilation during initial use. |
| Carriage handle does not stay down. | Toaster not plugged in or no power; browning cycle not initiated. | Ensure the toaster is plugged in and the power outlet is active. The handle will only lock down when power is supplied and the toasting cycle can begin. |
8. Spécifications
- Marque: VIOLONCELLE
- Modèle: Quick Pop 300
- Couleur: Rouge
- Matériel: Acrylonitrile butadiène styrène (ABS)
- Dimensions du produit : 6.1 cm (P) x 11.8 cm (L) x 7.5 cm (H)
- Quoitage: 700 watts
- Nombre de tranches: 2
- Paramètres de brunissage : 7 niveaux
- Voltage: 240 volts
- Poids de l'article : 810 gramme
- Caractéristiques spéciales : Anti-Slip Base, Automatic Shut-Off, Cancel Function, Cool Touch Exterior, Removable Crumb Tray
- Pays d'origine : Inde

Figure 8.1 : Dimensions of the CELLO Quick Pop 300 Toaster.
9. Garantie et assistance
The CELLO Quick Pop 300 Toaster comes with a Garantie de 1 ans from the date of purchase. Please refer to the included warranty card for detailed terms and conditions.
For prompt after-sales service or any inquiries, please contact CELLO customer care:
- All India Customer Care No: 7400001799
- E-mail: customercare@cellokitchenette.com

Figure 9.1 : CELLO Customer Care details for support and service.


