1. Introduction
This manual provides detailed instructions for the operation and maintenance of your Boytone BT-101WT Bluetooth Turntable Briefcase Record Player. Please read this manual thoroughly before using the device to ensure proper function and to prevent damage.
The Boytone BT-101WT is a portable briefcase-style record player featuring Bluetooth connectivity, a built-in rechargeable battery, and dual stereo speakers. It supports 3-speed vinyl playback (33/45/78 RPM), FM radio, and includes an LCD display. The unit offers USB/SD card slots for MP3 playback and direct encoding of vinyl records, FM radio, or AUX input to MP3 files without requiring a computer. It also includes RCA line-out, AUX input, and a headphone jack. The device operates on AC-DC power (110V & 220V compatible).
2. Consignes de sécurité
- Lisez toutes les instructions avant d'utiliser l'appareil.
- Conservez le manuel pour référence ultérieure.
- N'exposez pas l'appareil à la pluie ou à l'humidité.
- Ne bloquez pas les ouvertures de ventilation.
- Assurez-vous que le volume de l'adaptateur secteurtage correspond à votre alimentation électrique locale.
- Protégez le cordon d’alimentation pour éviter qu’il ne soit piétiné ou pincé.
- Débranchez l'appareil pendant les orages ou lorsqu'il n'est pas utilisé pendant de longues périodes.
- Confiez toute intervention d'entretien à un personnel qualifié.
- N'ouvrez pas l'unité casing.
- Évitez de placer l’appareil à proximité de sources de chaleur ou en plein soleil.
3. Contenu du colis
Vérifiez que tous les éléments énumérés ci-dessous sont inclus dans votre colis :
- Boytone BT-101WT Turntable Unit
- Adaptateur secteur CA/CC
- Câble USB
- Manuel d'instructions
- Adaptateur 45 tr / min
- Anti-Static Flat Mat (may be pre-installed)
4. Produit terminéview
Familiarize yourself with the components of your BT-101WT unit.

Figure 4.1: Boytone BT-101WT Turntable in open position, showcasing the record player, speakers, and control panel.
4.1 Panneaux avant et arrière

Figure 4.2 : Haut view showing the control panel with USB, SD, and AUX IN ports. Bottom view showing the power input, RCA line out, and AUX OUT ports.
- Plateau tournant: Area where records are placed for playback.
- Bras de lecture : Il maintient le stylet et suit les sillons du disque.
- Stylet (aiguille) : Reads the audio information from the record grooves.
- Sélecteur de vitesse : Switch to select playback speed (33, 45, or 78 RPM).
- Interrupteur d'arrêt automatique : Active ou désactive l'arrêt automatique du plateau à la fin d'un disque.
- Bouton d'alimentation/volume : Turns the unit on/off and adjusts the audio output volume.
- Bouton Fonction/Mode : Cycles through input sources (Phono, Bluetooth, FM, USB/SD, AUX).
- Écran LCD : Affiche le mode actuel, les informations sur la piste et la fréquence FM.
- Port USB : For connecting a USB flash drive for playback or MP3 encoding.
- Emplacement pour carte SD : For inserting an SD card for playback or MP3 encoding.
- Prise AUX IN : Entrée jack 3.5 mm pour connecter des périphériques audio externes.
- Prise casque: 3.5mm output for private listening with headphones.
- RCA Line Out Jacks: Stereo output for connecting to external amplifiers ou haut-parleurs amplifiés.
- Prise d'entrée CC : Connection point for the AC/DC power adapter.
- Haut-parleurs intégrés : Haut-parleurs stéréo intégrés pour la sortie audio.
4.2 Control Panel Details

Figure 4.3: Close-up of the control panel, highlighting the LCD display, function buttons, USB port, SD card slot, and AUX IN jack.
The control panel features buttons for playback control (Play/Pause, Skip Forward/Backward), recording (REC), deleting files (DEL), and mode selection. The LCD display provides visual feedback on the selected function and media status.
5. Installation
5.1 Connexion d'alimentation
- Veillez à placer l'appareil sur une surface stable et plane.
- Connect the AC/DC power adapter to the DC IN jack on the rear of the unit.
- Branchez l'adaptateur dans une prise murale.
- Alternatively, the unit has a built-in rechargeable battery for portable use. Ensure it is charged before first use.
5.2 Configuration initiale
- Open the briefcase lid.
- Retirez le capuchon de protection du stylet.
- If not already in place, position the anti-static flat mat on the turntable platter.
- Turn the Power/Volume knob clockwise to power on the unit. The LCD display will illuminate.
6. Mode d'emploi
6.1 Disques de lecture

Figure 6.1: Illustration of the 3-speed control (33, 45, 78 RPM) for different record sizes (7", 10", 12").
- Placez un disque sur le plateau du tourne-disque.
- Select the appropriate speed (33, 45, or 78 RPM) using the speed selector switch, matching the record's speed.
- Pour écouter un 45 tours, placez l'adaptateur 45 tours fourni sur l'axe central.
- Soulevez le bras de lecture à l'aide du levier de repérage et positionnez-le au-dessus de la piste souhaitée sur le disque.
- Gently lower the tone arm onto the record using the cue lever. Playback will begin.
- Réglez le volume à l'aide du bouton Marche/Arrêt/Volume.
- At the end of the record, if the Auto Stop switch is ON, the turntable will stop spinning automatically. If OFF, it will continue to spin.
- To stop playback manually, lift the tone arm and return it to its rest.
6.2 Fonctionnement Bluetooth
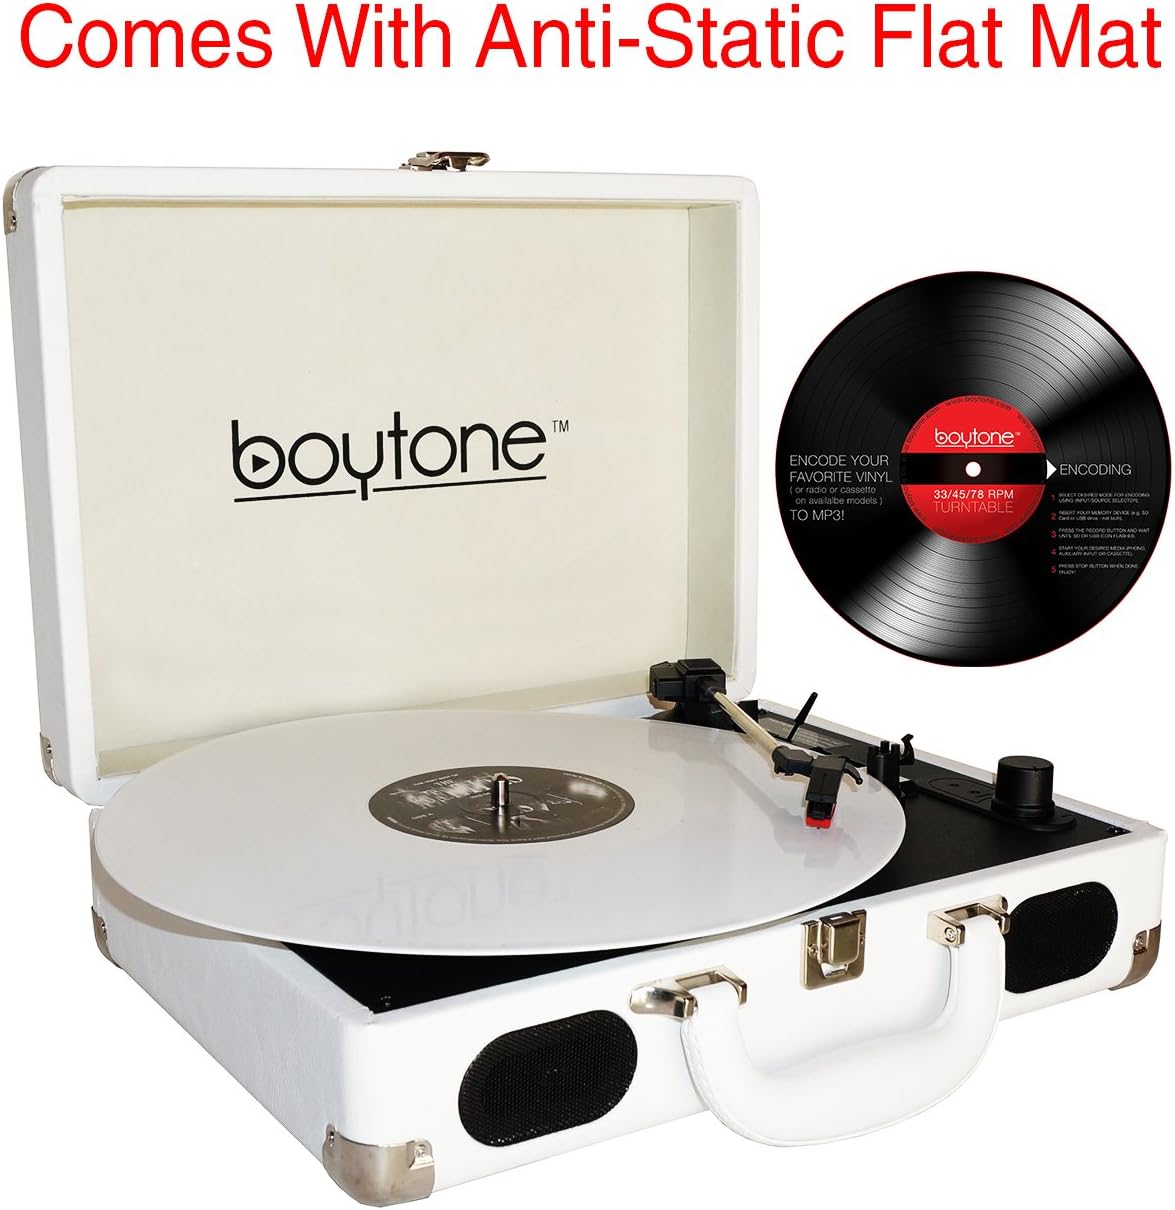
Figure 6.2: Visual representation of a smartphone wirelessly connecting to the BT-101WT via Bluetooth.
- Allumez l'appareil.
- Press the Mode button repeatedly until "BT" appears on the LCD display. The unit will enter Bluetooth pairing mode, indicated by a flashing "BT".
- Activez le Bluetooth sur votre smartphone ou tout autre appareil compatible Bluetooth.
- Rechercher "Boytone BT-101WT" in your device's Bluetooth settings and select it to pair.
- Once paired, "BT" will stop flashing and remain solid. You can now stream audio from your device to the turntable.
- Control playback (play/pause, skip) from your connected device. Adjust volume using the turntable's volume knob or your device's volume controls.
Fonctionnement de la radio FM 6.3
- Allumez l'appareil.
- Press the Mode button repeatedly until "FM" appears on the LCD display.
- To auto-scan and save stations, press and hold the Play/Pause button. The unit will scan for available FM stations and store them.
- Utilisez les boutons Avancer/Retour pour naviguer entre les stations enregistrées.
- Réglez le volume à l'aide du bouton Marche/Arrêt/Volume.
6.4 Lecture USB/SD
- Insérez une clé USB dans le port USB ou une carte SD dans la fente pour carte SD.
- Press the Mode button repeatedly until "USB" or "SD" appears on the LCD display. The unit will automatically begin playing MP3/WMA files à partir du support inséré.
- Use the Play/Pause, Skip Forward/Backward buttons to control playback.
- Réglez le volume à l'aide du bouton Marche/Arrêt/Volume.
6.5 MP3 Encoding (Recording)
The BT-101WT can convert audio from Vinyl, FM Radio, or AUX input directly to MP3 files sur une clé USB ou une carte SD.
- Insert a USB flash drive or SD card into the corresponding slot. Ensure it has sufficient free space.
- Select the desired source for recording (Phono, FM, or AUX IN) using the Mode button.
- Start playback on the source (e.g., begin playing a record, tune to an FM station, or play audio from an AUX-connected device).
- Press the "REC" button on the control panel. The recording indicator will illuminate, and the unit will begin converting the audio to MP3.
- To stop recording, press the "REC" button again. The recording will be saved as an MP3 file sur votre clé USB ou carte SD.
- Pour supprimer un enregistrement file, accédez au file in USB/SD playback mode and press the "DEL" button.
6.6 AUX Input and Output
- AUX IN: Connect an external audio device (e.g., smartphone, MP3 player) to the AUX IN jack using a 3.5mm audio cable. Press the Mode button until "AUX" appears on the display. Audio from the external device will play through the turntable's speakers.
- Sortie ligne RCA : Connect the RCA Line Out jacks on the rear of the unit to an external amplifier or powered speakers using RCA cables for enhanced audio output.
- Prise casque: Plug standard 3.5mm headphones into the headphone jack for private listening. This will mute the built-in speakers.
7. Entretien
7.1 Nettoyage de l'appareil
- Essuyez l'extérieur de l'appareil avec un chiffon doux et sec.
- N’utilisez pas de nettoyants abrasifs, de cires ou de solvants.
7.2 Entretien du stylet
- Handle the stylus with care. Avoid touching the tip.
- Nettoyez régulièrement le stylet avec une brosse douce, en brossant de l'arrière vers l'avant.
- Un stylet usé peut endommager les disques et dégrader la qualité sonore. Remplacez le stylet dès que la qualité sonore se détériore.
7.3 Gestion des dossiers
- Keep records clean and free of dust. Use an anti-static brush before each play.
- Rangez les disques verticalement dans leurs pochettes pour éviter qu'ils ne se déforment.
8. Dépannage
| Problème | Cause possible | Solution |
|---|---|---|
| Pas de courant | Power adapter not connected; Unit not turned on; Battery drained. | Check power connection; Turn Power/Volume knob clockwise; Charge the battery. |
| Aucun son des haut-parleurs | Volume trop faible ; écouteurs connectés ; mode incorrect sélectionné. | Increase volume; Disconnect headphones; Select correct mode (Phono, BT, FM, USB/SD, AUX). |
| La platine ne tourne pas | Unit not powered on; Tone arm not lifted; Auto Stop engaged at end of record. | Ensure power is on; Lift tone arm from rest; Check Auto Stop switch. |
| Bluetooth ne pas appairer | L'appareil n'est pas en mode de couplage ; l'appareil est trop éloigné ; le Bluetooth est déjà connecté à un autre appareil. | Ensure "BT" is flashing; Move device closer; Disconnect from other devices. |
| Poor sound quality / Skipping records | Dirty stylus; Worn stylus; Dirty record; Unit not on a stable surface. | Clean stylus; Replace stylus; Clean record; Place unit on a stable, level surface. |
9. Spécifications
- Modèle: BT-101WT
- Source d'alimentation : AC/DC Adapter (110V/220V), Built-in Rechargeable Lithium-Ion Battery
- Vitesses du plateau tournant : 33 1/3, 45, 78 tours/minute
- Intervenants : 2 x haut-parleurs stéréo intégrés
- Connectivité : Bluetooth, USB, SD Card, AUX IN (3.5mm), RCA Line Out (Stereo)
- Radio: FM stéréo
- Encodage: Direct MP3 encoding from Vinyl, FM, AUX to USB/SD
- Prise casque: 3.5 mm
- Dimensions (paquet) : 16 x 13.1 x 6 pouces
- Poids: 7 livres
- Matériel: Plastique
10. Garantie et assistance
Ce produit est garanti par 1 Year direct Boytone USA warranty. For warranty claims or technical support, please contact Boytone customer service. Refer to the official Boytone webPour obtenir nos coordonnées, veuillez consulter le site ou votre documentation d'achat.
Boytone Customer Service: S'il vous plaît visitez the Boytone Store on Amazon or the official Boytone website d'information et de support.


