1. Introduction
This manual provides essential information for the safe assembly, operation, and maintenance of your Juskys Metal Garden Shed Model 21055. Please read these instructions carefully before beginning assembly and retain them for future reference. This garden shed is designed for storing garden tools, furniture, and other outdoor equipment, offering protection against weather elements.
Informations importantes sur la sécurité :
- Always wear protective gloves during assembly to prevent injuries from sharp edges on metal components.
- Assembly is recommended for two people to ensure stability and safety.
- Veillez à ce que l'abri soit monté sur une surface plane et stable.
- Tenez les enfants et les animaux domestiques éloignés de la zone de montage.
2. Contenu du colis
Before starting assembly, carefully unpack all components and verify them against the packing list (not provided in this manual, refer to your product packaging). Due to the modular design, there are numerous individual parts. Each part is typically labeled (e.g., A1, Ba2) for identification during assembly.

Image : Terminéview of the Juskys Metal Garden Shed, showcasinet sa conception et sa taille.
3. Configuration et assemblage
3.1 Préparation du site
Select a suitable, level location in your garden for the shed. The shed includes a robust metal foundation frame designed to compensate for minor ground irregularities and ensure a secure stand. This frame also allows for the installation of an additional floor if desired (floor material not included).

Image: Detail of the strong metal foundation frame, designed to provide a secure and level base for the shed.
3.2 Étapes d'assemblage
Follow the detailed assembly instructions provided with your product packaging. General steps include:
- Identifier les pièces : Before assembly, sort all components and identify them using the labels (e.g., A1, Ba2) and the provided diagrams.
- Assemblage du cadre de base : Begin by assembling the metal base frame on your prepared site. Ensure it is square and level.
- Installation du panneau mural : Attach the wall panels to the base frame. Pay close attention to the orientation of each panel; incorrect placement can lead to misaligned screw holes. If holes do not align, verify the panel's position and ensure you are using the correct left/right parts.
- Structure du toit : Assembler la structure de support du toit.
- Installation des panneaux de toiture : Install the roof panels, following the specified sequence and position to ensure proper fit and water tightness. The shed features a sloping pent roof with edge protection.
- Door and Ventilation: Install the double sliding door and the two front ventilation grilles. The double sliding door is designed to be space-saving and offers a wide opening for easy access.
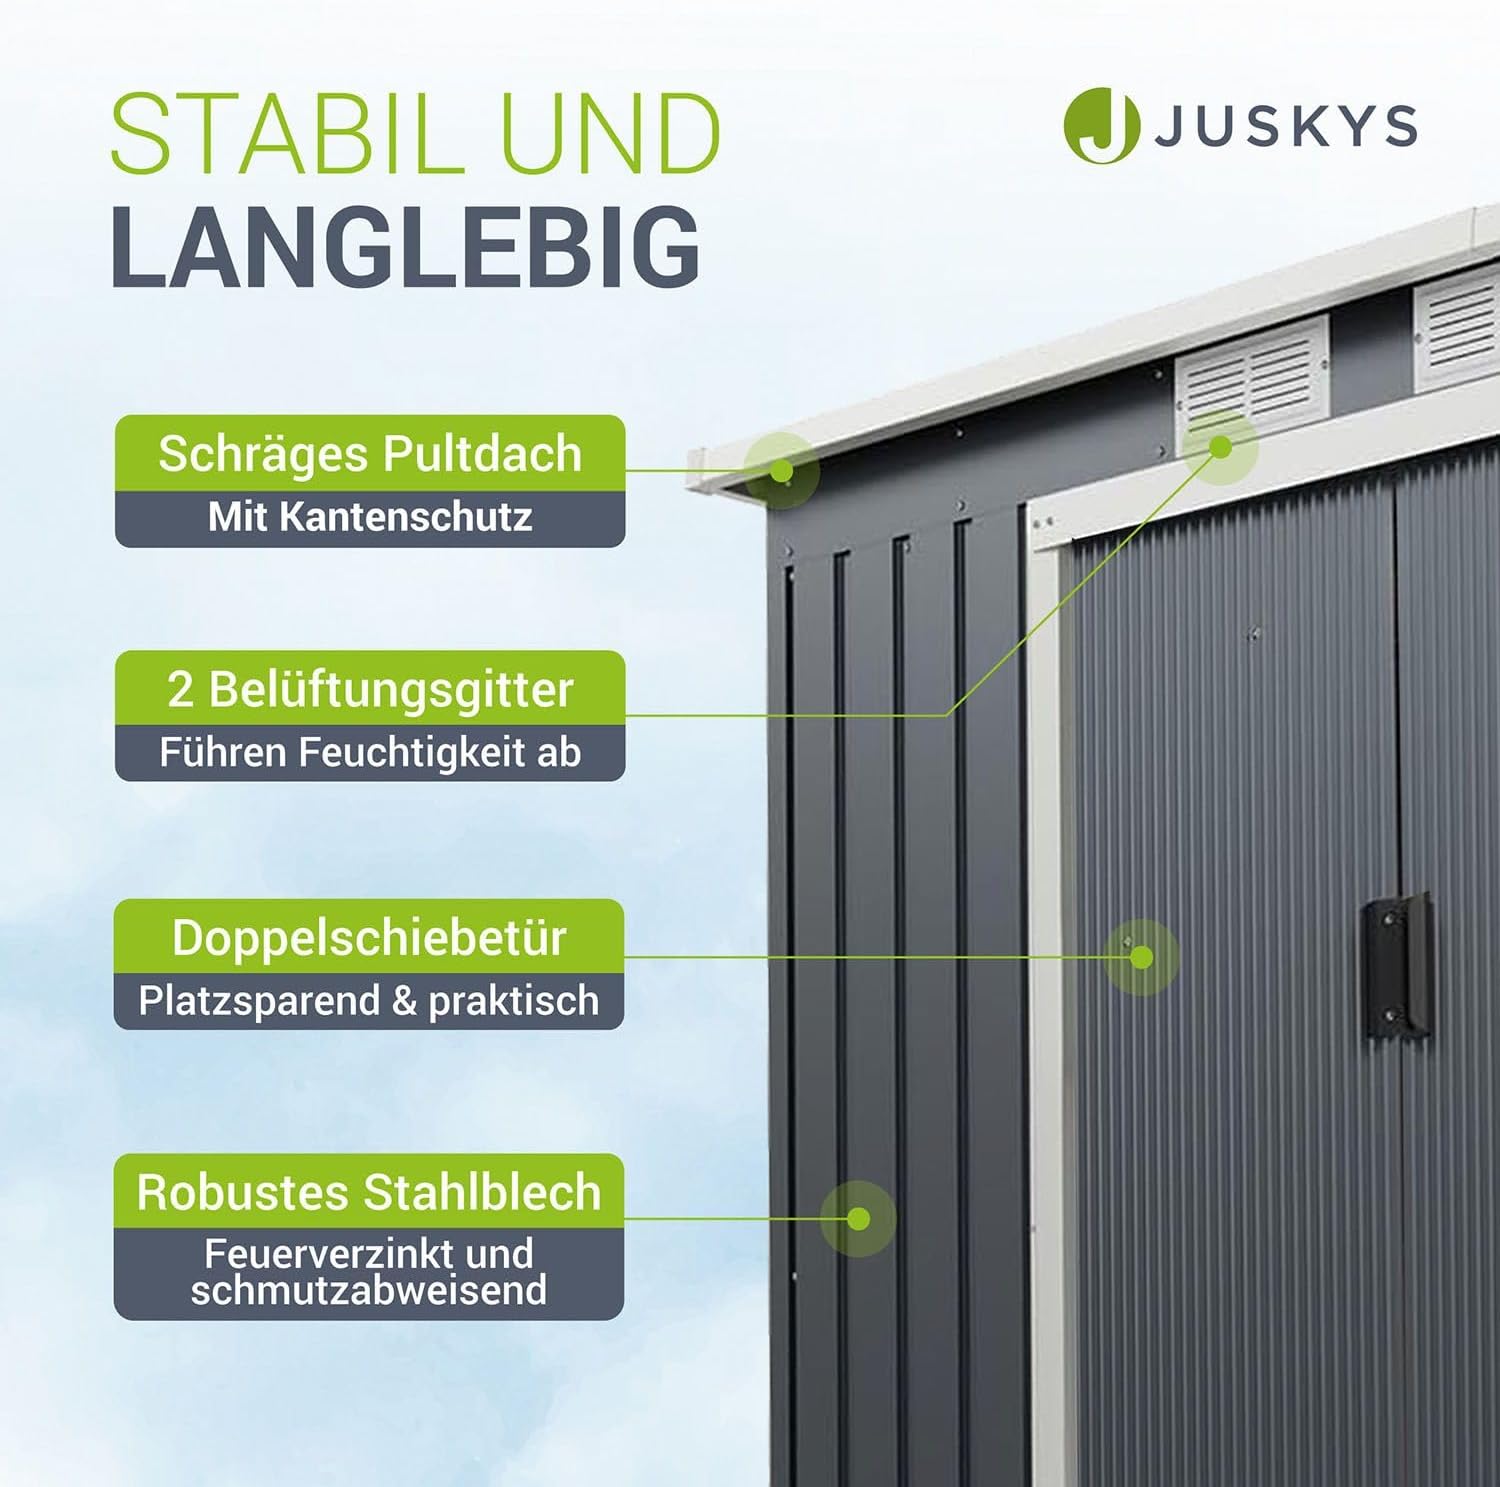
Image: Key features of the shed, including the sloping pent roof with edge protection, two ventilation grilles, space-saving double sliding door, and robust hot-dip galvanized steel sheet construction.
4. Mode d'emploi
4.1 Fonctionnement de la porte
The shed is equipped with a double sliding door for convenient access. To open, slide the door panels along their tracks. The wide opening (96 x 152 cm) allows for easy entry and exit, even with bulky items. Ensure the tracks are kept clear of debris for smooth operation.
4.2 Aération
Two ventilation openings are located at the front of the shed. These grilles facilitate air circulation, helping to remove humidity and prevent condensation, mold, and unpleasant odors inside the shed. Do not obstruct these openings.
5. Entretien
5.1 Nettoyage
Clean the exterior surfaces of the shed periodically with a mild detergent and water. Avoid abrasive cleaners or harsh chemicals that could damage the galvanized steel finish. Rinse thoroughly with clean water.
5.2 Prévention de la rouille
The shed is constructed from hot-dip galvanized steel, providing good resistance to rust and corrosion. Regularly inspect the shed for any signs of damage to the coating. Promptly repair any scratches or chips to maintain protection.
5.3 Gestion de la condensation
Condensation can occur inside metal sheds due to temperature differences between the interior and exterior, especially in changing weather conditions. This is a natural phenomenon and does not indicate a leak. To minimize condensation:
- Ensure the ventilation openings are clear and unobstructed.
- Avoid storing wet items inside the shed.
- Consider placing a moisture absorber inside if condensation is persistent.
- If storing moisture-sensitive items, use protective covers or elevated shelving.

Image: Illustration of the shed's resistance to various weather conditions, highlighting its UV-resistant, waterproof, and weatherproof properties.
6. Dépannage
6.1 Difficultés d'assemblage
- Trous mal alignés : If screw holes do not align, re-check the part numbers and orientation. It is common for similar-looking parts (e.g., left and right panels) to be mistakenly interchanged. Refer to the diagrams in your product's assembly guide.
- Pièces tordues : Metal sheets can bend if not handled carefully. Straighten gently if possible, ensuring not to compromise the structural integrity.
6.2 Condensation Inside Shed
As mentioned in the Maintenance section, condensation is a normal occurrence in metal sheds due to temperature fluctuations. It is not a sign of a leak. Ensure proper ventilation and consider the tips provided in section 5.3 to manage humidity.
7. Spécifications

Image: Visual representation of the shed's external dimensions and internal storage area.
| Fonctionnalité | Détail |
|---|---|
| Numéro de modèle | 21055 |
| Dimensions extérieures (L x L x H) | 213 x 130 x 173 cm (83.9 x 51.2 x 68.1 pouces) |
| Internal Storage Area | 2.375 m² (203 x 117 cm) |
| Volume de stockage | Jusqu'à 4 m³ |
| Door Opening (W x H) | 96 x 152 cm (37.8 x 59.8 pouces) |
| Matériel | Hot-dip galvanized steel sheet, Alloy steel frame |
| Couleur | Anthracite (Gris) |
| Poids | 25 kg (55.1 lb) |
| Niveau de résistance à l'eau | Étanche |
| Ventilation | 2 front ventilation openings |
8. Garantie et assistance
For warranty information, spare parts, or technical support, please refer to the documentation included with your purchase or contact Juskys customer service directly. Keep your proof of purchase for any warranty claims.


