Introduction
Merci pour votre achatasing the Ezonetronics 1DIN Car Stereo, Model RM-CW9601. This unit features a 7-inch retractable touchscreen, Bluetooth connectivity, FM radio, and multimedia playback capabilities. This manual provides essential information for installation, operation, and maintenance to ensure optimal performance and user satisfaction. Please read this manual thoroughly before using the product.
Consignes de sécurité
- N’utilisez pas l’appareil d’une manière qui vous distrait de la conduite. La sécurité routière doit toujours être votre priorité.
- Faites installer l'appareil ou le véhicule par un professionnel qualifié afin d'éviter tout dommage.
- Évitez d'exposer l'appareil à des températures extrêmes, à la lumière directe du soleil pendant des périodes prolongées ou à l'humidité.
- Ne tentez pas de démonter ou de modifier l'appareil. Cela pourrait annuler la garantie et présenter des risques pour la sécurité.
- Réglez le volume à un niveau qui vous permette d'entendre les bruits de la circulation extérieure.
Contenu du colis
Vérifiez que tous les éléments sont présents dans le colis :
- Ezonetronics 1DIN Car Stereo Unit (RM-CW9601)
- Faisceau de câblage d'alimentation et de haut-parleur
- Télécommande
- Manuel de l'utilisateur (ce document)
- Accessoires de montage (supports, vis)
- En option : arrièreview Appareil photo (si inclus dans votre forfait)
Produit terminéview
The Ezonetronics RM-CW9601 features a single DIN chassis with a motorized retractable 7-inch touchscreen display. The front panel includes essential controls and ports for easy access.

Figure 1 : Devant view of the Ezonetronics RM-CW9601 car stereo, illustrating the 7-inch screen in both retracted and extended positions, along with front panel controls and ports.
Commandes et ports du panneau avant :
- Bouton d'alimentation/mode : Press to turn on/off, short press to change mode.
- Bouton de volume : Tournez pour régler le volume. Appuyez pour activer/désactiver le son.
- Port USB : Pour la lecture de fichiers multimédias depuis des clés USB.
- Emplacement pour carte SD : Pour la lecture multimédia à partir de cartes SD.
- Entrée AUX: Prise jack 3.5 mm pour périphériques audio externes.
- Bouton de réinitialisation : Small button to reset the unit (requires a pointed object).
- Screen Retract/Extend Button: Controls the motorized screen movement.
Installation
1. Installation
The RM-CW9601 is designed for a standard 1DIN car stereo opening. Professional installation is highly recommended. Ensure the vehicle's battery is disconnected before starting installation.
- Retirez l'autoradio existant du tableau de bord.
- Connect the wiring harness to the vehicle's wiring.
- Secure the unit into the dashboard using the provided mounting brackets and screws.
- Rebranchez la batterie du véhicule et testez l'appareil.
2. Schéma de câblage (Général)
Refer to the detailed wiring diagram included with your product packaging for specific connections. Below are common connections:
- Fil jaune : 12 V constant (batterie)
- Fil rouge : 12 V commuté (accessoires/allumage)
- Fil noir : Sol
- Fil orange : Illumination (Optional)
- Fil bleu: Antenne de puissance / AmpAllumage à distance de l'amplificateur
- Fils de haut-parleur : Connect to vehicle speakers (e.g., White/White-Black for Front Left, Grey/Grey-Black for Front Right, Green/Green-Black for Rear Left, Purple/Purple-Black for Rear Right).
- Entrée caméra de recul : Se connecter à l'arrièreview camera video output and reverse trigger wire.
- Entrée de commande du volant : Connectez-vous aux fils de commande du volant du véhicule (le cas échéant).

Figure 2 : Illustration of USB connection points, relevant for media input and smartphone integration.
Mode d'emploi
1. Fonctionnement de base
- Marche/Arrêt : Appuyez sur le bouton d'alimentation du panneau avant ou de la télécommande.
- Réglage du volume : Tournez le bouton de volume ou utilisez la télécommande.
- Sélection du mode : Short press the power/mode button to cycle through available modes (Radio, USB, SD, Bluetooth, AUX, CarPlay/Android Auto).
- Contrôle de l'écran : Use the dedicated button to retract or extend the 7-inch display.
2. Fonction Bluetooth
L'appareil prend en charge le Bluetooth pour les appels mains libres et la diffusion audio sans fil.
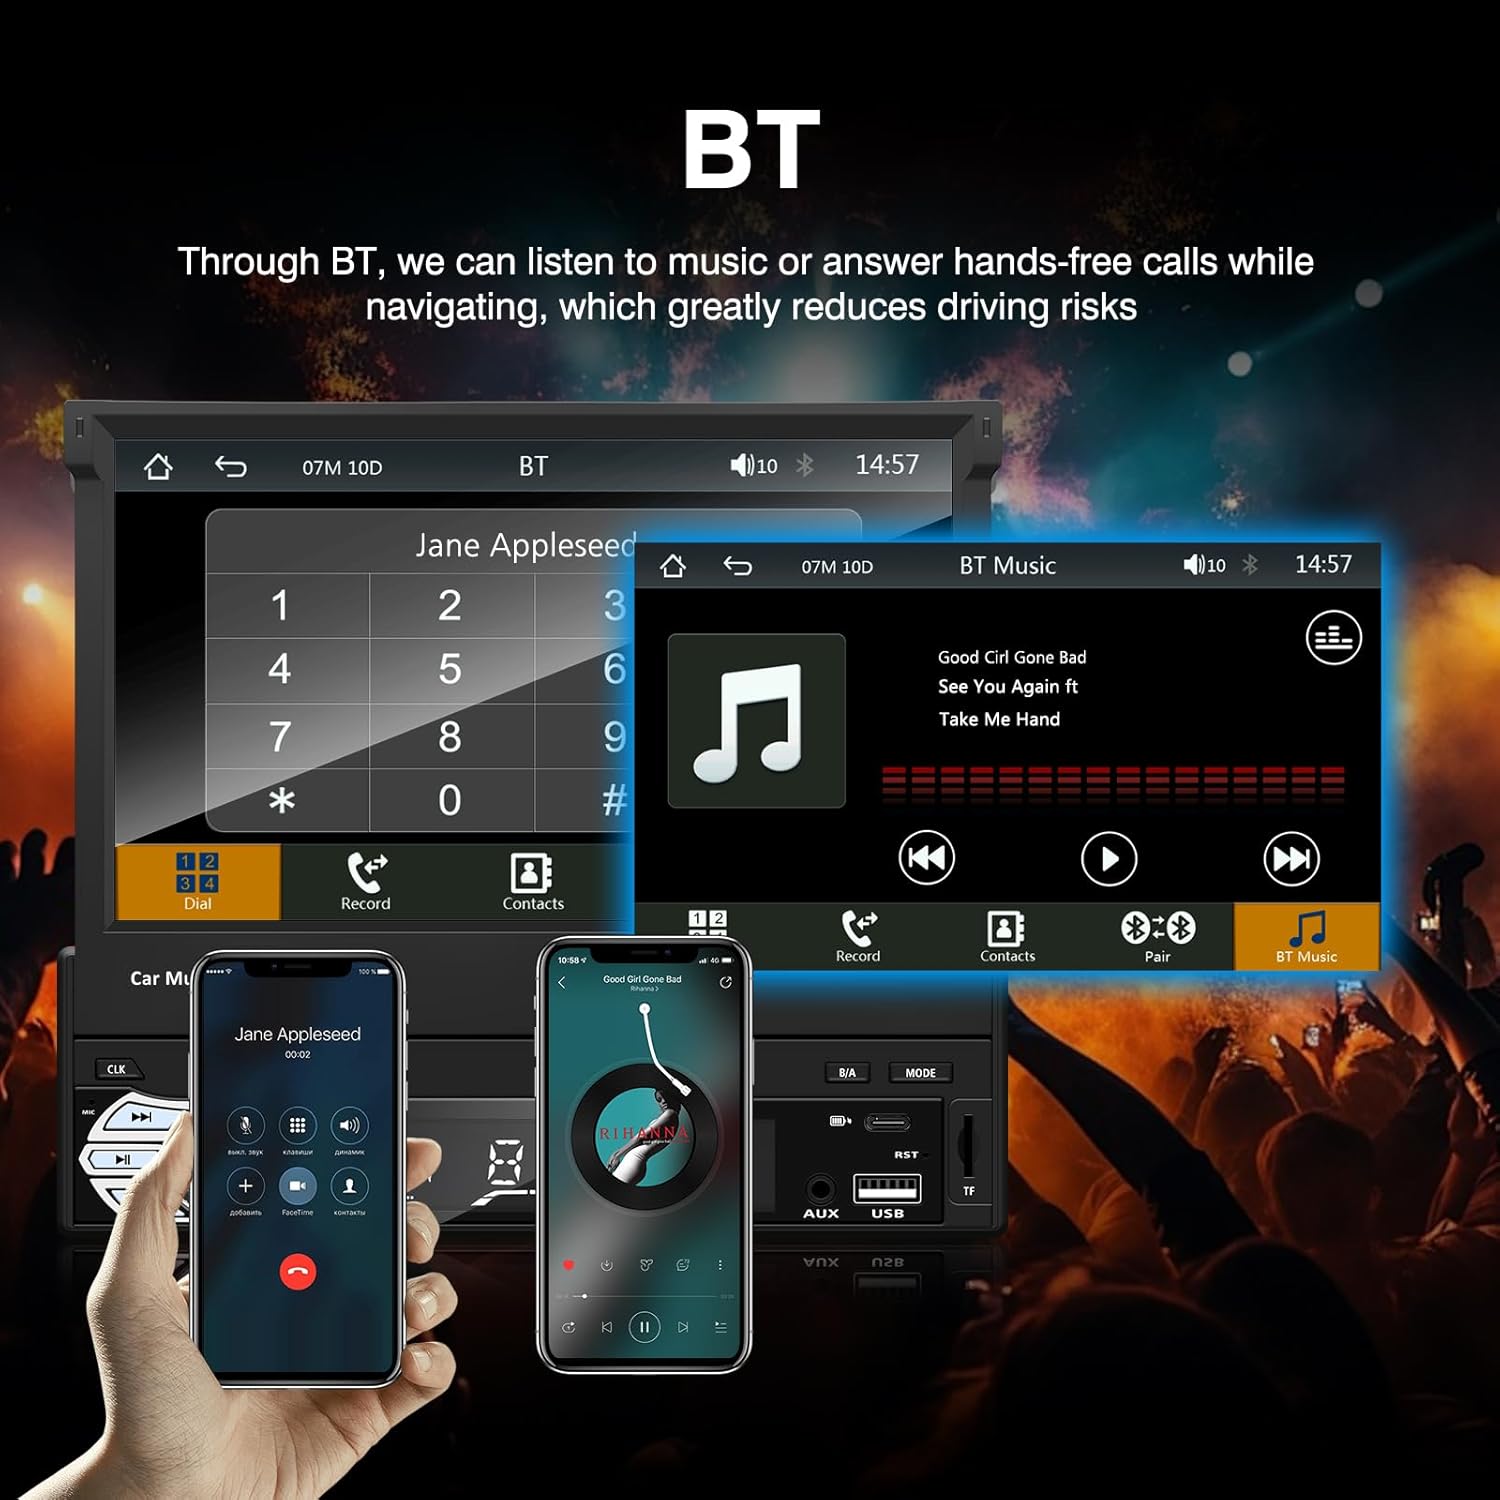
Figure 3 : Bluetooth interface for hands-free calls and music streaming, showing a dial pad and music controls.
- Jumelage : Activez le Bluetooth sur votre appareil mobile. Rechercher available devices and select "Ezonetronics" or similar. Enter PIN "0000" if prompted.
- Appels mains libres : Once paired, you can make and receive calls directly through the car stereo. Use the touchscreen or remote to dial, answer, or end calls.
- Diffusion audio (A2DP) : Play music from your paired device wirelessly. Control playback (play/pause, skip) from the car stereo or your device.
3. Lecture multimédia USB/SD
Insert a USB drive or SD card into the respective slot. The unit will automatically switch to USB/SD mode and begin playing compatible media files.

Figure 4 : Icons indicating support for Bluetooth, Auxiliary input, TF (SD) Card, and USB connections for media playback.
- Supported formats include RM, RMVB, ASF, MKV, DIVX, MPEG4, AVI, VOB for video, and MP3/MP4 for audio.
- Naviguez dans les dossiers et files en utilisant l'interface tactile.
4. Radio FM
Access the FM radio mode to listen to local broadcasts.

Figure 5 : FM Radio interface with frequency display and equalizer settings for audio customization.
- Scan automatique: Automatically search and save strong stations.
- Réglage manuel: Fine-tune frequencies using the touchscreen.
- Présélections: Save your favorite stations for quick access (up to 18 preset stations).
5. Apple CarPlay / Android Auto
Connect your compatible smartphone via USB to access Apple CarPlay or Android Auto features directly on the stereo's display.

Figure 6 : Wired Apple CarPlay interface, displaying phone applications like navigation, music, and messages on the car stereo screen.

Figure 7 : Wired Android Auto interface, displaying Android applications like Google Maps, Spotify, and phone calls on the car stereo screen.
- Ensure your phone has CarPlay or Android Auto enabled.
- Use a high-quality USB cable for a stable connection.
- Access navigation, music, messages, and other compatible apps safely while driving.
6. Lien miroir
Mirror Link allows you to display your smartphone's screen content directly onto the car stereo's display via a USB data cable.

Figure 8 : Mirror Link function demonstrating a smartphone screen being projected onto the car stereo display.
- Connectez votre smartphone au port USB à l'aide d'un câble de données.
- Suivez les instructions affichées à l'écran sur la chaîne stéréo et sur votre téléphone pour établir la connexion.
- Note: Functionality may vary depending on your smartphone model and operating system.
7. Arrièreview Entrée de la caméra
Lorsqu'un arrièreview camera is connected and the vehicle is shifted into reverse, the stereo automatically displays the camera feed.

Figure 9 : Reversing display showing the view vue de l'arrièreview camera with parking assistance lines, providing an intuitive aid for parking.
- Assurez-vous que l'arrièreview camera is properly installed and connected to the dedicated input.
- L'écran basculera automatiquement sur la caméra. view lorsque la marche arrière est enclenchée.
8. Commandes au volant
The unit supports connection to your vehicle's existing steering wheel controls for convenient operation. Refer to your vehicle's manual and the stereo's wiring diagram for proper connection and configuration.
Entretien
- Nettoyage de l'écran : Utilisez un chiffon doux non pelucheux pour essuyer délicatement l'écran tactile. N'utilisez pas de nettoyants abrasifs ni de solvants.
- Nettoyage général : Essuyez l'extérieur de l'appareil avec un chiffon doux et sec.
- Évitez les liquides : Ne vaporisez pas de liquides directement sur l'appareil.
- Température: Évitez toute exposition prolongée à des températures extrêmes, qu'il s'agisse de chaleur ou de froid, car cela peut affecter la durée de vie de l'appareil.
Dépannage
| Problème | Cause possible | Solution |
|---|---|---|
| L'unité ne s'allume pas. | Câblage incorrect ; fusible grillé ; problème de batterie du véhicule. | Vérifiez les connexions d'alimentation (fils jaune, rouge et noir). Inspectez les fusibles du véhicule. Assurez-vous que la batterie est chargée. |
| Pas de son. | Volume trop faible ; mode muet activé ; câblage des haut-parleurs incorrect. | Augmentez le volume. Vérifiez si la fonction muet est activée. Vérifiez les connexions des haut-parleurs. |
| Connexion Bluetooth impossible. | Bluetooth not enabled on phone; Incorrect pairing process. | Assurez-vous que le Bluetooth de votre téléphone est activé et détectable. Réessayez l'appairage. |
| USB/SD media not playing. | Non pris en charge file format; Corrupted media; Drive/card not inserted correctly. | Vérifier file formats. Try a different USB drive/SD card. Ensure proper insertion. |
| Arrièreview L'appareil photo ne s'affiche pas. | Caméra non connectée ; fil de déclenchement de marche arrière non connecté. | Vérifiez la connexion du câble d'entrée vidéo de la caméra et du câble de déclenchement de marche arrière. |
Si les problèmes persistent, consultez un technicien qualifié ou contactez le service client.
Caractéristiques
- Marque: EZoneTronics
- Numéro de modèle : RM-CW9601
- Couleur: Noir
- Écran: 7-inch Capacitive Touchscreen, Retractable
- Technologie de connectivité: Bluetooth, USB, SD, AUX, RCA
- Bluetooth : Integrated Bluetooth 2.0 with A2DP/Hands-free
- Appareils compatibles : Smartphone
- Mode de sortie audio : Stéréo
- Prise en charge de l'encodage vidéo : RM, RMVB, ASF, MKV, DIVX, MPEG4, AVI, VOB
- Prise en charge USB/SD : Up to 32GB max.
- Caractéristiques spéciales : Touchscreen, Steering Wheel Control Support, Rear Camera Input, Apple CarPlay, Android Auto, Mirror Link
- Fabricant: Rhythm Electronics Limited
Garantie et assistance
This product comes with a limited manufacturer's warranty.
- Garantie de l'unité principale : 12 months for defective items (excluding damaged or misused items after receipt).
- Garantie des accessoires : 3 months for accessories.
Pour toute réclamation au titre de la garantie ou pour obtenir une assistance technique, veuillez contacter directement votre revendeur ou le fabricant. Conservez votre reçu d'achat comme preuve d'achat.


