1. Introduction
Merci pour votre achatasing the COBY DTV-700 Digital to Analog TV Converter. This device allows you to receive digital broadcast television signals and convert them for display on older analog televisions. It also functions as a multimedia player, supporting various audio, video, and image formats via its USB port, and offers recording capabilities. Please read this manual thoroughly before operating the device to ensure proper use and to maximize your viewexpérience de travail.
2. Contenu du colis
Veuillez cocher la case correspondant aux éléments suivants :
- COBY DTV-700 Digital to Analog TV Converter
- Télécommande
- Adaptateur secteur CA/CC
- Câble AV (RCA)
- Manuel de l'utilisateur (ce document)
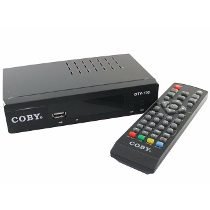
Image 2.1: The COBY DTV-700 Digital to Analog TV Converter. This image shows the compact design of the converter unit, typically black with various ports and indicators.
3. Consignes de sécurité
Pour garantir un fonctionnement sûr et éviter tout dommage, veuillez respecter les précautions suivantes :
- N’exposez pas l’appareil à la pluie, à l’humidité ou à des températures extrêmes.
- N'ouvrez pas le casing; confier toute intervention à un personnel qualifié.
- Assurez une ventilation adéquate autour de l’appareil pour éviter toute surchauffe.
- Utilisez uniquement l’adaptateur secteur fourni.
- Tenez l'appareil à l'écart de la lumière directe du soleil, des sources de chaleur et des champs magnétiques puissants.
- Éliminez les piles et les déchets électroniques de manière responsable, conformément à la réglementation locale.
4. Produit terminéview
4.1 Panneau avant
The front panel typically includes:
- Indicateur d'alimentation : S'allume lorsque l'appareil est allumé.
- Boutons Canal Haut/Bas : Pour changer de chaîne.
- Bouton Menu : Accède au menu principal.
- Port USB : For connecting USB storage devices for media playback and recording.
4.2 Panneau arrière
Le panneau arrière comporte tous les ports de connexion nécessaires :
- FOURMI DANS : Connects to your antenna for receiving digital signals.
- SORTIE HDMI: Connects to an HDMI-compatible TV for high-definition output.
- AV OUT (RCA): Connects to older analog TVs using composite video (yellow) and stereo audio (red/white) cables.
- SORTIE COAXIALE : Digital audio output (if available).
- DC IN: Connects to the provided AC/DC power adapter.
5. Installation
5.1 Connexion du convertisseur
- Connecter l'antenne : Connectez votre antenne numérique à l' FOURMI DANS port on the rear of the DTV-700.
- Se connecter à la télévision :
- For Analog TVs: Use the supplied AV cable. Connect the yellow plug to the video input of your TV, and the red/white plugs to the corresponding audio inputs. Connect the other end to the AV OUT ports on the DTV-700.
- For Digital/HDTVs: Use an HDMI cable (not included). Connect one end to the SORTIE HDMI port on the DTV-700 and the other end to an available HDMI input on your TV.
- Connecter l'alimentation : Plug the AC/DC power adapter into the Entrée CC port on the DTV-700, then plug the adapter into a wall outlet.
5.2 Configuration initiale et recherche des chaînes
- Turn on your TV and select the correct input source (e.g., AV1, HDMI1) that corresponds to your connection.
- Power on the DTV-700 using the remote control or the power button on the front panel.
- The first time you power on, an initial setup wizard may appear. Follow the on-screen prompts to select your language and country.
- Initiate an automatic channel scan. This will search for all available digital channels in your area. This process may take several minutes. Do not interrupt the scan.
- Once the scan is complete, the converter will tune to the first available channel.
6. Mode d'emploi
6.1 Fonctions de la télécommande
The remote control provides full functionality for your DTV-700. Ensure two AAA batteries are inserted correctly (batteries not included).
- POUVOIR: Allume ou éteint l'appareil.
- CH +/- : Change de chaîne (vers le haut ou vers le bas).
- VOL +/- : Règle le volume.
- M E N U: Accède au menu principal.
- SORTIE: Quitte le menu ou la fonction en cours.
- INFO: Affiche les informations de la chaîne actuelle.
- OK / Navigation Buttons: Confirme les sélections et permet de naviguer dans les menus.
- REC : Starts recording the current program.
- LECTURE/PAUSE, ARRÊT, AVANCE RAPIDE, RETOUR RAPIDE : Commandes de lecture multimédia.
- USB: Passe en mode de lecture multimédia USB.
6.2 Channel Navigation
Utilisez le CH +/- buttons on the remote or front panel to browse channels. You can also directly enter a channel number using the numeric keypad on the remote.
6.3 Menu principal
Appuyez sur le MENU button to access settings for Program, Picture, Sound, Time, Option, and System. Use the navigation buttons to select options and OK pour confirmer.
7. Lecture multimédia
The DTV-700 supports media playback from a USB storage device (e.g., USB flash drive, external hard drive). Insert your USB device into the USB port on the front panel.
7.1 Formats pris en charge
- Musique: MP3, WMA
- Photo: JPG, BMP, PNG
- Vidéo: MKV, AVI, DIVX, XVID, MOV, VOB, FLV, DAT, MPEG, MP4, TS
7.2 Lecture des médias
- Insérez un périphérique de stockage USB dans le port USB.
- Appuyez sur le USB button on the remote control or navigate to the 'Multimedia' section in the main menu.
- Select the desired media type (Music, Photo, Video) and browse your files.
- Utilisez les boutons de navigation pour sélectionner un file et appuyez sur OK jouer.
8. Fonctions d'enregistrement
The DTV-700 allows you to record live TV programs to a connected USB storage device.
8.1 Enregistrement instantané
Pendant le visionnage d'un programme, appuyez sur REC button on the remote control to start recording. Press ARRÊT pour terminer l'enregistrement.
8.2 Scheduled Recording (PVR)
Access the PVR (Personal Video Recorder) or Schedule menu via the main menu to set up timed recordings. You will need to specify the channel, start time, end time, and date for the recording.
9. Dépannage
| Problème | Cause/solution possible |
|---|---|
| Pas d'image ni de son |
|
| Mauvaise qualité d'image / Aucune chaîne |
|
| La télécommande ne fonctionne pas |
|
| Lecture impossible du périphérique USB |
|
10. Spécifications
- Modèle: DTV-700
- Marque: Coby
- Saisir: Digital TV Antenna (ATSC/DVB-T/T2 compatible, depending on region)
- Sortir: HDMI, AV (RCA Composite Video/Audio)
- Port USB : Yes (for media playback and PVR)
- Formats multimédias pris en charge :
- Music: MP3, WMA
- Photo : JPG, BMP, PNG
- Video: MKV, AVI, DIVX, XVID, MOV, VOB, FLV, DAT, MPEG, MP4, TS
- Pouvoir: AC/DC Adapter (Input: 100-240V ~ 50/60Hz, Output: typically 5V-12V DC)
- Dimensions: Approximately 20 x 15.6 x 6.2 cm (Package dimensions)
- Poids: Approximately 490 g (Package weight)
- Piles de la télécommande : 2 x AAA (non inclus)
11. Entretien
To ensure the longevity and optimal performance of your DTV-700 converter:
- Nettoyage: Utilisez un chiffon doux et sec pour nettoyer l'extérieur de l'appareil. N'utilisez pas de nettoyants liquides ni de produits chimiques abrasifs.
- Ventilation: Assurez-vous que les ouvertures de ventilation ne sont pas obstruées pour éviter une surchauffe.
- Stockage: Si vous devez entreposer l'appareil pendant une période prolongée, débranchez-le de l'alimentation électrique et rangez-le dans un endroit frais et sec.
12. Garantie et assistance
For warranty information and technical support, please refer to the warranty card included with your product or visit the official Coby webConsultez le site. Conservez votre reçu d'achat comme preuve d'achat pour toute réclamation au titre de la garantie.
Coby is committed to providing quality products and customer satisfaction. If you encounter any issues not covered in this manual, please contact Coby customer service for assistance.


