1. Produit terminéview
The Dino-Lite AM4113ZT is a versatile USB digital microscope designed for detailed observation and analysis. It features 1.3-megapixel resolution, offering true optical magnification from 20x to 50x, and up to 200x. This model includes integrated polarized light to reduce glare on reflective surfaces, MicroTouch for convenient image capture, and measurement capabilities through its accompanying software.

Image 1.1: The Dino-Lite AM4113ZT USB Digital Microscope, showcasing son design compact.

Image 1.2 : Terminéview of the Dino-Lite AM4113ZT's primary features, including magnification range, software compatibility, and specialized functions.
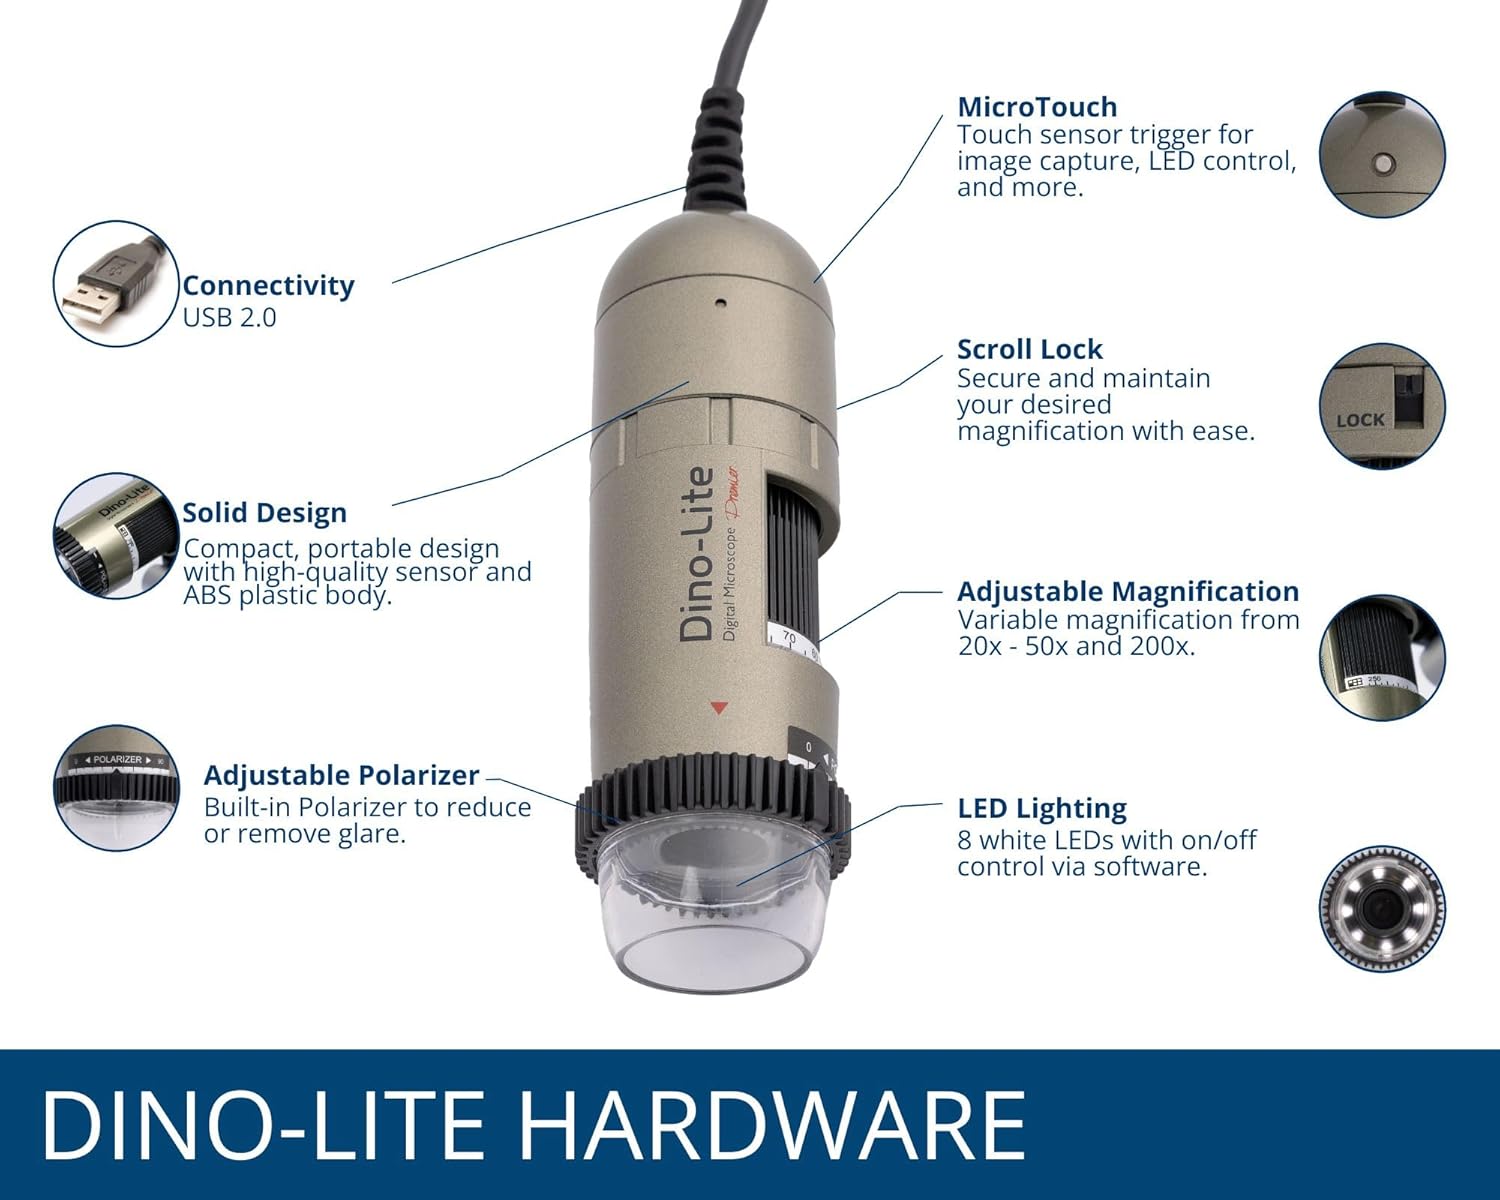
Image 1.3: Detailed illustration of the Dino-Lite AM4113ZT hardware, highlighting its various components and their functions.
2. Contenu du colis
Vérifiez que tous les éléments énumérés ci-dessous sont présents dans l'emballage de votre produit :
- Dino-Lite AM4113ZT USB Digital Microscope
- Guide de démarrage rapide
- Software Download Link/Information
- Pochette de transport
- Calibration Target + Cover
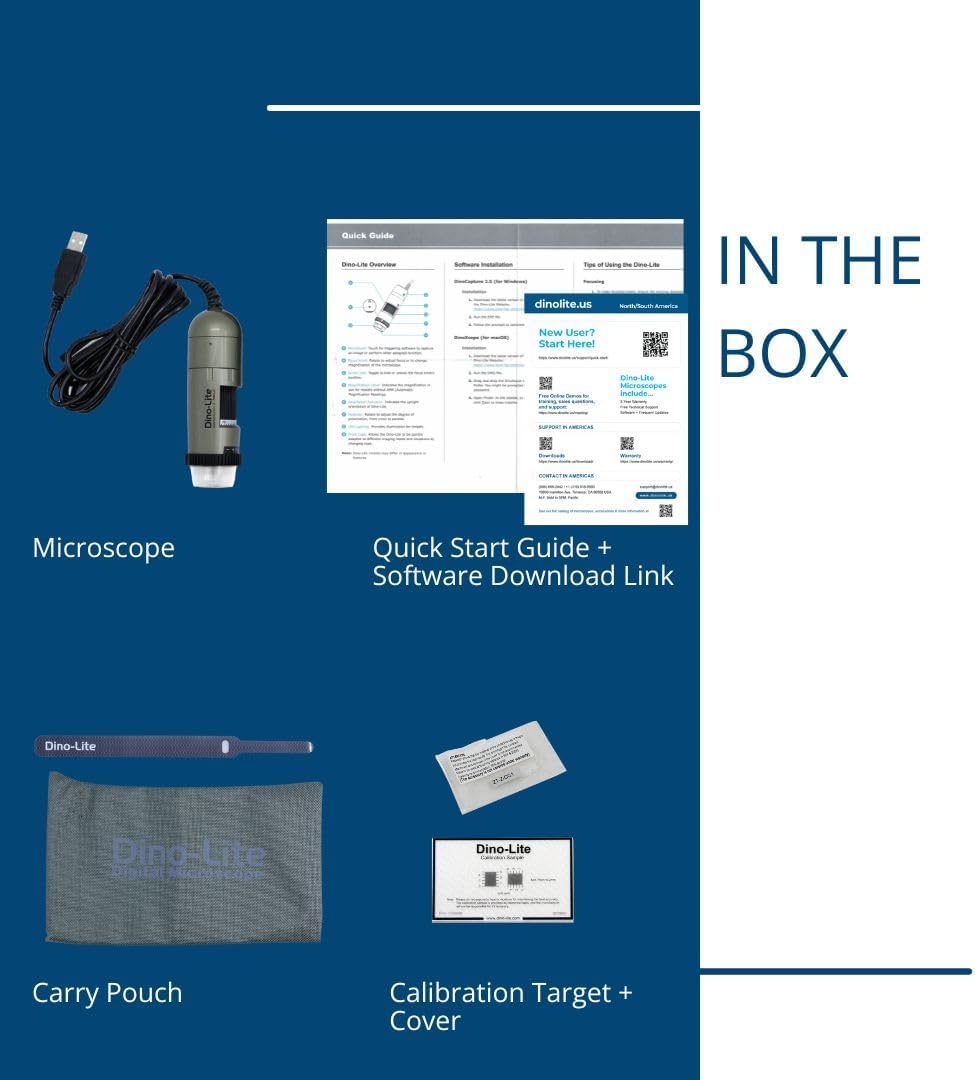
Image 2.1: Visual representation of the items included in the Dino-Lite AM4113ZT product box.
3. Installation
3.1 Installation du logiciel
- Télécharger des logiciels: Visit the official Dino-Lite website or use the provided software download link to obtain the latest version of DinoCapture (for Windows) or DinoXcope (for Mac).
- Installer le logiciel: Suivez les instructions à l'écran pour installer le logiciel sur votre ordinateur.
- Configuration requise : Ensure your operating system (Windows or Mac) meets the minimum requirements specified by the software.

Image 3.1: The DinoCapture software interface displayed on a laptop, demonstrating its functionality for image capture and analysis.
3.2 Connexion du microscope
- Connect the USB cable from the Dino-Lite AM4113ZT microscope to an available USB port on your computer.
- The operating system should automatically detect the device.
- Launch the DinoCapture (Windows) or DinoXcope (Mac) software. The microscope's live feed should appear in the software window.
The Dino-Lite AM4113ZT can be used handheld for quick inspections or mounted on an optional stand (sold separately) for more stable and precise observations.

Image 3.2: The Dino-Lite AM4113ZT shown in both handheld use and mounted on a stand, demonstrating its adaptability for various inspection needs.
4. Mode d'emploi
4.1 Réglage du grossissement
The AM4113ZT offers variable optical magnification from 20x to 50x, and a fixed 200x magnification. To adjust the magnification:
- Rotate the magnification dial on the microscope body.
- Observe the live image in the software to achieve the desired level of detail.
- For stable observation at a specific magnification, use the scroll lock mechanism to secure the dial.

Image 4.1: Close-up of the magnification dial and scroll lock on the Dino-Lite AM4113ZT.
4.2 Using Polarized Light
The integrated adjustable polarizer helps reduce glare on reflective surfaces, improving image clarity:
- Rotate the polarizer ring located at the front of the microscope.
- Adjust until glare is minimized and surface details become clearer.

Image 4.2: The adjustable polarizer ring, designed to control reflections and enhance image quality.
4.3 Image Capture and LED Control
- MicroTouch: Gently touch the MicroTouch sensor on the microscope body to capture a still image.
- Software Capture: Use the capture button within the DinoCapture/DinoXcope software to take photos or record videos.
- Éclairage LED : The microscope features 8 white LEDs. Control their on/off status and brightness through the software interface.
4.4 Fonctions de mesure
The DinoCapture/DinoXcope software provides advanced measurement tools:
- After capturing an image, use the software to perform various measurements such as length, area, and angles.
- Ensure proper calibration using the included calibration target for accurate measurements.

Image 4.3: The Dino-Lite AM4113ZT positioned on a stand, illustrating a stable setup for detailed observation and measurement tasks.
5. Entretien
5.1 Nettoyage
- Lentille: Utilisez un chiffon doux non pelucheux, spécialement conçu pour les lentilles optiques, pour essuyer délicatement la lentille du microscope. Évitez les matériaux abrasifs et les produits chimiques agressifs.
- Corps: Essuyez le corps du microscope avec un chiffon doux et sec. Si nécessaire, un chiffon légèrement damp cloth with mild soap can be used, followed by a dry cloth. Ensure no liquid enters the device.
- Éviter: Do not use alcohol, benzene, thinners, or other chemical solvents, as they may damage the plastic components.
5.2 Stockage
- Store the microscope in its protective carry pouch when not in use.
- Keep the device in a cool, dry place, away from direct sunlight, extreme temperatures, and high humidity.
- Évitez de stocker dans des environnements poussiéreux.
6. Dépannage
6.1 Aucune image affichée
- Assurez-vous que le câble USB est correctement connecté à la fois au microscope et à l'ordinateur.
- Verify that the DinoCapture/DinoXcope software is running and the correct device is selected.
- Essayez de vous connecter à un autre port USB de votre ordinateur.
- Redémarrez le logiciel et/ou votre ordinateur.
6.2 Blurry or Unfocused Image
- Adjust the magnification dial to bring the object into focus.
- Ensure the microscope is held steady or mounted on a stable stand.
- Check the working distance between the microscope lens and the object. Adjust as needed for optimal focus at the selected magnification.
- Clean the microscope lens if smudges or dust are present.
6.3 Software Issues (Crashing, Freezing)
- Assurez-vous que votre logiciel est mis à jour avec la dernière version.
- Check your computer's system resources (RAM, CPU) to ensure they meet the software's requirements.
- Fermez les autres applications gourmandes en ressources qui s'exécutent en arrière-plan.
- Réinstallez le logiciel si le problème persiste.
6.4 Glare on Specimen
- Rotate the adjustable polarizer ring on the microscope to minimize reflections.
- Adjust the intensity of the LED lighting through the software.
- Change the angle of the microscope relative to the specimen.
7. Spécifications
| Fonctionnalité | Détail |
|---|---|
| Nom du modèle | AM4113ZT |
| Résolution d'image | 1.3 mégapixels (1280 x 1024) |
| Grossissement | 20x - 50x, 200x (Optical) |
| Fréquence d'images vidéo | Jusqu'à 30 FPS |
| Connectivité | USB 2.0 |
| Source de lumière | 8 White LEDs (adjustable via software) |
| Caractéristiques spéciales | MicroTouch, Measurement, Adjustable Polarized Light |
| Appareils compatibles | Personal Computer, Laptop (Windows/Mac) |
| Dimensions du produit | 6.5"L x 7.3"l x 2.6"H |
| Poids de l'article | 0.11 kilogrammes (3.87 onces) |
| Matériel | Plastique |
| Voltage | 5 Volts (via USB) |
8. Garantie et assistance
8.1 Informations sur la garantie
For detailed warranty information regarding your Dino-Lite AM4113ZT USB Digital Microscope, please refer to the warranty card included in your product packaging or visit the official Dino-Lite webLes conditions de garantie peuvent varier selon la région et la date d'achat.
8.2 Assistance technique
If you encounter issues not covered in this manual or require further assistance, please contact Dino-Lite customer support. Contact information can typically be found on the official Dino-Lite websur votre site ou dans la documentation de votre produit.
- Ressources en ligne : Check the Dino-Lite website for FAQs, driver updates, and additional support materials.
- Contact: Refer to your product's quick start guide or the manufacturer's website for specific contact details (phone, email, or support portal).


