1. Introduction
This manual provides detailed instructions for the safe and effective use of your PerfectPrime IR0002 Infrared Thermal Imager. Please read this manual thoroughly before operating the device and retain it for future reference.
The PerfectPrime IR0002 is an advanced infrared thermal imager and visible light camera designed for various applications, offering an IR resolution of 3600 pixels and a temperature range from -20°C to 300°C (-4°F to 572°F). Its 6 Hz refresh rate ensures responsive thermal imaging.
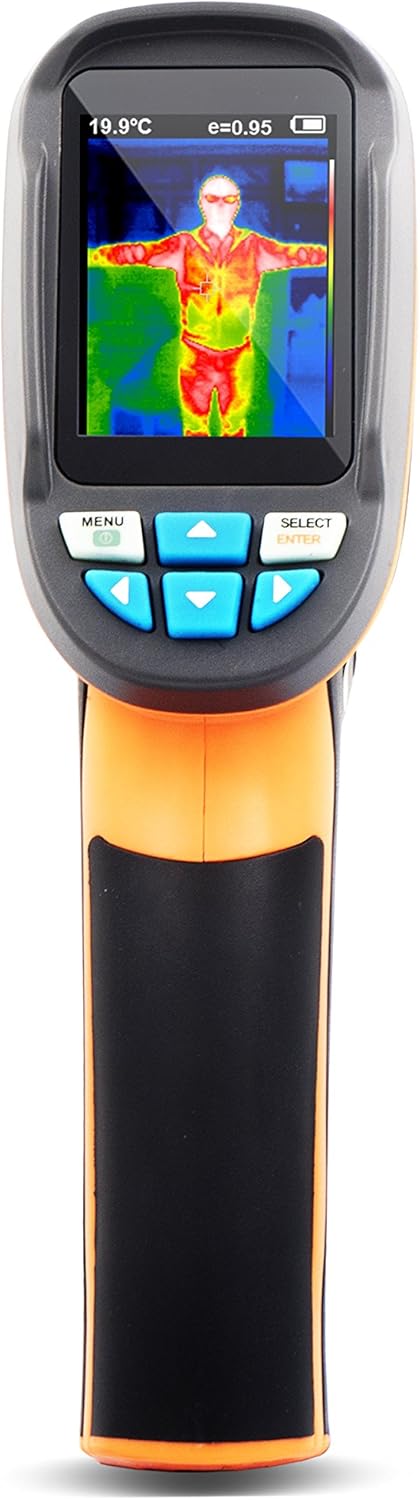
Figure 1 : Face avant view of the PerfectPrime IR0002 Thermal Imager.
2. Précautions de sécurité
To ensure safe operation and prolong the life of your device, observe the following precautions:
- Do not point the imager directly at high-intensity light sources (e.g., the sun, lasers) as this may damage the infrared sensor.
- Évitez d'exposer l'appareil à des températures extrêmes, à une humidité élevée ou à des environnements corrosifs.
- Use only the specified battery type: 4 x AA Alkaline 1.5V batteries. Do not use 1.2V rechargeable batteries.
- Gardez l’appareil à l’écart des champs électromagnétiques puissants.
- Ne tentez pas de démonter ou de modifier l'appareil. Confiez toute réparation à un personnel qualifié.
- Nettoyez l'appareil avec un chiffon doux et sec. N'utilisez pas de nettoyants abrasifs ni de solvants.
3. Product Description and Structure
The PerfectPrime IR0002 integrates an infrared thermal imager and a visible light camera. This combination allows for clear display of temperature distribution and easier identification of target areas.

Figure 2: Structure of the Product and Basic Functions.
Identification des composants :
- Écran couleur TFT haute définition
- Start-up/menu key
- Couvercle de la batterie
- Select/enter key
- Small SD card slot
- Capteur d'imagerie infrarouge
- Caméra à lumière visible
- Lumière LED
- Image capturing key
- Interface for the installation of tripod
4. Installation
Installation de la batterie :
Pour installer ou remplacer les piles :
- Open the battery cover (3) located on the handle.
- Insert 4 x AA Alkaline 1.5V batteries, ensuring correct polarity. Do not use 1.2V rechargeable batteries.
- Slide the battery cover back to its accurate position until it clicks securely.

Figure 3: Battery cover installation method.
5. Mode d'emploi
5.1 Basic Functions:
- Press the "start-up" key (2) for 5 seconds to turn on the instrument.
- Press the "menu" key (2) for 1 second to enter the mode of setting of basic functions. There are only five options on the display screen.
- Press "up" or "down" key to scan the menu and select the yellow option box.
- Press "select" key (4) and "menu" option to edit the value.
- Press "up" or "down" to edit the value. After adjustment, confirm the new value and press "menu" key to exit the edit mode.
5.2 Description des menus :
The device menu provides various settings and functions:
- Réglage de l'heure : Adjust the device's internal clock.
- Save image: Store captured thermal images.
- Background light setting: Réglez la luminosité de l'écran.
- Réglage de l'unité de température : Basculez entre Celsius (°C) et Fahrenheit (°F).
- Réglage de la température de fond : Calibrate the background temperature for accurate readings.
- Capacity of memory card: View remaining storage on the Micro SD card.
- Color palette setting: Choose different color schemes for thermal images.
- Réglage de l'émissivité : Adjust the emissivity value for different materials.
5.3 Mesure :
The measured temperature of the center of the pixel is displayed in the upper left corner of the display screen. The setting of the radiation coefficient is also displayed in the upper right corner of the display screen. Move the product until the hot spot or cold spot coincides with the center of the pixel. Direct the product to the object whose temperature is higher or lower than the surrounding temperature to get the optimum measured results.
5.4 Focal Distance:
This product is a fixed-focal thermal imaging camera. The applicable distance is 50cm (20in).
5.5 Elimination of Noise:
Start up the instrument and then put the head of the sensor close to the worktop. Press the "up" key for 5 seconds to eliminate noise.
5.6 LED Light:
Press the "image capturing" key (9) for 5 seconds to turn on the LED light to cooperate with the working of the visible camera.

Figure 4: Advanced Operating Functions.
5.7 Palette de couleurs :
The "Color palette" menu allows changing the fake color of the infrared image displayed on the screen or captured. A series of color palettes is available for usage. Some color palettes are more applicable to specific areas, so they are set as required options. Gray-scale color palette provides balanced linear color, so it can help to fully reveal details. High-contrast color palette can emphasize the displayed color. This color palette is applicable to the hot-cold contrast situation. It is used to improve the color contrast of high-temperature and low-temperature. Iron red and rainbow color palettes provide a mixed high-contrast gray-scale color palette.
5.8 Temperature of Reflective Background:
The background temperature can be set between 0°C and +36°C. Set the temperature compensation for reflective background in the option of background. Over-hot or over-cold objects may influence the object and the surface temperature and measurement accuracy of the measured object. When the radiation coefficient of the surface of the measured object is low, this phenomenon is obvious. Under many situations, adjust the temperature of the reflective background to get the optimum measured result.
5.9 Marking of Spot Temperature:
Turn on or off the marking of spot temperature. If turned on, the marking of spot temperature indicates that the hot spot or cold spot in the screen needs additional appraisal. If turned off, it indicates that the user can focus on the measured pixel per time.
5.10 Unit of Temperature:
The product displays the temperature in unit of °C or °F.
5.11 Image Mixing:
Use the aligned visible image and infrared image. The mixed image makes the understanding of the infrared image easier. The product can capture the visible image of the infrared image to accurately display the temperature distribution of the target area. It helps to share with others. If this mixing function is used, press "left" or "right" key to adjust the mixed image from 0% to 100%.
5.12 Image Capture and Storage:
This product can be stored for up to 25,000 images on the micro SD card. Press the image capturing button (9) and the symbol of "store photos yes no" will display. Press "MENU" key to store the image; press "SELECT" to delete the captured image. If "NO SD" is displayed at the lower left corner of the screen, it indicates the SD card is not installed. If "FULL" is displayed at the lower left corner of the screen, it indicates that the SD card is full.
5.13 Checking Internal Storage:
- Press "menu" to enter into the mode of "menu".
- Select the image storage module using the arrow keys.
- Press the "SELECT" button to choose the picture you want to view.
- Appuyez sur les touches fléchées pour view d'autres photos.
- Press the above key on the screen will display "Delete photo yes no", then press the MENU key to delete the picture. Press "SELECT" to cancel.
- Press the "MENU" button to exit Review.
5.14 Notes on Radiation Coefficient:
All objects have radiated infrared energy. The radiated quantity of infrared energy is based on the actual temperature and radiation coefficient of the surface. Our instrument can sense the infrared energy on the surface of the object and estimate the temperature based on the sensed value of infrared energy. Many objects (e.g., coated metal, wood, water, skin, and texture) can radiate energy, so it is easy to get the accurate measured value. As to the surface which is easy to radiate energy (high radiation coefficient), the radiation coefficient is greater than 90% (0.90). This simple method is not applicable to the glossy surface or coated metal because their radiation coefficient is less than 60% (0.60). These materials are not easy to radiate energy so they are classified as low radiation coefficient materials. To accurately measure the low radiation coefficient materials, calibrate the radiation coefficient. Adjustment of radiation coefficient is to make the product more accurately calculate the estimated value of actual temperature.

Figure 5: Image Mixing and Storage Functions.
5.15 Emissivity:
For the emissivity within the step length of 0.01, it can be adjusted from 0.10 to 1.00. Set the default value to 0.95. The accurate value of emissivity is very important to the accurate measurement of temperature. The surface emissivity has great impact on the measured temperature of our product. To know the emissivity of the measured surface helps to get more accurate results of temperature but this is not always true.
5.16 Emissivity of Normal Materials:
| Matériels | Radiation thermique | Matériels | Radiation thermique |
|---|---|---|---|
| Asphalte | 0.90–0.98 | Tissu noir | 0.98 |
| Béton | 0.94 | Peau humaine | 0.98 |
| Ciment | 0.96 | Bulle | 0.75–0.80 |
| Sable | 0.90 | Poussière de charbon de bois | 0.96 |
| Sol | 0.92–0.96 | Peinture | 0.80–0.95 |
| Eau | 0.92–0.96 | Matt paint | 0.97 |
| Glace | 0.96–0.98 | Caoutchouc noir | 0.94 |
| Neige | 0.83 | Plastique | 0.85–0.95 |
| Verre | 0.90–0.95 | Bois | 0.90 |
| Céramique | 0.90–0.94 | Papier | 0.70–0.94 |
| Marbre | 0.94 | Oxyde chromique | 0.81 |
| Gypse | 0.80–0.90 | Oxyde de cuivre | 0.78 |
| Mortier | 0.89–0.91 | Oxyde ferrique | 0.78–0.82 |
| Brique | 0.93–0.96 | Texture | 0.90 |
Figure 6 : Valeurs d'émissivité pour les matériaux courants.
6. Entretien
To maintain your PerfectPrime IR0002 in optimal condition:
- Use a wet cloth or liquid soap to clean the shell of the device.
- Do not use abrasive compounds or isopropyl alcohol to clean the shell or lens.
- Rangez l'appareil dans un endroit frais et sec lorsqu'il n'est pas utilisé.
- Retirez les piles si l'appareil ne doit pas être utilisé pendant une période prolongée afin d'éviter toute fuite.
7. Dépannage
If you encounter issues with your PerfectPrime IR0002, consider the following common solutions:
- L'appareil ne s'allume pas : Ensure batteries are correctly installed and fully charged. Replace with new alkaline batteries if necessary.
- Relevés de température inexacts : Check the emissivity setting for the material being measured. Ensure the background temperature compensation is correctly set. Avoid measuring highly reflective surfaces without proper emissivity adjustment.
- Problèmes de qualité d'image : Ensure the lens is clean and free from dust or smudges. Check the image mixing percentage if the visible and IR images appear distorted.
- Impossible d'enregistrer les images : Verify that a Micro SD card is inserted and that it is not full. If "NO SD" or "FULL" is displayed, address the SD card status.
- Appareil non réactif : Try removing and reinserting the batteries to perform a hard reset.
If problems persist, contact PerfectPrime customer support for assistance.
8. Spécifications
| Fonctionnalité | Détail |
|---|---|
| IR Image Resolution | 60 x 60 pixels (110 592 pixels) |
| Résolution d'image visible | 0.3 méga pixels |
| Écran d'affichage | 2.4" Full angle HD |
| Plage de température | -20°C à 300°C (-4°F à 572°F) |
| Sensibilité thermique | 0.15°C |
| Précision de la température | +/- 2% or +/- 2°C |
| Taux de rafraîchissement | 6 Hz |
| Mémoire de stockage | Micro SD Card (4GB included for image storage) |
| Source d'énergie | 4 x AA Alkaline 1.5V batteries (not included) |
| Meilleur Viewdistance | 1.6 pi à 16 pi |
| Poids de l'article | 8 onces |
| Dimensions du colis | 10.1 x 6.3 x 3.8 pouces |
| Certification | CE, RoHS |
| Caractéristiques spéciales | Sans contact |
9. Garantie et assistance
PerfectPrime products are designed for reliability and performance. For warranty information, product registration, or technical support, please visit the official PerfectPrime webConsultez leur site web ou contactez directement leur service client. Conservez votre reçu d'achat comme preuve d'achat pour toute réclamation au titre de la garantie.
For further assistance, please refer to the contact information provided with your product packaging or on the PerfectPrime website.


