1. Introduction
This manual provides instructions for the installation, operation, and maintenance of the Westek In-Wall Programmable Digital Timer, Model ATW-T24. This device is designed to add automated programming functionality to various electrical devices such as lights, heaters, and fans. It features an LCD display for easy programming and a rechargeable battery backup to retain settings during power interruptions.
The timer supports up to 7 weekly programs and includes a random option for enhanced security.
2. Consignes de sécurité
AVERTISSEMENT: To avoid fire, shock, or death; turn off power at the circuit breaker or fuse box and test that the power is off before wiring. All wiring should be performed by a qualified electrician or in accordance with local electrical codes. This device is for indoor use only. Do not exceed the specified electrical ratings.
- Toujours couper l'alimentation électrique avant toute installation ou intervention.
- Assurez-vous que toutes les connexions sont sécurisées et correctement isolées.
- Ne pas utiliser par temps humide ou damp emplacements.
- Tenir hors de portée des enfants.
3. Contenu du colis
The package for the Westek In-Wall Programmable Digital Timer (Model ATW-T24) includes:
- One (1) Westek In-Wall Programmable Digital Timer, 120 V, 1 HP
- One (1) Lithium Ion battery (pre-installed)
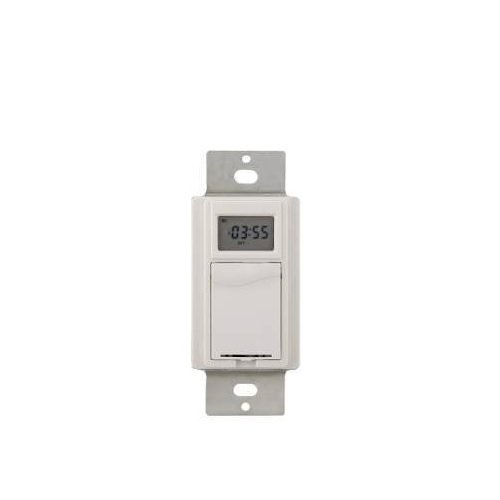
Illustration 1 : Avant view of the Westek In-Wall Programmable Digital Timer. The timer features a white faceplate with a digital display and control buttons.
4. Installation
Installation of this in-wall timer requires electrical wiring knowledge. If you are unsure about any part of the installation process, consult a qualified electrician.
- Couper l'alimentation : Locate the circuit breaker or fuse that supplies power to the switch box where the timer will be installed. Turn off the power completely. Verify power is off using a voltage testeur.
- Supprimer le commutateur existant : Retirez délicatement la plaque murale et dévissez l'interrupteur existant de la boîte murale. Débranchez les fils de l'ancien interrupteur.
- Câbler le minuteur : Connect the wires to the Westek timer according to the wiring diagram provided with the product packaging. Typically, this involves connecting line (hot), load, and ground wires. Ensure all connections are tight and secure.
- Monter le minuteur : Gently push the wired timer into the wall box. Secure it with the provided screws.
- Installez la plaque murale : Attach the new or existing wall plate over the timer.
- Restaurer l'alimentation : Remettez le courant au niveau du disjoncteur ou du tableau électrique.

Image 2: The Westek In-Wall Programmable Digital Timer shown with its internal components and wiring connections. This image illustrates the back of the timer where electrical connections are made.
5. Mode d'emploi
The Westek In-Wall Programmable Digital Timer allows for flexible scheduling of connected devices. The LCD display and control buttons facilitate programming.
5.1 Configuration initiale et réglage de l'heure
- Lors de la mise sous tension initiale ou après une coupure de courant prolongéetage, the display may show a default time or require setting.
- Use the designated buttons (e.g., "SET," "HOUR," "MINUTE," "DAY") to adjust the current time and day of the week. Refer to the specific button labels on your device for precise controls.
- Confirm the settings to save the current time.
5.2 Programmation des cycles marche/arrêt
The timer supports up to 7 custom weekly programs.
- Press the "PROG" or "PROGRAM" button to enter programming mode.
- The display will typically show "PROG 1 ON" or similar. Use the "HOUR," "MINUTE," and "DAY" buttons to set the desired ON time and days for the first program.
- Press "PROG" again to set the "PROG 1 OFF" time and days.
- Repeat for up to 7 programs as needed.
- Exit programming mode by pressing a dedicated "RUN" or "CLOCK" button, or by allowing the timer to time out.
5.3 Random Option
To deter intruders, the timer includes a random ON/OFF feature. When activated, the timer will randomly vary the programmed ON/OFF times by a small interval (e.g., +/- 30 minutes) to simulate occupancy.
- Locate the "RANDOM" or "RND" button.
- Press it to activate or deactivate the random function. An indicator on the LCD may confirm its status.
5.4 Commande manuelle
Most digital timers allow for a temporary manual override of the current program without erasing il.
- Press the "MANUAL" or "ON/OFF" button to toggle the connected device on or off, overriding the current program until the next programmed event.
5.5 Alimentation de secours par batterie
The integrated rechargeable Lithium Ion battery maintains the time and programmed settings during power outages. The battery recharges automatically when main power is restored.
6. Entretien
The Westek In-Wall Programmable Digital Timer requires minimal maintenance.
- Nettoyage: To clean the timer, wipe the surface with a soft, dry cloth. Do not use abrasive cleaners, solvents, or spray directly onto the unit.
- Batterie: The internal rechargeable battery is designed for long-term use and typically does not require replacement. If the timer consistently loses settings during power outages, the battery may need servicing by a qualified technician.
7. Dépannage
| Problème | Cause possible | Solution |
|---|---|---|
| La minuterie ne s'allume pas. | No power to the switch box; incorrect wiring. | Vérifiez le disjoncteur/fusible. Assurez-vous que les connexions électriques sont correctes et bien fixées. |
| L'appareil ne s'allume/s'éteint pas comme prévu. | Incorrect program settings; manual override active. | Review and re-enter program settings. Check if manual override is active and deactivate if necessary. |
| LCD display is difficult to read. | Poor lighting conditions; display angle. | Ensure adequate ambient lighting. Adjust viewangle d'attaque si possible. |
| La minuterie perd ses paramètres après une coupure de courant.tage. | Rechargeable battery backup not functioning. | Allow time for the battery to recharge. If problem persists, contact customer support. |
| Difficulté à programmer la minuterie. | Unfamiliarity with programming steps. | Carefully follow the operating instructions in Section 5. Practice programming without a connected load if possible. |
8. Spécifications
- Marque: Westek
- Numéro de modèle : ATW-T24
- Numéro de pièce : TMDW30CC
- Voltage: 120 V
- Puissance (CV) : 1 CV
- Matériel: Plastique
- Couleur: Blanc
- Poids de l'article : 5.9 onces
- Dimensions du produit : 1.25 x 1.75 x 3 pouces
- Piles : 1 batterie lithium-ion (incluse)
- Style de commutation: Basculer
- Code à barres : 700814916251, 889932723870, 070686506066, 696746170994
- Première disponibilité : 26 juillet 2005
9. Garantie et assistance
Description de la garantie : The manufacturer states "Not applicable" for warranty information. Please refer to your retailer's return policy for details on returns or exchanges.
For technical assistance or further inquiries, please contact Westek customer support through their official website ou le détaillant où le produit a été acheté.


