1. Introduction
This manual provides comprehensive instructions for the installation, operation, and maintenance of your 1byone OUSQH-0535 Easy Chime Wireless Doorbell Kit. This kit includes two plug-in receivers and one push button, designed to provide a reliable and convenient notification system for your home or office. Please read this manual thoroughly before use to ensure proper functionality and safety.
2. Contenu du colis
Vérifiez que tous les éléments sont présents dans votre colis :
- 2 x 1byone Plug-in Receivers
- 1 x 1byone Wireless Push Button
- 1 x AAA Battery (pre-installed in push button)
- Mounting Hardware (screws and adhesive tape)

Figure 2.1: Complete 1byone Wireless Doorbell Kit
3. caractéristiques du produit
- Portée sans fil étendue : Operates up to 100 meters (300 feet) in open areas, ensuring reliable signal transmission throughout most homes.
- Plusieurs tonalités de carillon : Offers 36 selectable CD-quality melodies.
- Volume réglable : Three volume levels ranging from 25dB to 85dB.
- Alerte visuelle : Integrated LED flash provides a visual notification, beneficial for the hearing impaired or noisy environments.
- Weatherproof Push Button: IP44 rated for outdoor use, protecting against dust and splashing water.
- Système extensible : Supports adding additional 1byone chimes or push buttons.
- Installation facile : Simple plug-and-play setup for receivers and flexible mounting options for the push button.

Figure 3.1 : Illustration de la portée sans fil
4. Identification des composants
4.1. Plug-in Receiver
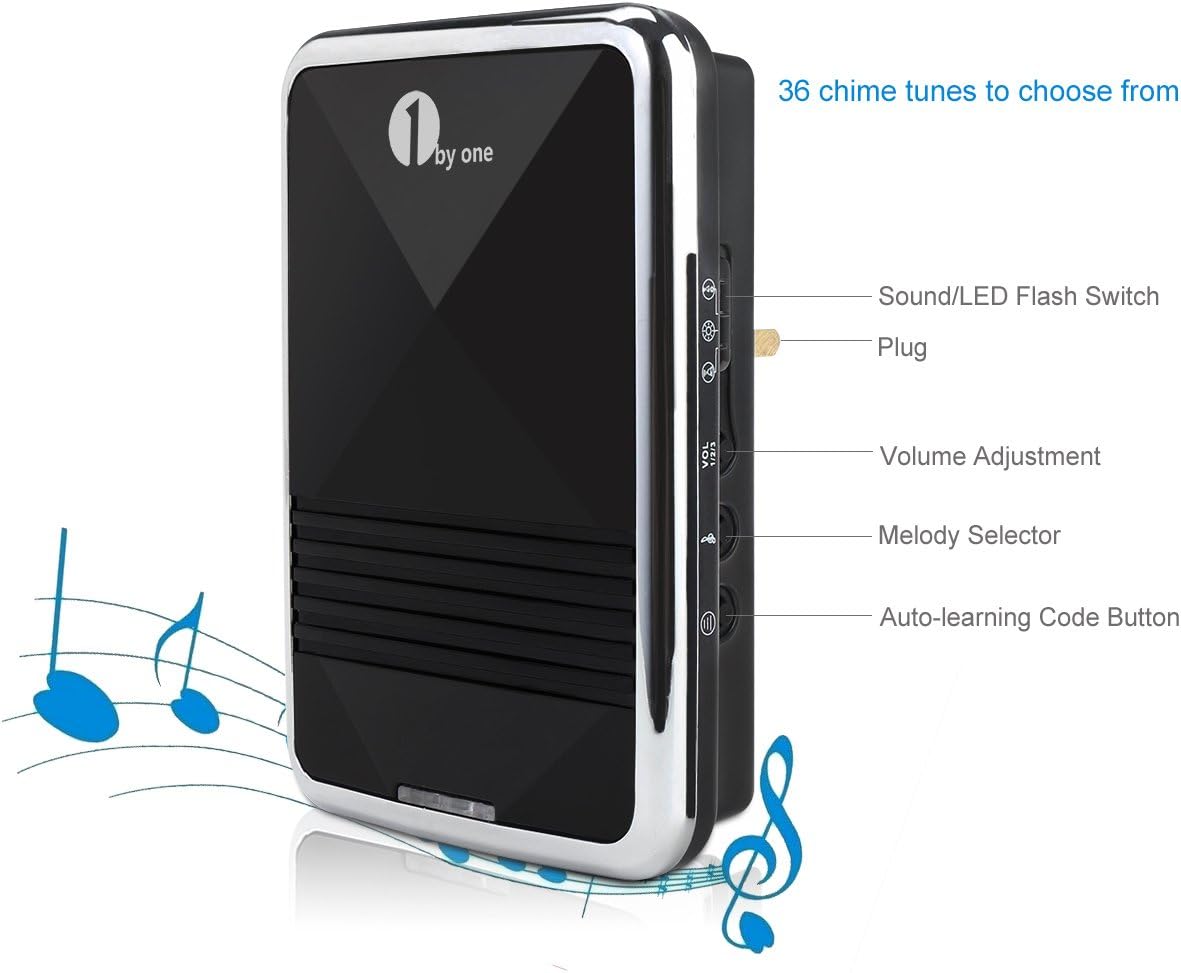
Figure 4.1: Receiver Controls and Features
- Sound/LED Flash Switch: Toggles between sound only, LED flash only, or sound and LED flash modes.
- Prise: Pour le raccordement à une prise électrique standard.
- Réglage du volume : Cycles through three volume levels (low, medium, high).
- Sélecteur de mélodie : Cycles through the 36 available chime melodies.
- Auto-learning Code Button: Used for pairing the receiver with a push button.
4.2. Wireless Push Button
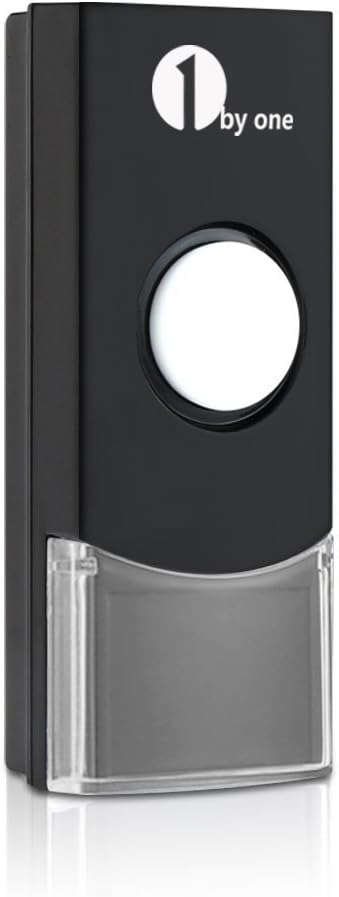
Figure 4.2: Wireless Push Button
- Bouton poussoir: Active la sonnette.
- Indicateur LED : Illuminates when the button is pressed, confirming signal transmission.
- Compartiment à piles : Located on the back, houses the AAA battery.
5. Installation
5.1. Installation du bouton-poussoir
- Installation de la batterie : The push button comes with a pre-installed AAA battery. If replacement is needed, carefully open the back cover to access the battery compartment. Ensure correct polarity.
- Emplacement de montage : Choose a flat, vertical surface near your door. Ensure the location is easily accessible to visitors and within the wireless range of your receivers.
- Options de montage :
- Ruban adhésif : Peel off the protective film from the included double-sided adhesive tape and firmly press the push button onto the desired surface for at least 30 seconds.
- Vis: Use the provided screws and wall anchors to securely fasten the push button to the wall. It is recommended to apply a small amount of silicone sealant around the screw holes on the back of the button to enhance weather resistance.
5.2. Installing the Receivers
- Select a standard electrical outlet in a central location within your home or in areas where you wish to hear the chime.
- Plug the receiver directly into the electrical outlet. The receiver will power on.
- Repeat for the second receiver in another desired location.
5.3. Pairing the Push Button with Receivers (Auto-Learning)
The push button and receivers are typically pre-paired at the factory. If they do not work out of the box, or if you wish to add additional push buttons/receivers, follow these steps:
- Plug the receiver into an electrical outlet.
- Appuyez et maintenez enfoncé le Bouton de code d'apprentissage automatique on the receiver for approximately 5 seconds until the receiver emits a 'ding' sound and its LED indicator flashes. This indicates it is in pairing mode.
- Immediately press the wireless push button. The receiver will chime, confirming successful pairing.
- Test the pairing by pressing the push button. The receiver should chime.
- Repeat this process for any additional receivers you wish to pair with the same push button.
6. Fonctionnement
6.1. Changement de mélodies
Pour sélectionner une autre mélodie :
- Appuyez sur le Sélecteur de mélodie button on the side of the receiver. Each press will cycle to the next available melody.
- Stop pressing when you hear your desired melody. The selected melody will be saved.
6.2. Réglage du volume
To change the volume level:
- Appuyez sur le Réglage du volume button on the side of the receiver. Each press will cycle through the three available volume levels (low, medium, high).
- Sélectionnez le niveau sonore qui convient le mieux à votre environnement.
6.3. Sound and LED Flash Modes
To switch between notification modes:
- Utilisez le Sound/LED Flash Switch sur le côté du récepteur.
- Toggle the switch to select sound only, LED flash only, or both sound and LED flash.
7. Entretien
7.1. Remplacement de la pile du bouton-poussoir
When the push button's LED indicator no longer illuminates or the signal becomes unreliable, it's time to replace the battery.
- Carefully open the back cover of the push button. Note that the cover may be tight to ensure weather resistance.
- Retirez la pile AAA usagée.
- Insert a new AAA battery, ensuring correct positive (+) and negative (-) polarity.
- Fermez correctement le capot arrière.
- Test the push button with the receivers to confirm functionality.
7.2. Nettoyage
To clean the doorbell components, use a soft, dry cloth. Do not use abrasive cleaners, solvents, or immerse any part in water.
8. Dépannage
| Problème | Cause possible | Solution |
|---|---|---|
| Le récepteur ne sonne pas. | Récepteur non allumé. Push button battery low/dead. Non jumelé. Hors de portée. | Assurez-vous que le récepteur est branché sur une prise de courant fonctionnelle. Remplacez la pile du bouton-poussoir. Re-pair the push button and receiver (Section 5.3). Move receiver closer to push button. |
| La sonnette retentit de façon aléatoire. | Interférences provenant d'autres appareils sans fil. Facteurs environnementaux. | Re-pair the push button and receiver to reset the code (Section 5.3). Ensure no other strong radio frequency devices are directly adjacent to the doorbell components. |
| Receiver loses pairing after power cut. | Temporary power interruption. | Re-pair the push button and receiver (Section 5.3). |
| Push button difficult to open for battery replacement. | Tight seal for weather protection. | Use a small, flat tool to gently pry open the cover. Exercise caution to avoid damage. |
| Sound quality not as expected. | Subjective perception. Speaker limitations. | While the system offers 36 melodies, sound quality can vary. Ensure volume is set appropriately. |
9. Spécifications
| Fonctionnalité | Détail |
|---|---|
| Nom du modèle | OUSQH-0535 |
| Marque | 1 par un |
| Couleur | Noir |
| Matériel | Metal (components may include plastic) |
| Portée sans fil | Jusqu'à 100 mètres (300 pieds) |
| Mélodies | 36 sélectionnables |
| Niveaux de volume | 3 (25 dB à 85 dB) |
| Évaluation du bouton-poussoir | IP44 (résistant aux intempéries) |
| Pile à bouton-poussoir | 1 x AAA (inclus) |
| Puissance du récepteur | AC Plug-in (Voltage: 12V, Power Consumption: <5W) |
| Poids de l'article | Environ 7.8 once (0.49 livre) |
| Dimensions du produit | Receivers: 4.72 x 3.15 x 4.72 inches Push Button: 3.42 x 1.38 inches (approx.) |
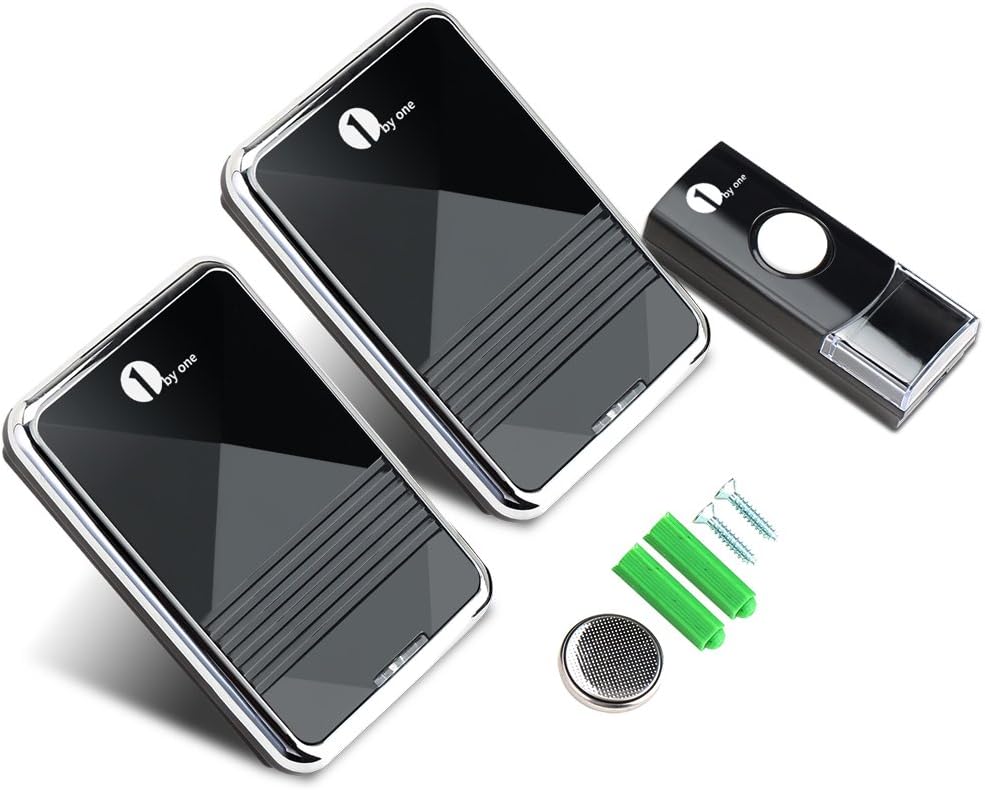
Figure 9.1 : Dimensions du produit
10. Consignes de sécurité
- Do not expose the push button to extreme temperatures or direct sunlight for prolonged periods.
- Ensure receivers are plugged into easily accessible outlets for quick disconnection if needed.
- Ne tentez pas de démonter ou de réparer le produit vous-même. Confiez toute intervention à un personnel qualifié.
- Tenir les piles hors de portée des enfants. Jeter les piles usagées conformément à la réglementation locale.
- Avoid placing receivers near strong electromagnetic fields, which may interfere with operation.
11. Garantie et assistance
For warranty information or technical support, please contact 1byone customer service through their official website or the retailer where the product was purchased. Please have your model number (OUSQH-0535) and purchase details ready.


