1. Introduction
Thank you for choosing the Xpelair C4HTR 4-inch Simply Silent Contour Extractor Fan. This fan is designed for efficient and quiet ventilation in bathrooms, kitchens, and other areas requiring moisture and odor extraction. It features a built-in humidistat and timer for automatic operation based on humidity levels and adjustable run-on time.
The C4HTR model is recognized for its extremely quiet operation, making it one of the quietest intermittent bathroom fans available. Its sleek design allows for versatile installation on walls, ceilings, or panels.

Image 1.1: The Xpelair C4HTR fan, highlighting its silent running at 16dBA at 3m (15 l/s).
2. Consignes de sécurité
Please read all instructions carefully before installation and use. Failure to follow these instructions may result in electric shock, fire, or personal injury.
- L'installation doit être effectuée par un électricien qualifié conformément aux normes électriques en vigueur.
- Ensure the power supply is disconnected at the mains before commencing any installation, maintenance, or cleaning.
- Cet appareil n'est pas destiné à être utilisé par des personnes (y compris les enfants) ayant des capacités physiques, sensorielles ou mentales réduites, ou manquant d'expérience et de connaissances, à moins qu'elles ne bénéficient d'une surveillance ou d'instructions concernant l'utilisation de l'appareil par une personne responsable de leur sécurité.
- Les enfants doivent être surveillés pour s’assurer qu’ils ne jouent pas avec l’appareil.
- Do not install the fan where it may be exposed to direct water spray.
- Ensure adequate ventilation is provided to prevent the back-flow of gases from open-flued appliances into the room.
- The fan must not be connected to a flexible ducting system that is less than 4 inches (100mm) in diameter.
3. Contenu du colis
Vérifiez que tous les composants sont présents avant de commencer l'installation :
- Xpelair C4HTR Extractor Fan Unit
- Vis de fixation et chevilles
- Manuel d'instructions (ce document)
4. Installation
The Xpelair C4HTR fan is suitable for wall, ceiling, or panel mounting. The 'Twist and Click' front cover simplifies installation and maintenance.
4.1 options de montage
The fan can be installed in various orientations:

Image 4.1: Visual representation of ceiling and wall mounting applications for the fan.
4.2 Préparation de l'installation
- Débrancher l'alimentation : Ensure the electrical supply to the installation area is completely switched off at the consumer unit/fuse box.
- Préparer l'ouverture : Create a circular opening of appropriate diameter (refer to specifications for exact dimensions) in the wall, ceiling, or panel.
- Composants séparés : The fan consists of a main body and a front cover. Gently twist and click to separate the front cover from the main unit for easier mounting.
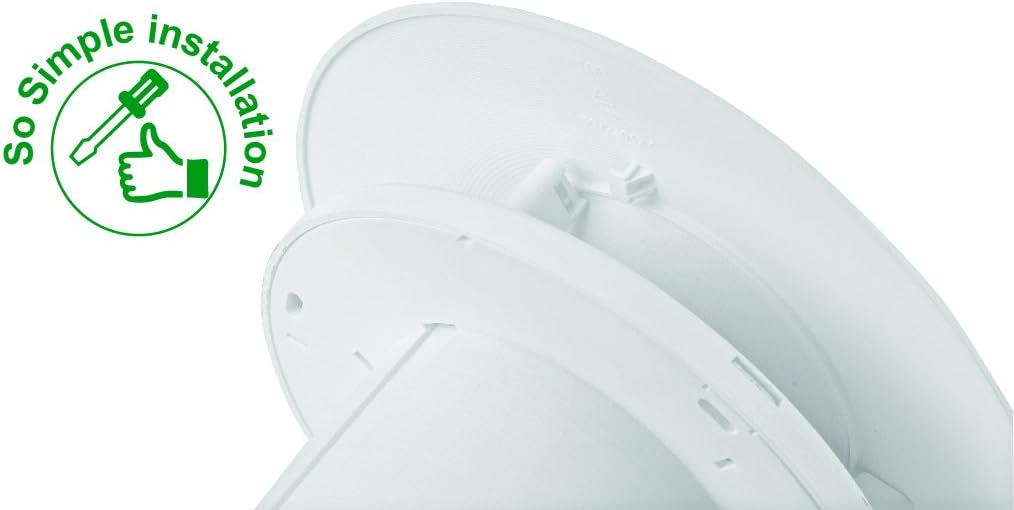
Image 4.2: The 'So Simple installation' feature, indicating ease of assembly with a screwdriver.
4.3 Connexion électrique
The C4HTR requires a 240V electrical supply. Wiring should be performed by a qualified electrician.
- Identify the Live (L), Neutral (N), and Switched Live (T) terminals on the fan unit.
- Connect the mains Live (L) to the fan's Live terminal.
- Connect the mains Neutral (N) to the fan's Neutral terminal.
- For timer and humidistat functionality, connect a switched live supply (e.g., from a light switch) to the fan's Switched Live (T) terminal. This allows the fan to activate when the light is switched on, or to override the humidistat.
- Assurez-vous que toutes les connexions sont bien fixées et correctement isolées.
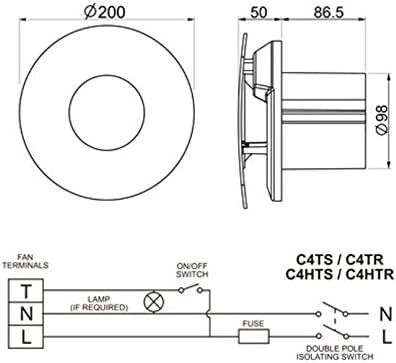
Image 4.3: Wiring diagram for C4HTR models, showing connections for Live, Neutral, and Switched Live, along with fan dimensions.
4.4 Sécuriser le ventilateur
- Position the main fan body into the prepared opening.
- Secure the fan body to the wall/ceiling/panel using the provided screws and wall plugs.
- Once the main body is secure and wired, reattach the front cover by aligning and twisting until it clicks into place.
5. Installation et réglage
The C4HTR fan features an adjustable humidistat and timer. These settings are typically accessed by removing the front cover.
5.1 Humidistat Adjustment
The humidistat controls when the fan activates based on the room's humidity level. It can be adjusted to suit your environment.
- Locate the humidistat adjustment dial or screw on the fan unit (usually behind the front cover).
- Turning the dial towards a higher setting (e.g., 'Max' or a higher percentage) means the fan will only activate at higher humidity levels.
- Turning the dial towards a lower setting (e.g., 'Min' or a lower percentage) means the fan will activate at lower humidity levels, running more frequently.
- Adjust incrementally and observe fan behavior over a few days to find the optimal setting for your needs.
5.2 Réglage de la minuterie
The timer controls how long the fan continues to run after the switched live supply is turned off (e.g., after the light is switched off) or after the humidity drops below the set point.
- Locate the timer adjustment dial or screw (often labeled 'Timer' or with time increments).
- The timer can typically be set from a few minutes up to 30 minutes.
- Turn the dial to increase or decrease the run-on time as desired.
6. Mode d'emploi
The Xpelair C4HTR fan operates automatically based on its humidistat and timer settings, or manually via a switched live connection.
6.1 Automatic Operation (Humidistat)
- When the ambient humidity level in the room rises above the set point on the humidistat, the fan will automatically switch on.
- The fan will continue to run until the humidity level drops below the set point, after which it will run for the duration of the set timer.
6.2 Manual Operation (Switched Live)
- If connected to a switched live supply (e.g., room light switch), the fan will activate when the switch is turned on.
- When the switch is turned off, the fan will continue to run for the duration set on the timer.
Paramètres de vitesse 6.3
The fan offers two speed settings for airflow:
- Vitesse 1 : 15 litres per second (L/s)
- Vitesse 2 : 21 litres per second (L/s)
Refer to the installation guide or consult a qualified electrician for instructions on how to select the desired speed setting, as this may involve internal wiring adjustments.

Image 6.1: The Xpelair C4HTR fan discreetly installed on a bathroom ceiling.
7. Entretien
Regular cleaning ensures optimal performance and longevity of your Xpelair C4HTR fan.
7.1 Nettoyage du ventilateur
- Débrancher l'alimentation : Always switch off the electrical supply to the fan at the mains before cleaning.
- Retirer le capot avant : Gently twist and click to remove the front cover.
- Clean Cover and Impeller: Wipe the front cover and the fan impeller blades with a soft, damp cloth. A mild detergent can be used if necessary. Do not use abrasive cleaners or solvents.
- Bien sécher : Assurez-vous que toutes les pièces sont complètement sèches avant de les remonter.
- Remettre le couvercle en place : Align the front cover and twist until it clicks securely into place.
- Restaurer l'alimentation : Switch the electrical supply back on at the mains.

Image 7.1: The Xpelair C4HTR fan, illustrating its easy-clean design with a sponge icon.
8. Dépannage
If your Xpelair C4HTR fan is not operating as expected, refer to the following common issues and solutions:
| Problème | Cause possible | Solution |
|---|---|---|
| Le ventilateur ne s'allume pas. | Pas d'alimentation électrique. Humidistat set too high. Timer not activated. | Check mains power and circuit breaker. Adjust humidistat to a lower setting. Ensure switched live is active or humidity is high enough. |
| Le ventilateur fonctionne en continu. | L’hygrostat est réglé trop bas. Minuteur réglé trop long. Faulty humidistat/timer. | Réglez l'humidistat sur une valeur plus élevée. Réduisez la durée de la minuterie. Contact qualified electrician or support. |
| Le ventilateur est bruyant. | Obstruction dans la roue. Montage lâche. Problème moteur. | Coupez l'alimentation et vérifiez qu'il n'y a pas d'obstructions. Assurez-vous que le ventilateur est bien fixé. Contact qualified electrician or support. |
| Mauvaise extraction. | Grille/conduit obstrué. La vitesse du ventilateur est réglée trop faible. | Nettoyez la grille et vérifiez que les conduits ne sont pas obstrués. Adjust fan to higher speed setting (if applicable). |
Si le problème persiste après avoir essayé ces solutions, veuillez contacter le service client de Xpelair ou un électricien qualifié.
9. Spécifications
| Fonctionnalité | Détail |
|---|---|
| Nom du modèle | C4HTR |
| Marque | Xpelair |
| Style | with hygrostat and timer |
| Couleur | Blanc |
| Voltage | 240 volts |
| Niveau de bruit | 16 décibels |
| Nombre de vitesses | 2 (15 l/s and 21 l/s) |
| Type de montage | Wall Mount, Ceiling Mount, Panel Mount |
| Méthode de contrôle | Touch (for adjustments) |
| Dimensions du produit | 0.31 x 0.31 x 0.31 inches (Note: This seems to be a placeholder or incorrect data, actual dimensions are likely larger for a 4-inch fan. Refer to Image 4.3 for diagrammatic dimensions.) |
| Poids de l'article | 0.32 ounces (Note: This seems to be a placeholder or incorrect data for a fan.) |
| Code UPC | 798256208287 |
Note: The provided product dimensions and item weight appear to be generic placeholder values. For accurate physical dimensions, please refer to the technical drawings or contact Xpelair directly.
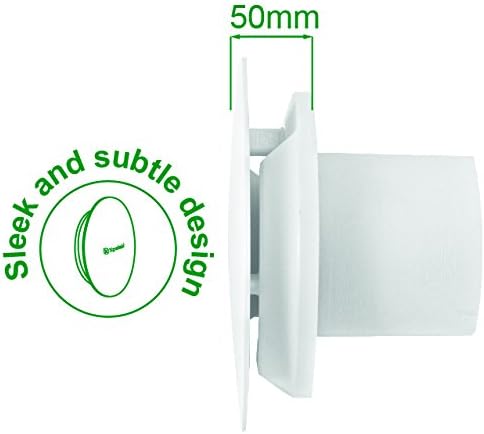
Image 9.1 : Profil latéralfile of the fan, highlighting its sleek design and a depth of 50mm.
10. Garantie et assistance
10.1 Garantie du fabricant
The Xpelair C4HTR fan comes with a Garantie constructeur de 2 ans À compter de la date d'achat. Cette garantie couvre les défauts de matériaux et de fabrication dans des conditions normales d'utilisation. Veuillez conserver votre preuve d'achat pour toute réclamation au titre de la garantie.
La garantie ne couvre pas les dommages causés par une installation incorrecte, une mauvaise utilisation, une négligence, des réparations non autorisées ou l'usure normale.
10.2 Assistance clientèle
For technical assistance, troubleshooting beyond this manual, or warranty claims, please contact Xpelair customer support through their official website ou le détaillant où le produit a été acheté.
When contacting support, please have your product model number (C4HTR) and proof of purchase readily available.


