1. Introduction
This manual provides comprehensive instructions for the installation, operation, maintenance, and troubleshooting of the NUUO NVRmini2 NE-4160 Network Video Recorder. The NE-4160 is a 16-channel NVR designed for robust surveillance systems, featuring 4 drive bays and a 4TB storage capacity, compatible with various IP cameras.
Veuillez lire attentivement ce manuel avant d'utiliser l'appareil afin de garantir une configuration correcte et des performances optimales.
2. Précautions de sécurité
- Veillez à placer l'appareil sur une surface stable et plane afin d'éviter toute chute accidentelle.
- Do not expose the NVR to water or excessive humidity.
- Utilisez uniquement l'adaptateur secteur fourni avec l'appareil.
- Évitez de bloquer les ouvertures de ventilation pour éviter la surchauffe.
- Coupez l'alimentation électrique avant d'effectuer toute opération de maintenance ou d'installation.
- Confiez toute intervention d'entretien à un personnel qualifié.
3. Contenu du colis
Vérifiez que tous les éléments sont présents dans le colis :
- NUUO NVRmini2 NE-4160 Unit
- Adaptateur secteur
- Câble Ethernet
- Guide d'installation rapide
- CD du logiciel (le cas échéant)
- Vis pour l'installation du disque dur
4. Produit terminéview
The NUUO NVRmini2 NE-4160 is a robust network video recorder designed for professional surveillance applications. It supports up to 16 IP camera channels and features four hot-swappable drive bays for extensive storage, pre-installed with 4TB capacity.
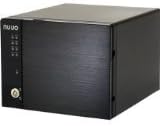
Figure 4.1 : Face avant view of the NUUO NVRmini2 NE-4160 NVR unit. This image shows the compact black chassis with the NUUO logo on the left side, status indicator lights, and a lockable front panel for drive bay access.

Figure 4.2 : Angulaire view of the NUUO NVRmini2 NE-4160 NVR unit. This perspective highlights the sleek design and the textured finish of the front panel, providing a better sense of the unit's dimensions.
Indicateurs du panneau avant:
- Voyant d'alimentation : Indique l'état de l'alimentation.
- HDD LEDs: Indicate hard drive activity for each bay.
- Voyant réseau : Indique la connectivité réseau.
- LED d'alarme : Indique les alarmes ou les erreurs du système.
5. Configuration et installation
5.1 Installation du matériel
- Déballage: Retirez soigneusement le NVR de son emballage.
- Installation du disque dur (s'il n'est pas préinstallé) :
- Unlock the front panel and open the drive bay door.
- Slide the hard drive trays out.
- Secure 3.5-inch SATA hard drives into the trays using the provided screws.
- Slide the trays back into the bays until they click into place.
- Fermez et verrouillez le panneau avant.
- Connexion réseau: Connect one end of the Ethernet cable to the NVR's LAN port and the other end to your network router or switch.
- Connexion électrique : Branchez l'adaptateur secteur à l'entrée d'alimentation du NVR, puis branchez-le à une prise de courant. Le NVR s'allumera automatiquement.
5.2 Configuration initiale du logiciel
Upon first boot, the NVR will acquire an IP address via DHCP (if available). You can access the NVR's web interface using its IP address or by using the NUUO Finder utility.
- Discovering the NVR:
- Install the NUUO Finder utility from the provided CD or NUUO website on a computer connected to the same network.
- Run NUUO Finder to scan for the NVRmini2 NE-4160 on your network.
- Note down the NVR's IP address.
- Accéder Web Interface:
- Ouvrir un web browser (e.g., Chrome, Firefox) and enter the NVR's IP address in the address bar.
- Log in using the default username (e.g., "admin") and password (e.g., "admin"). It is highly recommended to change the default password immediately after the first login.
- Initialisation du système : Follow the on-screen wizard for initial setup, which typically includes:
- Réglage de la date et de l'heure
- Network Settings (Static IP configuration, if desired)
- Hard Drive Formatting (if required)
- Ajout de caméras IP
6. Utilisation du NVR
6.1 En direct View
Le direct View interface allows you to monitor all connected cameras in real-time. You can customize the layout, view multiple cameras simultaneously, and access various controls.
- Sélection de la mise en page : Choose from various grid layouts (e.g., 1x1, 2x2, 3x3, 4x4) to display cameras.
- Contrôle PTZ: If your cameras support Pan/Tilt/Zoom, use the on-screen controls to adjust camera angles and zoom levels.
- Lecture instantanée : Rapidement review recent recordings from the live view.
6.2 Gestion des enregistrements
The NVRmini2 NE-4160 supports various recording modes:
- Enregistrement continu: Enregistrements 24h/24 et 7j/7.
- Enregistrement de détection de mouvement : Enregistre uniquement lorsque la caméra détecte un mouvement.
- Planifier l'enregistrement : Enregistrements basés sur un calendrier prédéfini.
- Enregistrement d'alarme : Enregistre le déclenchement d'une alarme externe.
Configure recording settings for each camera in the "Recording" section of the web interface.
6.3 Lecture et exportation
Pour review enregistré footage:
- Navigate to the "Playback" section.
- Sélectionnez la ou les caméras souhaitées ainsi que la plage de dates et d'heures.
- Utilisez la chronologie pour naviguer dans les enregistrements.
- Pour exporter footage, select the desired segment and choose the export format (e.g., AVI, MP4).
7. Entretien
7.1 Contrôles réguliers
- État du système: Periodically check the NVR's system status via the web interface to ensure all components are functioning correctly.
- État du disque dur : Monitor hard drive health and capacity. Replace drives showing signs of failure promptly.
- Mises à jour du micrologiciel : Check the NUUO website regularly for firmware updates. Applying updates can improve performance, add features, and fix bugs.
- Nettoyage physique : Keep the NVR unit clean and free of dust. Use a soft, dry cloth. Do not use liquid cleaners.
7.2 Sauvegarde des données
While the NVR records continuously, it is advisable to back up critical footage regularly to external storage or a network location.
8. Dépannage
| Problème | Cause possible | Solution |
|---|---|---|
| NVR not powering on | Pas d'alimentation, adaptateur secteur défectueux | Check power cable connection; try a different power outlet; test power adapter. |
| Impossible d'accéder web interface | Incorrect IP address, network issue, firewall | Verify NVR's IP address using NUUO Finder; check network cable; temporarily disable firewall on PC. |
| No video from cameras | Camera not connected, incorrect camera settings, network issue | Ensure cameras are powered and connected; verify camera IP addresses and credentials in NVR settings; check network connectivity. |
| Disque dur non détecté | Improper installation, faulty drive, incorrect format | Re-seat the hard drive; try a different drive bay; ensure drive is compatible and formatted correctly. |
If the problem persists after attempting the above solutions, please contact NUUO technical support.
9. Spécifications
| Fonctionnalité | Détail |
|---|---|
| Numéro de modèle | NE-4160-US |
| Marque | NUUO |
| Chaînes prises en charge | 16 |
| Baies de lecteur | 4 |
| Pre-installed Storage | 4 To (4000 Go) |
| Connectivité | Ethernet |
| Appareils compatibles | Caméras IP |
| Première date disponible | 9 décembre 2013 |
10. Informations sur la garantie
NUUO products typically come with a limited manufacturer's warranty. Please refer to the warranty card included with your product or visit the official NUUO website for detailed warranty terms and conditions specific to the NE-4160-US model. Keep your proof of purchase for warranty claims.
11. Assistance technique
For technical assistance, software updates, or further inquiries, please contact NUUO technical support through their official channels:
- Website: Visit the official NUUO website for support resources, FAQs, and downloads.
- E-mail: Refer to the NUUO website pour les adresses e-mail du support régional.
- Téléphone: Refer to the NUUO website répertoriant les numéros de téléphone du support régional.
When contacting support, please have your product model number (NE-4160-US) and serial number ready.


