1. Introduction
Merci pour votre achatasing the Fonestar AS-170RU Hi-Fi Amplifier. This device is designed to provide high-fidelity stereo audio amplification, featuring a built-in USB/MP3 player, AM/FM digital tuner, and multiple audio inputs. This manual provides detailed instructions for safe installation, operation, and maintenance of your ampAmplificateur. Veuillez lire attentivement ce manuel avant utilisation et le conserver pour toute consultation ultérieure.
2. Consignes de sécurité
- Alimentation: Assurez-vous que ampL'amplificateur est connecté à une alimentation électrique correspondant à la tensiontage specified on the unit. Disconnect the power cord from the outlet if the unit will not be used for an extended period.
- Ventilation: Ne pas obstruer les ouvertures de ventilation. Veiller à laisser un espace suffisant autour de l'appareil pour une bonne circulation de l'air et éviter toute surchauffe.
- Eau et humidité : N’exposez pas l’appareil à la pluie, à l’humidité ou aux projections de liquides. Ne placez pas d’objets remplis de liquide, tels que des vases, sur l’appareil.
- Sources de chaleur : Tenez l'appareil éloigné des sources de chaleur telles que les radiateurs, les bouches de chauffage, les poêles ou autres appareils (y compris amp(échangeurs thermiques) qui produisent de la chaleur.
- Nettoyage: Nettoyez uniquement avec un chiffon sec. Ne pas utiliser de nettoyants liquides ou aerosols.
- Entretien: N'essayez pas de réparer vous-même ce produit. Confiez tous les travaux d'entretien à du personnel de service qualifié.
- Placement: Placez l'appareil sur une surface stable et plane. Évitez de l'exposer directement au soleil ou à proximité de champs magnétiques puissants.
3. Contenu du colis
Veuillez vérifier que les éléments suivants sont inclus dans votre colis :
- Fonestar AS-170RU Hi-Fi Amplifier
- Télécommande
- Antenne AM
- Antenne FM
- Manuel de l'utilisateur (ce document)
4. Produit terminéview
4.1 Panneau avant
The front panel provides access to essential controls and the display.
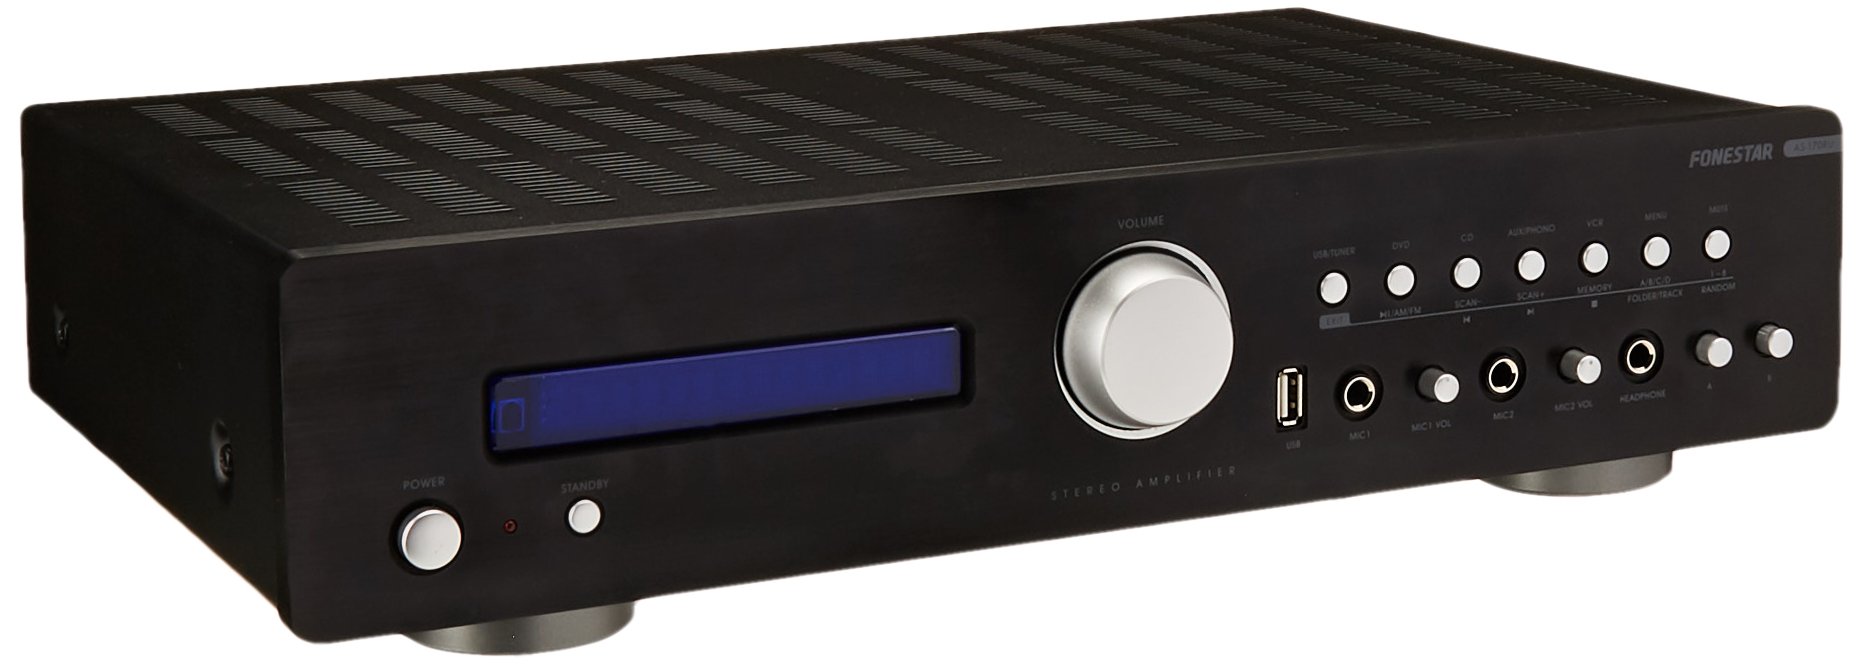
Image: Fonestar AS-170RU Front Panel. Cette image montre la face avant view de la amplifier, showing the VFD display, USB port, headphone output, input selectors, volume knob, and other control buttons.
- Bouton d'alimentation : Tourne le amplifier allumé ou éteint.
- Affichage VFD : Shows current input, volume level, tuner information (frequency, RDS), and USB/MP3 track details (ID3 tag).
- Port USB : Pour connecter des périphériques de stockage USB afin de lire des fichiers MP3 files.
- Sortie casque : Prise jack 6.3 mm pour brancher un casque.
- Sélecteurs d'entrée : Buttons for choosing audio sources (CD, DVD, VCR, AUX/Phono, USB/Tuner).
- Contrôle du volume : Rotary knob to adjust the master volume level.
- Entrées microphone: Two 6.3mm microphone jacks with independent volume control.
- Contrôles de tonalité : Buttons or menu options for adjusting Bass, Treble, and Balance.
4.2 Panneau arrière
The rear panel contains all the necessary connections for your audio sources, speakers, and antennas.

Image: Fonestar AS-170RU Rear Panel. This image illustrates the rear connections of the amplifier, including speaker terminals (A/B), various RCA input jacks (CD, DVD, VCR, AUX/Phono), REC OUT, PRE OUT, AMP IN, and antenna connections (FM COAX, AM LOOP ANT).
- Sorties haut-parleurs (A/B) : Terminals for connecting two pairs of speakers. Supports 4-16 ohms for A or B, or 8-16 ohms for A+B.
- Entrées audio (RCA) :
- Entrée CD : For connecting a CD player.
- DVD Input: For connecting a DVD player or other audio source.
- VCR Input: For connecting a VCR or other audio source.
- AUX/PHONO Input: For connecting auxiliary devices or a turntable (Phono input may require a pre-amplifier if your turntable does not have one built-in).
- SORTIE ENR : Sortie RCA pour le raccordement à un appareil d'enregistrement.
- PRÉ-SORTIE : RCA output for connecting to an external power amplifier.
- AMP DANS: RCA input for connecting an external pre-amplifier.
- Connexions d'antenne :
- FM COAX 75Ω: Pour connecter une antenne FM.
- AM LOOP ANT: For connecting the supplied AM loop antenna.
Télécommande 4.3
The included remote control allows convenient operation of the amplifier à distance.

Image: Fonestar AS-170RU Remote Control. This image shows the remote control unit with various buttons for power, input selection, volume, mute, tuner functions, USB playback controls, and tone adjustments.
- ETRE PRÊT: Marche / arrêt.
- Sélecteurs d'entrée : Buttons for CD, DVD, VCR, AUX/PHONO, USB/TUNER.
- Volume haut/bas (VOL +/-) : Règle le volume principal.
- MUET: Coupe le son.
- AM/FM : Switches between AM and FM tuner modes.
- BALAYAGE: Recherche de stations de radio.
- MÉMOIRE: Enregistre les stations de radio préréglées.
- Commandes de lecture USB : Play/Pause, Stop, Skip Track, Folder/Track navigation.
- EQ OFF / BASS / TREBLE: Access tone controls.
- RDS / ID3: Displays RDS information for radio or ID3 tag pour MP3 files.
5. Installation
5.1 Connexion des enceintes
- Assurez-vous que ampL'amplificateur est éteint et débranché de la prise de courant.
- Connect your speakers to the "SPEAKERS OUTPUT" terminals on the rear panel.
- Faites correspondre la borne positive (+) de amplifier (red) to the positive (+) terminal of your speaker, and the negative (-) terminal (black) to the negative (-) terminal.
- The AS-170RU supports two groups of speakers (A and B). You can connect one pair to "SPEAKERS A" and another to "SPEAKERS B".
- Assurez-vous que l'impédance de vos haut-parleurs corresponde à celle de l'amplificateur. amplifier's specifications: 4-16 ohms for A or B, or 8-16 ohms for A+B.
5.2 Connexion des sources audio
Use RCA cables to connect your audio components to the corresponding input jacks on the rear panel.
- Lecteur CD: Connect to the "CD" input.
- Lecteur de DVD: Connect to the "DVD" input.
- Magnétoscope: Connect to the "VCR" input.
- Auxiliary Device (e.g., smartphone, tablet): Connect to the "AUX/PHONO" input.
- Turntable: Connect to the "AUX/PHONO" input. If your turntable does not have a built-in pre-amplifier, you may need an external phono pre-amplifier.
5.3 Antennes de connexion
- Antenne FM : Connect the supplied FM wire antenna to the "FM COAX 75Ω" terminal. Extend the wire for optimal reception.
- Antenne AM : Connect the supplied AM loop antenna to the "AM LOOP ANT" terminals. Position the loop for best reception.
5.4 Connexion d'alimentation
Une fois tous les branchements audio et haut-parleurs effectués, branchez le amplifier's power cord into a suitable AC power outlet.
6. Mode d'emploi
6.1 Fonctionnement de base
- Marche/Arrêt : Press the Power button on the front panel or the STANDBY button on the remote control to turn the amplifier allumé ou éteint.
- Sélectionnez la source d'entrée : Press the desired input selector button on the front panel (CD, DVD, VCR, AUX/PHONO) or the remote control (CD, DVD, VCR, AUX/PHONO, USB/TUNER).
- Régler le volume : Rotate the Volume knob on the front panel or use the VOL +/- buttons on the remote control to adjust the sound level.
- Muet: Press the MUTE button on the remote control to temporarily silence the audio. Press it again to restore sound.
6.2 Lecture USB/MP3
- Insert a USB storage device (flash drive) into the USB port on the front panel.
- Select "USB/TUNER" as the input source. The amplifier will automatically detect and begin playing MP3 files.
- Use the playback controls on the remote control (Play/Pause, Stop, Skip Track, Folder/Track) to navigate and control your music.
- The VFD display will show track information, including ID3 tags si disponible.
- Le amplifier supports up to 65,000 indexable folders and files, with a maximum of 8 folder levels.
Fonctionnement du tuner AM/FM 6.3
- Select "USB/TUNER" as the input source, then press the AM/FM button on the remote control to switch between AM and FM bands.
- Analyse automatique : Press the SCAN button on the remote control to automatically search for and store available radio stations.
- Réglage manuel: Use the tuning buttons (usually arrow keys) on the remote control to manually adjust the frequency.
- Stations préréglées : Le amplifier supports 64 presets. Use the MEMORY button to store and recall your favorite stations.
- Fonction RDS : If available, press the RDS button on the remote control to display Radio Data System information (e.g., station name, program type).
Entrées microphone 6.4
- Connect microphones to the 6.3mm MIC 1 and MIC 2 jacks on the front panel.
- Adjust the independent volume controls for each microphone to achieve the desired level.
6.5 Tone and Balance Control
Le amplifier allows adjustment of bass, treble, and balance through its menu system or dedicated buttons on the remote control. Refer to the remote control section for specific buttons like EQ OFF, BASS, TREBLE.
7. Entretien
- Nettoyage: Débranchez l'appareil avant de le nettoyer. Essuyez les surfaces extérieures avec un chiffon doux et sec. N'utilisez pas de nettoyants abrasifs, de cires ni de solvants.
- Ventilation: Vérifiez régulièrement que les ouvertures de ventilation sont dégagées de poussière et de débris.
- Stockage: Si vous devez entreposer l'appareil pendant une période prolongée, débranchez-le de la prise de courant et rangez-le dans un endroit frais et sec, à l'abri de la lumière directe du soleil et des températures extrêmes.
8. Dépannage
If you encounter problems with your amplifier, refer to the following table for possible solutions.
| Problème | Cause possible | Solution |
|---|---|---|
| Pas de courant | Cordon d'alimentation non branché ; prise de courant défectueuse ; Amplifier en mode veille. | Ensure power cord is securely plugged in. Test the outlet with another device. Press the Power/STANDBY button. |
| Pas de son | Entrée incorrecte sélectionnée ; Volume trop faible ; Haut-parleurs mal connectés ; Fonction Muet activée. | Select the correct input source. Increase volume. Check speaker connections. Deactivate MUTE. |
| Mauvaise réception radio | Antenne non connectée ou mal positionnée ; interférences. | Connect and adjust the position of the AM/FM antennas. Move the ampL'amplificateur doit être tenu à l'écart des autres appareils électroniques. |
| La lecture USB ne fonctionne pas | Périphérique USB mal inséré ; Incompatible file format; USB device faulty. | Assurez-vous que le périphérique USB est complètement inséré. Vérifiez si fileLes fichiers sont au format MP3. Essayez un autre périphérique USB. |
| Amplifier turns off unexpectedly or cycles power | Overheating; Short circuit in speaker wiring; Internal fault. | Ensure adequate ventilation. Check speaker wires for frayed strands causing short circuits. If the problem persists, disconnect power and contact qualified service personnel. |
9. Spécifications
- Modèle: AS-170RU
- Puissance de sortie : 80 + 80 W RMS at 4 Ω
- Impédance du haut-parleur : 4-16 Ω (A or B), 8-16 Ω (A+B)
- Protection: 3 circuits (short circuits, overload, overvoltage)
- Lecteur USB : MP3 file lecture, ID3 tag support. Max 65,000 indexable folders/files, max 8 folder levels.
- Tuner: Digital AM/FM, 64 presets, RDS.
- Entrées : 2 x Microphone (6.3mm), 4 x RCA (CD, DVD, VCR, AUX/Phono), 1 x RCA (AMP DANS).
- Résultats : 1 x RCA (REC OUT), 1 x RCA (PRE OUT), Headphone (6.3mm).
- Afficher: Blue VFD.
- Contrôle de tonalité: Bass, Treble, Balance (via menu/remote).
- Dimensions: 40 x 40 x 60 cm (environ 15.7 x 15.7 x 23.6 pouces)
- Poids: 7.2 kg (environ 15.87 lb)
10. Garantie et assistance
For warranty information and technical support, please refer to the warranty card included with your product or contact your authorized Fonestar dealer. Do not attempt to repair the unit yourself, as this may void your warranty.


