Introduction
Merci pour votre achatasing the GPX Weatherx WR282B Weather and Alert Radio. This portable radio is designed to provide you with AM/FM radio reception and access to all 7 NOAA weatherband channels, ensuring you stay informed during various conditions. It offers flexible power options, operating on either AC power or D-size batteries, making it suitable for both indoor and outdoor use.
Veuillez lire attentivement ce manuel avant d'utiliser l'appareil afin d'en garantir une utilisation correcte et d'optimiser ses performances et sa durée de vie.
Informations importantes sur la sécurité
- Lire les instructions : Toutes les consignes de sécurité et d'utilisation doivent être lues avant d'utiliser le produit.
- Conserver les instructions : Les instructions de sécurité et d’utilisation doivent être conservées pour référence ultérieure.
- Tenez compte des avertissements : Tous les avertissements figurant sur le produit et dans le mode d’emploi doivent être respectés.
- Suivez les instructions : Toutes les instructions d’utilisation et de fonctionnement doivent être respectées.
- Eau et humidité : Do not use this product near water (e.g., near a bathtub, washbowl, kitchen sink, laundry tub, in a wet basement, or near a swimming pool).
- Nettoyage: Nettoyer uniquement avec un chiffon sec.
- Ventilation: Ne pas obstruer les ouvertures de ventilation. Procéder à l'installation conformément aux instructions du fabricant.
- Chaleur: Ne pas installer à proximité de sources de chaleur telles que radiateurs, bouches de chauffage, poêles ou autres appareils (y compris amp(échangeurs thermiques) qui produisent de la chaleur.
- Protection du cordon d'alimentation: Protégez le cordon d’alimentation pour éviter qu’il ne soit piétiné ou pincé, en particulier au niveau des fiches, des prises de courant et du point de sortie de l’appareil.
- Foudre: Débranchez cet appareil en cas d’orage ou lorsqu’il n’est pas utilisé pendant de longues périodes.
- Entretien: Confiez toute réparation à un technicien qualifié. Une réparation est nécessaire lorsque l'appareil a été endommagé de quelque façon que ce soit, par exemple si le cordon d'alimentation ou la prise sont endommagés, si du liquide a été renversé ou si des objets sont tombés à l'intérieur de l'appareil, si l'appareil a été exposé à la pluie ou à l'humidité, s'il ne fonctionne pas normalement ou s'il est tombé.
Caractéristiques
- Tuner radio AM/FM
- Weatherband - All 7 NOAA Channels
- Swivel Telescopic Antenna
- Contrôle du volume
- Audio Line Input (Auxiliary Input)
- Poignée de transport intégrée
- Dual Power Options: AC/DC Adapter or 3 x 'D' Batteries
Contenu du colis
- GPX Weatherx WR282B Weather and Alert Radio
- Adaptateur secteur CA/CC
- Manuel de l'utilisateur (ce document)
Commandes et indicateurs
Familiarize yourself with the various controls and indicators on your WR282B radio.
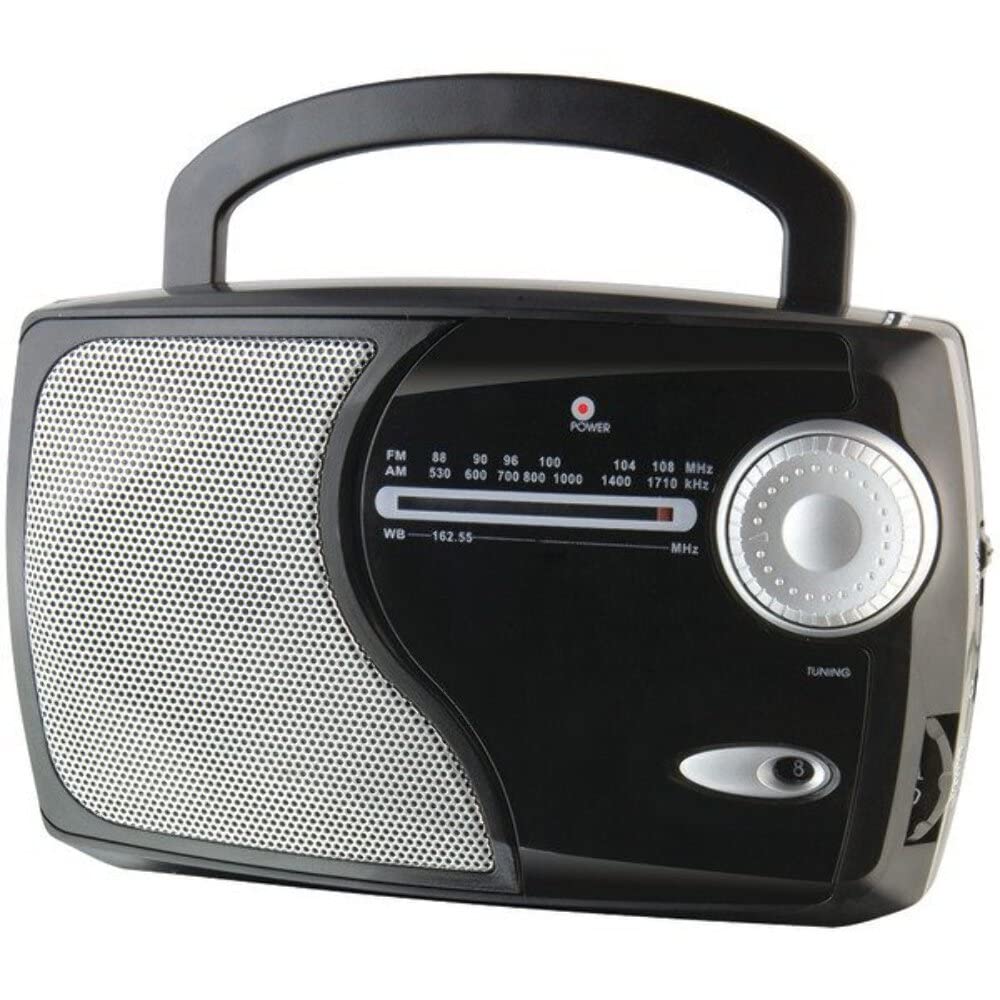
Image : Avant view of the GPX Weatherx WR282B radio, showing the speaker, tuning dial, and control knobs.
- Bouton d'alimentation/volume : Turns the radio on/off and adjusts the audio output level.
- Sélecteur de bande : Selects between AM, FM, and Weatherband (WB) modes.
- Bouton de réglage : Adjusts the frequency to tune into desired radio stations or weather channels.
- Indicateur de réglage : Illuminates when a strong signal is received.
- Cadran de fréquence : Affiche la fréquence radio actuelle.
- Antenne télescopique : Extendable antenna for improved FM and Weatherband reception.
- Entrée auxiliaire (AUX IN) : Prise jack 3.5 mm pour connecter des périphériques audio externes.
- Entrée de courant alternatif: Jack for connecting the included AC/DC power adapter.
- Compartiment à piles : Located on the back, holds 3 'D' size batteries.
- Poignée de transport : Pour une portabilité facile.
Installation
Alimenter la radio
The WR282B radio can be powered using either the included AC/DC power adapter or three 'D' size batteries.
1. AC Power Operation
- Ensure the radio is turned off by rotating the Power/Volume knob counter-clockwise until it clicks.
- Insert the small plug of the AC/DC power adapter into the AC Power Input jack on the radio.
- Plug the other end of the AC/DC power adapter into a standard wall outlet (AC 120V~60Hz).
- La radio est maintenant prête à être utilisée avec une alimentation secteur.
Note: Lorsque l'adaptateur secteur est branché, l'alimentation par batterie est automatiquement coupée.
2. Battery Power Operation
- Assurez-vous que la radio est éteinte.
- Localisez le compartiment à piles à l'arrière de la radio.
- Ouvrez le couvercle du compartiment à piles.
- Insert three (3) 'D' size batteries (not included) into the compartment, observing the correct polarity (+/-) as indicated inside the compartment.
- Fermez soigneusement le couvercle du compartiment à piles.
- La radio est maintenant prête à être utilisée sur batterie.
Important: Remove batteries if the radio will not be used for an extended period to prevent leakage and damage.
Mode d'emploi
1. Turning On and Adjusting Volume
- Faites pivoter le Bouton d'alimentation/volume clockwise to turn on the radio. Continue rotating to increase the volume to a comfortable listening level.
- Pour éteindre la radio, tournez le Bouton d'alimentation/volume counter-clockwise until it clicks.
2. Selecting a Radio Band (AM/FM/Weatherband)
- Utilisez le Commutateur de sélection de bande to choose your desired listening mode:
- UN M: Pour AmpStations de radio à modulation de fréquence.
- FM: Pour les stations de radio à modulation de fréquence.
- WB: For NOAA Weatherband channels.
3. Tuning to a Station or Channel
- Prolongez le Antenne télescopique fully for optimal FM and Weatherband reception. For AM reception, the radio has a built-in antenna, and adjusting the radio's position may improve reception.
- Faites pivoter le Bouton d'accord to scan through frequencies on the Cadran de fréquence.
- When a strong signal is received, the Indicateur de réglage la lumière s'allumera.
- For Weatherband (WB) mode, tune to one of the 7 NOAA weather channels (162.400 MHz to 162.550 MHz).
4. Using the Auxiliary Input (AUX IN)
- Connect a 3.5mm audio cable (not included) from your external audio device (e.g., MP3 player, smartphone) to the Entrée auxiliaire (AUX IN) jack on the radio.
- Ensure the radio is turned on and the volume is adjusted.
- The audio from your external device will now play through the radio's speaker. Control playback and track selection from your external device.
Entretien
- Nettoyage: Essuyez l'extérieur de la radio avec un chiffon doux et sec. N'utilisez pas de nettoyants abrasifs, de cires ni de solvants.
- Remplacement de la batterie : Replace all three 'D' batteries when the radio's performance diminishes or if the unit will not be used for an extended period. Always replace with new batteries of the same type.
- Stockage: When storing the radio for a long time, remove the batteries to prevent leakage. Store in a cool, dry place away from direct sunlight and extreme temperatures.
- Entretien de l'antenne : Manipulez l'antenne télescopique avec précaution pour éviter de la plier ou de la casser.
Dépannage
| Problème | Cause possible | Solution |
|---|---|---|
| Pas de courant |
|
|
| Mauvaise réception radio |
|
|
| Aucun son provenant de l'entrée AUX |
|
|
Caractéristiques
- Modèle: WR282B
- Bandes radio : AM, FM, Weatherband (7 NOAA channels)
- Source d'alimentation : AC 120V~60Hz (via included adapter) or 3 x 'D' Batteries (not included)
- Connectivité : Entrée auxiliaire 3.5 mm
- Antenne: Telescopic (FM/WB), Built-in Ferrite Bar (AM)
- Dimensions du produit : 8.86" L x 2.76" W x 5.51" H (approximately)
- Poids de l'article : 1.06 livre (sans les piles)
Garantie et assistance
For detailed warranty information and customer support, please refer to the warranty card included with your product or visit the official GPX webConsultez le site. Conservez votre reçu d'achat comme preuve d'achat pour toute réclamation au titre de la garantie.
If you experience issues not covered in the troubleshooting section, please contact GPX customer service for assistance.