1. Introduction
The AAXA P300 Pico Projector is a compact, high-definition projector designed for portability and versatility. It features a native 1280x800 HD resolution, 500 LED lumens, and a rechargeable battery, making it suitable for various applications including business presentations, home entertainment, and travel. This manual provides essential information for the proper setup, operation, and maintenance of your P300 projector.
2. Contenu du colis
Veuillez vérifier que tous les éléments énumérés ci-dessous sont inclus dans votre colis :
- AAXA P300 Pico Projector
- Adaptateur secteur
- Télécommande
- Mini trépied
- Manuel d'utilisation
3. Produit terminéview
Familiarize yourself with the physical components and ports of your P300 projector.

Figure 3.1 : Devant et dessus view of the AAXA P300 Pico Projector, illustrating its compact size and dimensions (5.9 x 3.8 x 1.5 inches).
3.1 Panneaux arrière et latéraux
The projector features various input and output ports for connectivity.

Figure 3.2 : Arrière/Côté view of the projector, showing the USB port for media playback and the Mini VGA port for computer connections.
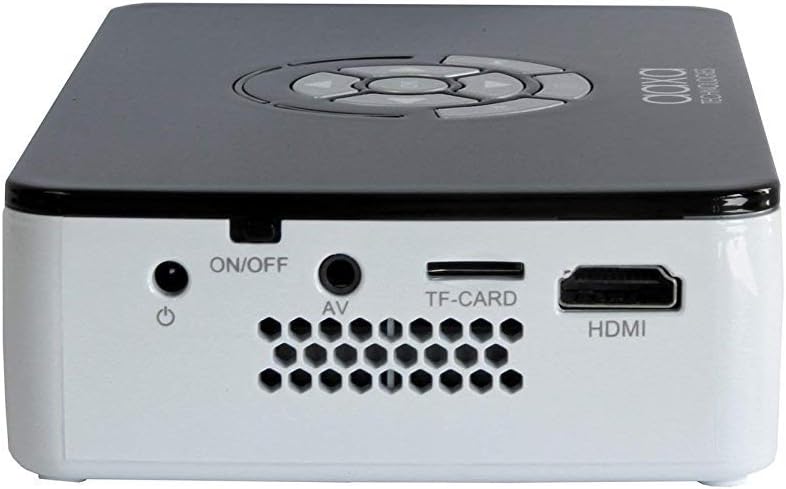
Figure 3.3 : Right side panel, featuring the HDMI input, AV (composite) input, TF-CARD slot, and the power ON/OFF button.

Figure 3.4 : Left side panel, highlighting the focus adjustment wheel for image clarity.
4. Installation
4.1 Mise sous/hors tension
- Connect the power adapter to the projector's DC input and then to a power outlet.
- Appuyez et maintenez enfoncé le MARCHE/ARRÊT button located on the side panel until the projector powers on.
- Pour mettre hors tension, maintenez la touche MARCHE/ARRÊT button again until the projector shuts down.
4.2 Connexion d'appareils
The P300 supports multiple input sources:
- HDMI: Connect an HDMI cable from your device (laptop, gaming console, streaming stick) to the projector's HDMI port.
- Mini VGA: Use a Mini VGA to VGA cable (sold separately) to connect to a computer's VGA output.
- Composite A/V : Use a 3.5mm to RCA composite A/V cable (sold separately) to connect to devices with RCA outputs.
- USB: Insérez une clé USB dans le port USB pour une lecture multimédia directe.
- CARTE TF : Insert a MicroSD card into the TF-CARD slot for direct media playback.
4.3 Réglage de la mise au point
To achieve a clear image, adjust the focus wheel on the side of the projector until the projected image is sharp.
4.4 Positioning and Projection Size
Place the projector on a stable, flat surface. The included mini tripod can be used for angle adjustments. The P300 can project an image up to 120 inches diagonally in low-light conditions.

Figure 4.1 : The AAXA P300 projector mounted on its mini tripod, demonstrating flexible positioning options.
5. Mode d'emploi
5.1 Navigation dans les menus
Use the directional buttons on the projector or the remote control to navigate through the on-screen menu. Press the OK / Entrer bouton pour sélectionner les options.
5.2 Lecture multimédia
When a USB drive or TF-CARD is inserted, the projector's onboard media player can be accessed through the main menu. Select the desired file type (video, photo, music, text) and navigate to your content for playback.
5.3 Utilisation de la batterie
The P300 features a built-in rechargeable lithium-ion battery providing approximately 60 minutes of operation. The battery charges automatically when the projector is connected to the power adapter. For optimal battery life, fully charge the projector before first use and avoid completely draining the battery frequently.
6. Entretien
6.1 Nettoyage
- Lentille: Use a soft, lint-free cloth or lens cleaning wipes specifically designed for optical surfaces. Avoid abrasive materials.
- Casing: Essuyez l'extérieur du projecteur avec un chiffon doux et sec. N'utilisez pas de nettoyants liquides ni de solvants.
- Vents: Ensure the ventilation openings are clear of dust and debris to prevent overheating. Use compressed air if necessary.
6.2 Entretien de la batterie
- Rangez le projecteur dans un endroit frais et sec lorsqu’il n’est pas utilisé.
- If storing for extended periods, charge the battery to approximately 50% every few months to maintain battery health.
7. Dépannage
-
Aucune image/aucun signal :
Ensure the correct input source is selected in the projector's menu. Verify all cables are securely connected. Test with a different source device or cable if possible. -
Image floue :
Adjust the focus wheel on the side of the projector. Ensure the projection surface is flat and the projector is at an appropriate distance. -
Pas de son :
Check the volume settings on both the projector and the source device. Ensure external speakers are connected correctly if used. The internal speaker may have limited output. -
Surchauffe du projecteur :
Ensure ventilation vents are not blocked. Operate the projector in a well-ventilated area. -
La batterie ne charge pas :
Vérifiez que l'adaptateur secteur est correctement branché et que la prise de courant est fonctionnelle.
8. Spécifications
| Fonctionnalité | Spécification |
|---|---|
| Résolution d'affichage | 1280 x 800 (Natif) |
| Luminosité | 500 lumens LED |
| Technologie de connectivité | HDMI, Mini VGA, Composite A/V (3.5mm Jack), 5 Pin Mini USB 2.0 |
| Dimensions du produit | 5.9 x 3.8 x 1.5 pouces |
| Poids de l'article | 15.5 onces |
| Piles | 2 Lithium Ion batteries (included, internal) |
| Fabricant | AAXA |
| Numéro de modèle | KP-600-01 |
9. Garantie et assistance
For warranty information, technical support, or service inquiries, please refer to the official AAXA Technologies webConsultez leur site web ou contactez directement leur service client. Conservez votre reçu d'achat comme preuve d'achat pour toute réclamation au titre de la garantie.
AAXA Technologies Contact Information:
S'il vous plaît visitez www.aaxatech.com for the most current support resources and contact details.


