1. Introduction
Thank you for choosing the Craftsman Digital 400A AC Clamp-On Ammeter, Model 82372. This instrument is designed for safe and accurate measurement of AC current without breaking the circuit, as well as AC/DC voltage, resistance, frequency, capacitance, continuity, diode, and temperature. Please read this manual thoroughly before use to ensure proper operation and to prevent potential hazards.
2. Consignes de sécurité
WARNING: To avoid electric shock or personal injury, read and understand all safety information before using this meter.
- Respectez toujours les codes de sécurité locaux et nationaux.
- N’utilisez pas l’appareil de mesure s’il semble endommagé ou si les cordons de test sont endommagés.
- Ne pas appliquer plus que le volume nominal.tage, comme indiqué sur le compteur, entre les bornes ou entre toute borne et la terre.
- Soyez prudent lorsque vous travaillez avec des volumestages au-dessus de 30 V CA RMS, 42 V crête ou 60 V CC. Ces voltagils présentent un risque d'électrocution.
- Gardez vos doigts derrière les protections des cordons de test pendant les mesures.
- Ne faites pas fonctionner le multimètre à proximité de gaz explosifs, de vapeur ou de poussière.
- Before measuring current, ensure the meter is set to the correct function and range.
- Débranchez les cordons de test du circuit avant de modifier les fonctions.
- Remplacez immédiatement la batterie dès que le voyant de batterie faible s'allume.
- This meter is rated for Category III - 600V.
3. Produit terminéview
The Craftsman Digital 400A AC Clamp-On Ammeter features a compact design for measurements in tight locations and an extra-large 4000 count LCD screen for clear readings.
3.1 Meter Components

Figure 1: Top Section of the Ammeter
This image displays the upper portion of the Craftsman Digital 400A AC Clamp-On Ammeter. Visible components include the clamp jaw for non-contact current measurement, the rotary function dial with settings for AC current (2A, 20A, 200A, 400A), resistance (Ω), DC voltage (VDC), AC voltage (VAC), and OFF. The yellow 'MAX' button and 'HOLD' button are also shown, along with the 'AUTO POWER OFF' indicator.
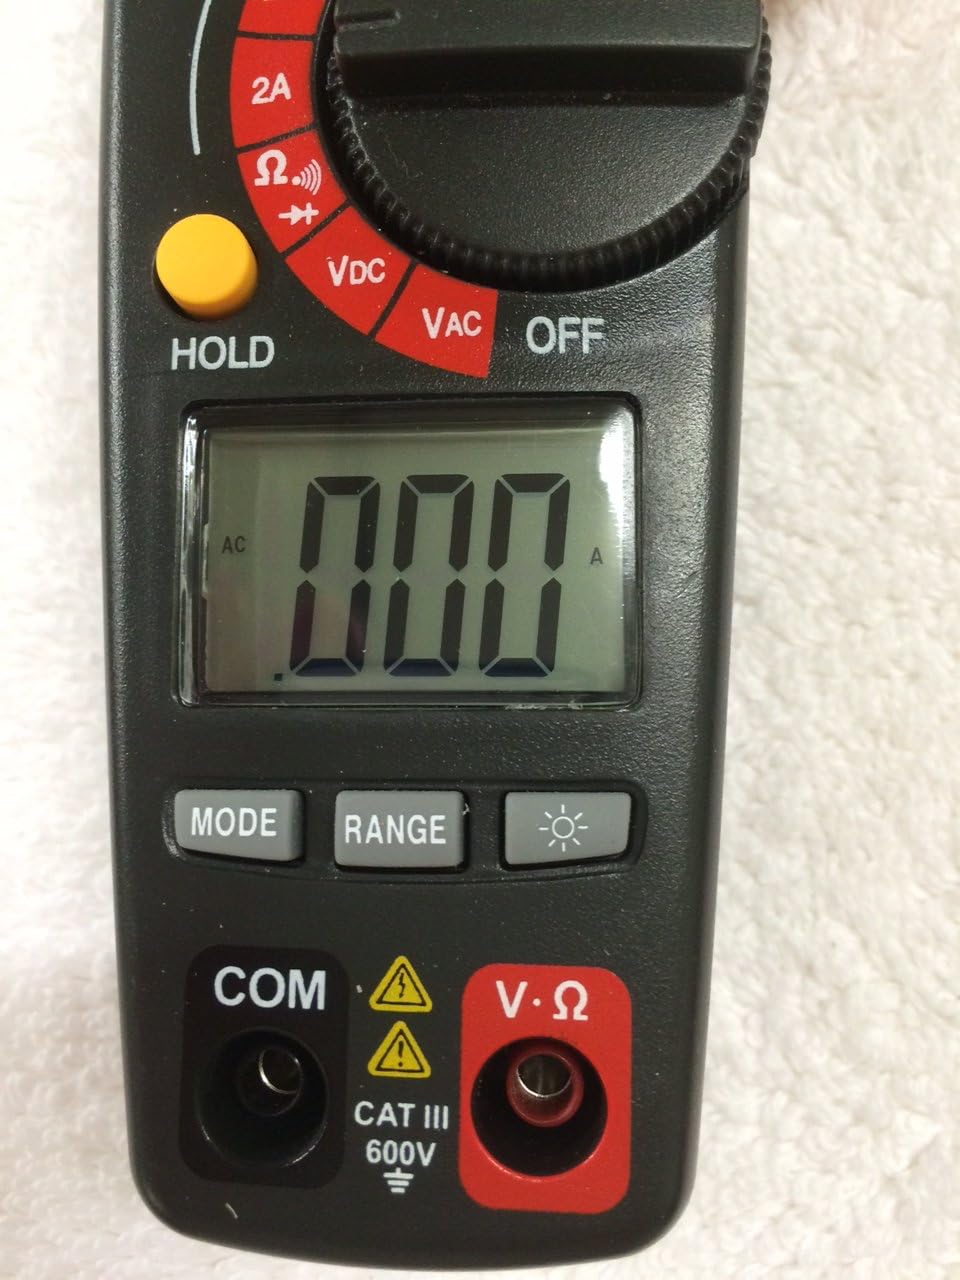
Figure 2: Bottom Section of the Ammeter
This image shows the lower part of the Craftsman Digital 400A AC Clamp-On Ammeter. Key features include the large LCD display, the 'MODE' button, 'RANGE' button, and the backlight button (indicated by a light bulb icon). Below the display are the input jacks: 'COM' (common) and 'V·Ω' (voltage/resistance) with a CAT III 600V safety rating warning.
- Clamp Mâchoire: Used for non-contact AC current measurements.
- Cadran de fonction : Selects the desired measurement function (AC Current, Voltage, Resistance, etc.) and turns the meter ON/OFF.
- Écran LCD : Affiche les mesures, les unités et les indicateurs de fonction.
- Bouton MAX : Toggles between maximum value hold and normal operation.
- Bouton MAINTENIR : Fige la lecture actuelle affichée.
- Bouton MODE : Selects between different functions within a dial setting (e.g., AC/DC voltage, continuité/diode).
- Bouton GAMME : Manually selects measurement range or returns to auto-ranging.
- Bouton de rétroéclairage : Active le rétroéclairage de l'écran pour une meilleure visibilité en faible luminosité.
- Input Jacks (COM, V·Ω): Pour connecter les cordons de test pour voltage, resistance, continuity, diode, capacitance, and frequency measurements.
4. Installation
4.1 Installation de la batterie
The meter requires batteries for operation. To install or replace batteries:
- Ensure the meter is OFF and disconnect any test leads.
- Repérez le couvercle du compartiment à piles à l'arrière de l'appareil.
- Dévissez la ou les vis de fixation et retirez le couvercle.
- Insérez les piles neuves en respectant la polarité (+ et -).
- Remettez le couvercle du compartiment à piles en place et fixez-le avec la ou les vis.
Note: The meter features auto power off to conserve battery life.
5. Mode d'emploi
Before taking any measurements, ensure the meter is in good condition and the test leads are properly connected (if applicable).
5.1 Mesure du courant alternatif (Clamp Une fonction)
This function allows non-contact measurement of AC current up to 400A.
- Turn the function dial to the desired AC current range (2A, 20A, 200A, or 400A).
- Appuyez sur la touche clamp déclencher l'ouverture du clamp mâchoire.
- Enfermer un seul conducteur (et non un faisceau de fils) à l'intérieur de la clôtureamp mâchoire. Assurez-vous que la mâchoire est complètement fermée.
- Lisez la valeur du courant alternatif sur l'écran LCD.
Note: For accurate readings, ensure only one conductor is inside the clamp mâchoire.
5.2 Mesure du vol AC/DCtage
The meter measures AC/DC voltage jusqu'à 600V.
- Insert the black test lead into the COM jack and the red test lead into the V·Ω jack.
- Turn the function dial to the VDC or VAC position.
- If measuring DC voltage, press the MODE button to select DC if necessary.
- Connectez les sondes de test aux bornes du circuit ou du composant à mesurer.
- Lire le voltage valeur sur l'écran LCD.
5.3 Mesure de la résistance (Ω)
Measures resistance in Ohms (Ω).
- Insert the black test lead into the COM jack and the red test lead into the V·Ω jack.
- Turn the function dial to the Ω position.
- Assurez-vous que le circuit ou le composant est hors tension avant de mesurer la résistance.
- Connectez les sondes de test aux bornes du composant.
- Lisez la valeur de résistance sur l'écran LCD.
5.4 Test de continuité et de diode
These functions are typically accessed via the Ω setting using the MODE button.
- Insert the black test lead into the COM jack and the red test lead into the V·Ω jack.
- Turn the function dial to the Ω position.
- Press the MODE button repeatedly until the continuity symbol (a speaker icon) or diode symbol (a triangle with a line) appears on the display.
- For continuity: Connect probes across the circuit. A continuous beep indicates a complete circuit.
- For diode: Connect probes across the diode. A forward bias voltage drop will be displayed. Reverse bias should show OL (open loop).
5.5 Measuring Frequency and Capacitance
The meter supports frequency and capacitance measurements, typically accessed through the V·Ω input and MODE button.
- Insert the black test lead into the COM jack and the red test lead into the V·Ω jack.
- Turn the function dial to the appropriate setting (often shared with voltage or resistance, requiring MODE selection).
- Press the MODE button until the frequency (Hz) or capacitance (F) symbol appears.
- Connect the test probes to the circuit or component.
- Lisez la valeur sur l'écran LCD.
5.6 Temperature Measurement (Type K Thermometer)
The meter includes a Type K thermometer for surface or air temperature measurements.
- Ensure the meter is OFF and disconnect any test leads.
- Insert the Type K thermocouple probe into the designated input jacks (usually marked with 'TEMP' or shared with V·Ω, check meter markings).
- Turn the function dial to the temperature setting (often marked with °C or °F).
- Placez l'extrémité du thermocouple sur ou près de l'objet dont vous souhaitez mesurer la température.
- Lisez la température sur l'écran LCD.
5.7 Data Hold and Max Hold
- Bouton MAINTENIR : Appuyez sur le bouton HOLD pour figer la lecture actuelle affichée. Appuyez de nouveau pour relâcher.
- Bouton MAX : Press the MAX button to capture and display the maximum measured value. Press again to exit MAX hold.
6. Entretien
6.1 Nettoyage
Essuyez le compteur avec de la publicitéamp cloth and mild detergent. Do not use abrasives or solvents. Keep the clamp jaw free of dust and debris.
6.2 Remplacement de la batterie
Refer to Section 4.1 for battery installation/replacement instructions. Replace batteries when the low battery indicator appears on the display to ensure accurate readings.
6.3 Stockage
If the meter is not used for an extended period, remove the batteries to prevent leakage. Store the meter in a cool, dry place away from direct sunlight.
7. Dépannage
| Problème | Cause possible | Solution |
|---|---|---|
| Le compteur ne s'allume pas. | Piles mortes ou mal installées. | Vérifiez la polarité des piles ; remplacez les piles. |
| "OL" (Surcharge) affiché. | La mesure dépasse la plage sélectionnée ou la capacité maximale du compteur. | Select a higher range or ensure measurement is within meter's specifications. |
| Lectures inexactes. | Low battery, incorrect function/range, poor test lead connection, external interference. | Replace batteries, verify function/range, ensure secure connections, move away from strong magnetic fields. |
| No reading for AC current. | Multiple conductors in clamp jaw, DC current being measured. | Ensure only one AC conductor is in the clamp. This meter measures AC current only. |
8. Spécifications
| Fonctionnalité | Spécification |
|---|---|
| Marque | Artisan |
| Modèle | 82372 |
| Type de mesure | Ammeter (Clamp-Sur) |
| Plage de courant alternatif | Jusqu'à 400A |
| Vol AC/DCtaget gamme | Jusqu'à 600 V |
| Résistance | Oui |
| Fréquence | Oui |
| Capacitance | Oui |
| Test de continuité | Oui |
| Test de diode | Oui |
| Mesure de la température | Thermomètre de type K |
| Afficher | Écran LCD 4000 points |
| Accuracy (AC Current) | 3.0% (VAC) - Note: Product description states 3.0% (VAC) for AC/DC current, which is unusual. Assuming it refers to AC current accuracy. |
| Cote de sécurité | Category III - 600V |
| Source d'énergie | Alimenté par batterie |
| Caractéristiques spéciales | One-touch auto zero, belt holster, molded rubber holster, auto on/off, Data Hold, Max Hold. |
9. Garantie et assistance
For warranty information and technical support, please refer to the official Craftsman webConsultez leur site web ou contactez leur service client. Conservez votre reçu d'achat comme preuve d'achat pour toute réclamation au titre de la garantie.
Craftsman Customer Service: S'il vous plaît visitez www.craftsman.com/support pour obtenir les informations d'assistance les plus récentes et les coordonnées.


