1. Introduction
This manual provides detailed instructions for the installation, operation, and maintenance of your Jennov K4-P52-V18 Wireless Solar Video Surveillance Camera Kit. Please read this manual thoroughly before using the product to ensure proper setup and functionality. Keep this manual for future reference.
2. Contenu du colis
Carefully unpack the box and verify that all the following items are included:
- 1 x NVR (V18) with Built-in 10-inch Touchscreen Monitor
- 4 x Wireless Solar Cameras
- 1 x 500GB HDD (Built-in)
- 1 x souris
- 1 x adaptateur secteur NVR
- 1 x 9V Battery (for NVR, included)
- 1 x Manuel d'utilisation (ce document)
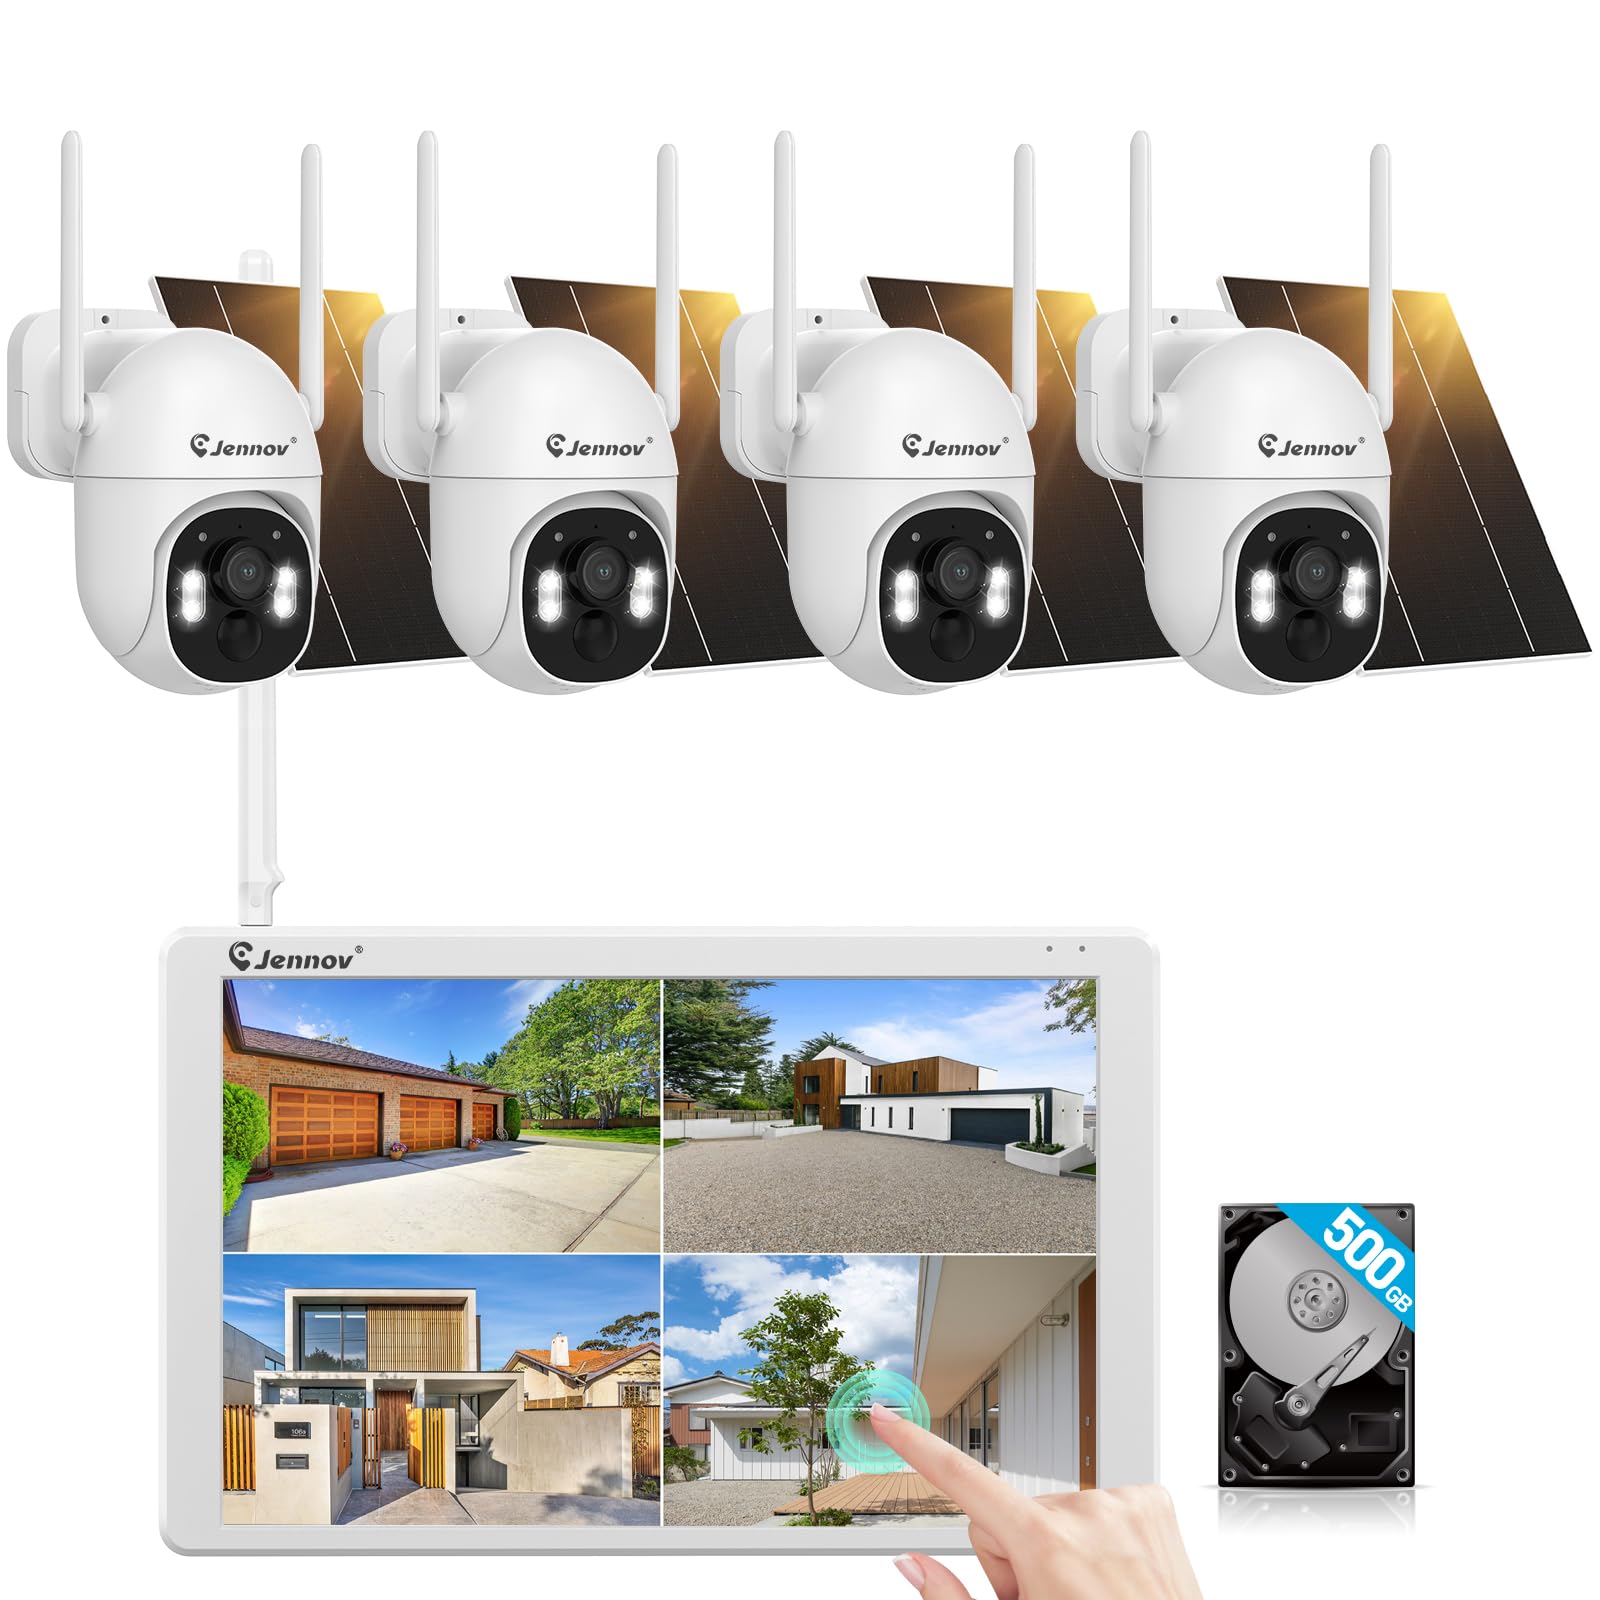
Image : Terminéview of the Jennov K4-P52-V18 Wireless Solar Video Surveillance Camera Kit, showing the NVR with monitor and multiple cameras.
3. Produit terminéview
The Jennov K4-P52-V18 is a comprehensive wireless video surveillance system designed for outdoor security. It features a 10-channel NVR with an integrated 10-inch touchscreen monitor for direct viewing and control. The system includes four 1920p resolution cameras, each powered by a solar panel, offering wireless connectivity and PTZ (Pan-Tilt-Zoom) functionality for flexible monitoring. A 500GB hard disk drive (HDD) is pre-installed for local video storage.
4. Installation
4.1 Configuration du NVR
- Placement: Place the NVR in a secure, central location within your property, ensuring it is within Wi-Fi range of the cameras.
- Connexion électrique : Connect the NVR power adapter to the NVR's power input and then to a power outlet. The NVR will power on automatically.
- Connexion de la souris : Connect the included USB mouse to a USB port on the NVR for navigation.
- Démarrage initial : The NVR will boot up and display the initial setup wizard on the 10-inch touchscreen. Follow the on-screen prompts to configure basic settings such as language, time zone, and password.
4.2 Installation de la caméra
- Sélection de l'emplacement : Choose suitable outdoor locations for each camera, ensuring a clear line of sight to the monitoring area and sufficient sunlight exposure for the solar panel. The cameras are designed for wall mounting.
- Montage: Use the provided mounting hardware to securely attach each camera to a wall or other stable surface. Adjust the camera angle for optimal coverage.
- Connexion du panneau solaire : Ensure the solar panel is securely connected to the camera and positioned to receive maximum direct sunlight throughout the day.
- Appariement (si nécessaire) : The cameras are typically pre-paired with the NVR. If a camera does not connect automatically, refer to the NVR's on-screen menu for manual pairing instructions.
4.3 Configuration du réseau
Pour activer la télécommande viewing and software updates, connect the NVR to your home Wi-Fi network:
- On the NVR touchscreen, navigate to Paramètres du système > Réseau.
- Sélectionner Wifi and choose your network from the list of available networks.
- Enter your Wi-Fi password and confirm the connection.
5. Mode d'emploi
5.1 En direct View
After successful setup, the NVR will display the live feed from all connected cameras on the 10-inch monitor. You can tap on a specific camera feed to view en plein écran.
5.2 Contrôle PTZ
For cameras with PTZ functionality:
- In full-screen live view, look for PTZ control icons on the screen.
- Tap the directional arrows to pan (left/right) and tilt (up/down) the camera.
- Use the zoom in/out icons to adjust the optical or digital zoom.
5.3 Enregistrement et lecture
The system automatically records video to the built-in 500GB HDD based on motion detection or continuous recording settings. To access recorded footage:
- Dans le menu principal, sélectionnez Lecture.
- Choisissez l'appareil photo souhaité et la plage de dates/heures.
- Use the timeline to navigate through recordings and play back events.
5.4 Accès à distance
Download the official Jennov mobile application (available on iOS and Android) to view live feeds, playback recordings, and receive alerts remotely. Follow the app's instructions to add your NVR system using its unique ID or QR code.
6. Entretien
- Nettoyage: Nettoyez régulièrement les objectifs de l'appareil photo et les panneaux solaires avec un chiffon doux et sec.amp Tissu pour garantir des images nettes et une recharge solaire efficace. Ne pas utiliser de produits chimiques agressifs.
- Mises à jour logicielles : Periodically check for firmware updates for the NVR and cameras through the system settings or the mobile app to ensure optimal performance and security.
- Gestion des disques durs : The 500GB HDD will overwrite older footage once full. If you need to retain specific recordings, back them up to an external USB drive.
- Vérification de la batterie : Ensure the 9V battery in the NVR is functioning correctly, especially if experiencing power interruptions.
7. Dépannage
| Problème | Cause possible | Solution |
|---|---|---|
| Aucune image sur le moniteur NVR | NVR not powered on; Camera not connected/powered; Loose cable | Check NVR power adapter; Ensure cameras are charged and within range; Reconnect all cables securely. |
| Cameras not recording | Recording settings incorrect; HDD full or faulty | Verify recording schedules in NVR settings; Check HDD status and free space; Format HDD if necessary (this will erase all data). |
| L'accès à distance ne fonctionne pas | NVR not connected to internet; Incorrect app settings | Check NVR Wi-Fi connection; Ensure NVR is online; Re-add NVR to the mobile app. |
| Commande PTZ non réactive | Camera power issue; Software glitch | Check camera power and solar charging; Restart the camera and NVR. |
8. Spécifications
| Fonctionnalité | Détail |
|---|---|
| Numéro de modèle | K4-P52-V18 |
| Marque | Jenov |
| Technologie de connectivité | Sans fil, Wi-Fi |
| Source d'énergie | Alimentation solaire |
| Caractéristiques spéciales | PTZ Technology, 10-inch Touchscreen Monitor |
| Résolution de capture vidéo | 1920p |
| Type de montage | Support mural |
| Composants inclus | NVR (V18), 4 Cameras, 500GB HDD (Built-in), Mouse, NVR Adapter, 9V Battery |
| Dimensions du produit | 18 x 39 x 27 cm |
| Poids de l'article | 4.16 kg |
| Fabricant | Shenzhen Dianchen industrielle Cie., Ltd |
9. Garantie et assistance
For warranty information and technical support, please refer to the documentation provided with your purchase or contact Jennov customer service directly. Contact details can typically be found on the manufacturer's official website ou sur l'emballage du produit.