
Introduction
Thank you for choosing the LIORQUE Wireless Weather Station YGH6208. This device provides accurate indoor and outdoor temperature and humidity readings, weather forecasts, and features a DCF radio-controlled clock with alarm functions. This manual will guide you through the setup, operation, and maintenance of your weather station.
Contenu du colis
- 1 x Station météo sans fil LIORQUE (unité principale)
- 1 x capteur extérieur
- 3 piles AAA (pour l'unité principale)
- 2 x AAA Batteries (for Outdoor Sensor)
- 1 x Manuel d'utilisation (ce document)
Produit terminéview
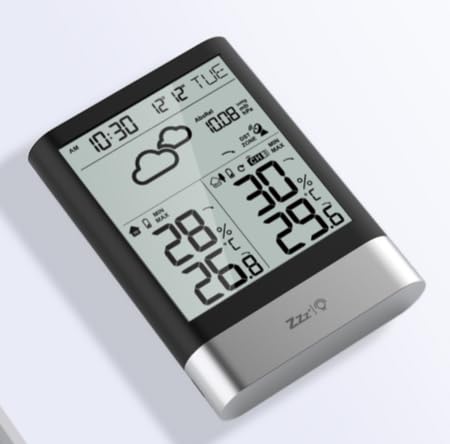
Image 1: LIORQUE Wireless Weather Station Main Unit. This image shows the front view of the main display unit, highlighting its LCD screen and compact design.
Caractéristiques de l'unité principale:
- 4.3-inch LCD screen with backlight
- Affichage de la température et de l'humidité intérieures
- Affichage de la température et de l'humidité extérieures
- Icônes de prévision météo
- DCF radio-controlled clock with manual setting option
- Double alarm clock with snooze function
- Calendar and day of the week display (7 languages)
- Enregistrements de température et d'humidité maximales/minimales
- Air pressure display and weather trend
- Affichage de l'heure 12/24 heures
Caractéristiques du capteur extérieur :
- Wireless transmission up to 100m (open area)
- Mesure de la température et de l'humidité
- Supports hanging or standing placement
- Data updated every 30 seconds
- Prend en charge jusqu'à 3 capteurs (un inclus)
Installation
1. Installation de la batterie
- Capteur extérieur : Open the battery compartment cover on the back of the outdoor sensor. Insert 2 x AAA batteries, ensuring correct polarity (+/-). Close the cover.
- Unité principale : Ouvrez le couvercle du compartiment à piles situé à l'arrière de l'appareil. Insérez 3 piles AAA en respectant la polarité (+/-). Refermez le couvercle.
- The main unit will power on and display indoor readings.
2. Appairage des capteurs
After installing batteries in both units, the main unit will automatically search for the outdoor sensor. The outdoor temperature and humidity should appear on the main unit's display within a few minutes. If the outdoor readings do not appear:
- Ensure both units are within range (up to 100m in open air).
- Appuyez sur le bouton « TX » situé à l'intérieur du compartiment à piles du capteur extérieur pour envoyer manuellement un signal.
- On the main unit, press and hold the "CHANNEL" button to initiate a manual search for the sensor.
3. Paramètres initiaux (Heure, Date, Unités)
The weather station will attempt to synchronize with the DCF radio signal for automatic time setting. This may take several hours, especially in areas with weak signals. You can manually set the time and date if needed.
- Réglage manuel de l'heure : Press and hold the "MODE" button to enter time setting mode. Use the "UP" and "DOWN" buttons to adjust values and "MODE" to confirm and move to the next setting (e.g., 12/24 hour format, hour, minute, year, month, day, language for day of week).
- Unités de température : Appuyez sur le bouton « °C/°F » pour basculer entre Celsius et Fahrenheit.
- Unités de pression d'air : Press the "BARO" button to cycle through air pressure units (e.g., hPa, inHg).
Mode d'emploi
Afficher les informations
The 4.3-inch LCD screen displays various information:
- Heure et date : Heure, date et jour de la semaine actuels.
- Lectures d'intérieur : Température et humidité intérieures actuelles.
- Lectures en plein air : Current outdoor temperature and humidity from the connected sensor.
- Prévisions météorologiques: Icônes indiquant les conditions météorologiques prévues (par exemple, ensoleillé, nuageux, pluvieux).
- Pression atmosphérique: Current atmospheric pressure and trend.
- Rétroéclairage : The screen backlight activates with a light touch and returns to normal brightness after 10 seconds to conserve battery.
Fonction réveil
The weather station features a double alarm clock with snooze.
- Réglage des alarmes : Appuyez sur le bouton « ALARME » pour view Alarm 1. Press "ALARM" again to view Alarm 2. Hold "ALARM" to enter alarm setting mode. Use "UP" and "DOWN" to adjust the hour and minute, and "ALARM" to confirm.
- Activation/Désactivation des alarmes : Alors que viewing an alarm, press "UP" to toggle it on or off. An alarm icon will appear when active.
- Fonction de répétition: When an alarm sounds, press any button (except "ALARM OFF") to activate snooze. The alarm will sound again after a set interval. Press "ALARM OFF" to stop the alarm completely.
Enregistrements maximum et minimum
The weather station records the maximum and minimum indoor/outdoor temperature and humidity values.
- Press the "MAX/MIN" button once to display maximum recorded values.
- Press "MAX/MIN" again to display minimum recorded values.
- Press "MAX/MIN" a third time to return to current readings.
- To clear records, hold the "MAX/MIN" button while viewles enregistrements.
Entretien
- Remplacement de la batterie : Remplacez les piles de l'unité principale et du capteur extérieur lorsque le témoin de batterie faible s'affiche. Remplacez toujours toutes les piles en même temps.
- Nettoyage: Nettoyez l'écran et les surfaces de l'appareil avec un chiffon doux et sec.amp chiffon. N'utilisez pas de nettoyants abrasifs ou de solvants.
- Emplacement du capteur extérieur : For optimal performance and longevity, install the outdoor sensor in a shaded area, protected from direct sunlight and rain. Ensure it is within the 100m wireless range of the main unit.
Dépannage
| Problème | Solution possible |
|---|---|
| Affichage de la température et de l'humidité extérieures absent. |
|
| Affichage de l'heure incorrect. |
|
| L'écran est sombre ou vide. |
|
| Les prévisions météorologiques semblent inexactes. |
|
Caractéristiques
- Modèle: YGH6208
- Marque: LIORQUE
- Type d'affichage : Écran LCD
- Source d'alimentation (unité principale) : Piles 3 x AAA (incluses)
- Source d'alimentation (capteur extérieur) : Piles 2 x AAA (incluses)
- Portée sans fil : Jusqu'à 100 m (zone ouverte)
- Précision de la température : ±0.5 °C
- Technologie des capteurs : Funk (sans fil)
- Caractéristiques spéciales : DCF Radio Clock, Alarm, Snooze, Weather Forecast, Max/Min Records, Backlight
- Composants inclus : Weather Station Main Unit, Outdoor Sensor
Garantie et assistance
Les produits LIORQUE sont conçus pour offrir fiabilité et performance. Pour toute information concernant la garantie ou l'assistance technique, veuillez consulter les coordonnées fournies avec votre achat ou visiter le site officiel de LIORQUE. webVeuillez conserver votre preuve d'achat pour toute réclamation au titre de la garantie.