1. Introduction
This manual provides detailed instructions for the FULODE X1-16C 16-Channel Audio Mixer. Please read this manual thoroughly before operating the device to ensure proper usage and to maximize its performance and longevity. This professional audio console is designed for various applications including studio recording, live performances, DJ events, and karaoke.

2. Consignes de sécurité
To prevent electric shock, fire, or damage to the device, please observe the following safety precautions:
- N'ouvrez pas l'appareil casing. Confiez toutes les interventions de maintenance à un personnel qualifié.
- Assurer l'alimentation voltage correspond aux exigences spécifiées sur l’appareil.
- Keep the device away from water, moisture, and excessive heat.
- Do not operate the device if the power cord is damaged or frayed.
- Débranchez toujours l'alimentation électrique avant de procéder au nettoyage ou à la maintenance.
- Utilisez uniquement les accessoires spécifiés par le fabricant.
3. Contenu du colis
Vérifiez que tous les éléments sont présents dans le colis :
- FULODE X1-16C 16-Channel Audio Mixer
- Power Adapter (AC 90-240V, 50-60Hz)
- Manuel d'utilisation
4. Produit terminéview: Commandes et connexions
The FULODE X1-16C mixer features a comprehensive layout for intuitive control over your audio. Familiarize yourself with the various inputs, outputs, and control elements.

4.1 Commandes du panneau avant
- Composite Interface: Combination XLR/TRS input for microphones and line-level signals.
- Interrupteur fantôme : Active l'alimentation fantôme +48V pour les microphones à condensateur.
- Réglage du gain : Controls the input sensitivity of each channel.
- Treble/Midrange/Bass Adjustment (3-Band EQ): Equalization controls for high, mid, and low frequencies on each channel.
- Réglage AUX : Contrôle le niveau d'envoi auxiliaire pour les effets externes ou les mixages de monitoring.
- Adjustment of Effect: Controls the amount of internal DSP effect applied to the channel.
- Équilibre du plateau : Ajuste la position stéréo du signal du canal.
- Channel Mute Switch: Active ou désactive le son de chaque canal.
- Pousseur de volume du canal : Fader to control the output level of each channel.
- Reverberation Effect Selection: Knob to select from 99 built-in DSP effects.
- Lecture USB/MP3 : Section for USB drive and Bluetooth audio input, with transport controls and digital display.
- Voyant de niveau : Affichage visuel des niveaux de sortie.
- Main Channel Seven Segment Balance: Égaliseur graphique pour la sortie stéréo principale.
- Réglage du volume du moniteur : Contrôle le volume de la sortie casque.
- Effect Main Volume Adjustment: Contrôle le niveau global de l'effet DSP sélectionné.
- Left/Right Main Volume Adjustment: Faders for the main stereo output.
- Earphone Monitoring Interface: 1/4" jack for headphone monitoring.
- MP3 Main Volume Adjustment: Controls the output level of the USB/MP3/Bluetooth section.
4.2 Connexions du panneau arrière
- Interrupteur: Allume ou éteint le mélangeur.
- Interface d'alimentation : Se connecte à l'adaptateur secteur fourni.
5. Installation
Follow these steps for initial setup of your FULODE X1-16C Audio Mixer.
5.1 Connexion d'alimentation
- Assurez-vous que l'interrupteur d'alimentation de la table de mixage est en position OFF.
- Connect the power adapter to the Power Interface on the rear panel of the mixer.
- Plug the power adapter into a suitable AC power outlet (110V).
- Turn the mixer's power switch to the ON position. The digital display should illuminate.
5.2 Connexion des microphones et des instruments
- For microphones or line-level instruments, connect them to the Composite Interface (XLR or 1/4" TRS) on the desired channel.
- Si vous utilisez un microphone à condensateur, appuyez sur Commutateur fantôme (+48V) for that specific channel. An indicator light will confirm activation.
- Ajustez le Réglage du gain knob for each input channel to achieve an optimal signal level without clipping.

5.3 Connexion des périphériques de sortie
- Connectez vos haut-parleurs principaux ou amplifier à la Main Output Interface (XLR or 1/4" TRS) on the top right of the mixer.
- For monitoring, connect headphones to the Earphone Monitoring Interface.
6. Mode d'emploi
6.1 Contrôle des canaux
- Gagner: Adjust the input gain for each channel to prevent clipping (indicated by the PEAK LED) and ensure a strong signal.
- Égaliseur 3 bandes : Use the HI, MID, and LOW knobs to shape the tone of each input.
- AUX: Control the amount of signal sent to the auxiliary output for external effects or monitor mixes.
- FX : Adjust the level of the internal DSP effect applied to the channel.
- LA POÊLE: Position the channel's signal in the stereo field (left to right).
- Muet: Press the MUTE button to instantly silence a channel.
- Fader de canal : Use the fader to control the overall volume of the channel in the main mix.
6.2 Effets DSP
The mixer includes 99 built-in 24-bit DSP effects for enhancing your sound.
- Utilisez le Reverberation Effect Selection knob to browse through the 99 available effects (e.g., Warm Room, Bright Room, Hall, Plate, Chorus, Delay). The digital display will show the selected effect number.
- Appuyez sur le bouton pour confirmer votre sélection.
- Ajustez le Effect Main Volume Adjustment to control the overall wet/dry mix of the effects.
- Use the individual channel's FX knob to send more or less of that channel's signal to the effects processor.

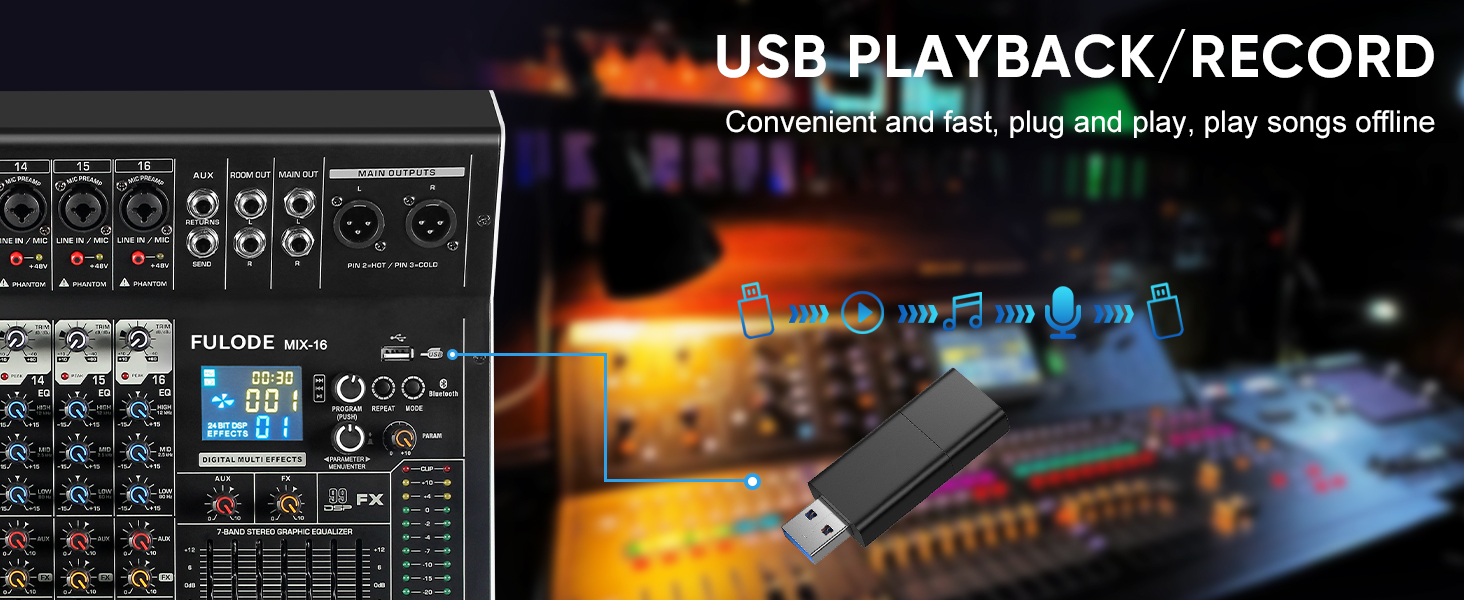
Lecture USB/MP3/Bluetooth 6.3
The mixer supports audio playback from USB drives and Bluetooth-enabled devices.
- Lecture USB: Insérer une clé USB contenant du MP3 files into the USB port. Use the transport controls (Play/Pause, Skip) and the MP3 Main Volume Adjustment pour contrôler la lecture.
- Connexion Bluetooth: Press the MODE button on the USB/MP3 section until 'BT' appears on the digital display. On your smart device, search for 'MIX-BT' (or similar) and pair. Once connected, you can stream audio wirelessly to the mixer.


6.4 Sortie principale et surveillance
- Utilisez le Left/Right Main Volume Adjustment faders to control the overall output level of the mix.
- Le Voyant de niveau provides visual feedback on the main output levels. Adjust faders to keep levels within the optimal range (avoiding red/clipping).
- Le Main Channel Seven Segment Balance (graphic EQ) allows for fine-tuning the overall frequency response of your main mix.
- Ajustez le Réglage du volume du moniteur for comfortable listening through headphones.

6.5 Démonstration vidéo officielle du produit
Watch this video for a visual demonstration of the FULODE mixer's features and operation. Note: The video features a MIX-12 model, which shares many similar functionalities with the X1-16C.
7. Entretien
Un entretien régulier garantit la longévité et les performances optimales de votre mixeur.
- Nettoyage: Use a soft, dry cloth to wipe the surface of the mixer. Do not use liquid cleaners or solvents, as they may damage the finish or internal components.
- Stockage: Store the mixer in a cool, dry place away from direct sunlight and extreme temperatures. If storing for extended periods, cover the unit to protect it from dust.
- Ventilation: Assurez une ventilation adéquate autour du mélangeur pour éviter toute surchauffe. Ne bloquez pas les ouvertures de ventilation.
8. Dépannage
If you encounter issues with your FULODE X1-16C mixer, refer to the following common problems and solutions:
| Problème | Cause possible | Solution |
|---|---|---|
| Pas de courant | Câble d'alimentation non connecté ; interrupteur d'alimentation éteint ; adaptateur/prise de courant défectueux | Vérifiez la connexion du câble d'alimentation ; assurez-vous que l'interrupteur d'alimentation est sur ON ; essayez une autre prise de courant ou un autre adaptateur. |
| Aucun son provenant d'une chaîne | Channel muted; Gain too low; Cable issue; Phantom power not activated (for condenser mics) | Check MUTE button; Increase Gain; Verify cable connections; Activate +48V phantom power if needed. |
| Aucun son provenant de la sortie principale | Main faders down; Output cables disconnected; Amplifier/speakers off | Raise Main Volume faders; Check output cable connections; Ensure amplifier/speakers are powered on and connected. |
| Bluetooth ne se connecte pas | Mixer not in Bluetooth mode; Device too far; Already connected to another device | Press MODE until 'BT' appears; Ensure device is within 33 ft; Disconnect from other devices. |
| Son déformé | Gain too high (clipping); EQ settings extreme; Faulty cable/microphone | Reduce Gain (ensure PEAK LED is not constantly lit); Adjust EQ to neutral or moderate settings; Test with different cables/microphones. |
9. Spécifications
Technical specifications for the FULODE X1-16C 16-Channel Audio Mixer:
- Modèle: X1-16C
- Nombre de canaux : 16
- Effets DSP : 99 built-in 24-bit effects
- Égalisation: 3-band EQ per channel, 7-band graphic EQ on main output
- Puissance fantôme: +48V (commutable par canal)
- Connectivité : USB (playback/recording), Bluetooth, XLR, 1/4" TRS
- Source d'alimentation : Électrique avec fil
- Voltage: 110 Volts (CA)
- Dimensions du produit : 15.55 po P x 18.9 po L x 4.13 po H (39.5 cm P x 48 cm L x 10.5 cm H)
- Poids de l'article : 18.16 livres (8.24 kg)
10. Garantie et assistance
For warranty information and technical support, please refer to the documentation included with your purchase or contact FULODE customer service through their official channels. Keep your proof of purchase for any warranty claims.