Introduction
This manual provides essential information for the setup, operation, maintenance, and troubleshooting of your AWOW Mini PC, Model BA7. Please read these instructions carefully before using the device.

Image : Terminéview of the AWOW BA7 Mini PC, highlighting its compact design and key features.
Contenu du colis
Vérifiez que tous les éléments sont présents dans le colis :
- AWOW BA7 Mini PC
- Adaptateur secteur
- Vis de montage
- Support de montage VESA
- Câble HDMI
- Manuel de l'utilisateur (ce document)

Image: Illustration of the AWOW BA7 Mini PC and its included accessories: power adapter, screws, VESA mount, HDMI cable, and user manual.
Instructions d'installation
- Connectez les périphériques : Connect your keyboard, mouse, and monitor(s) to the appropriate ports on the Mini PC.
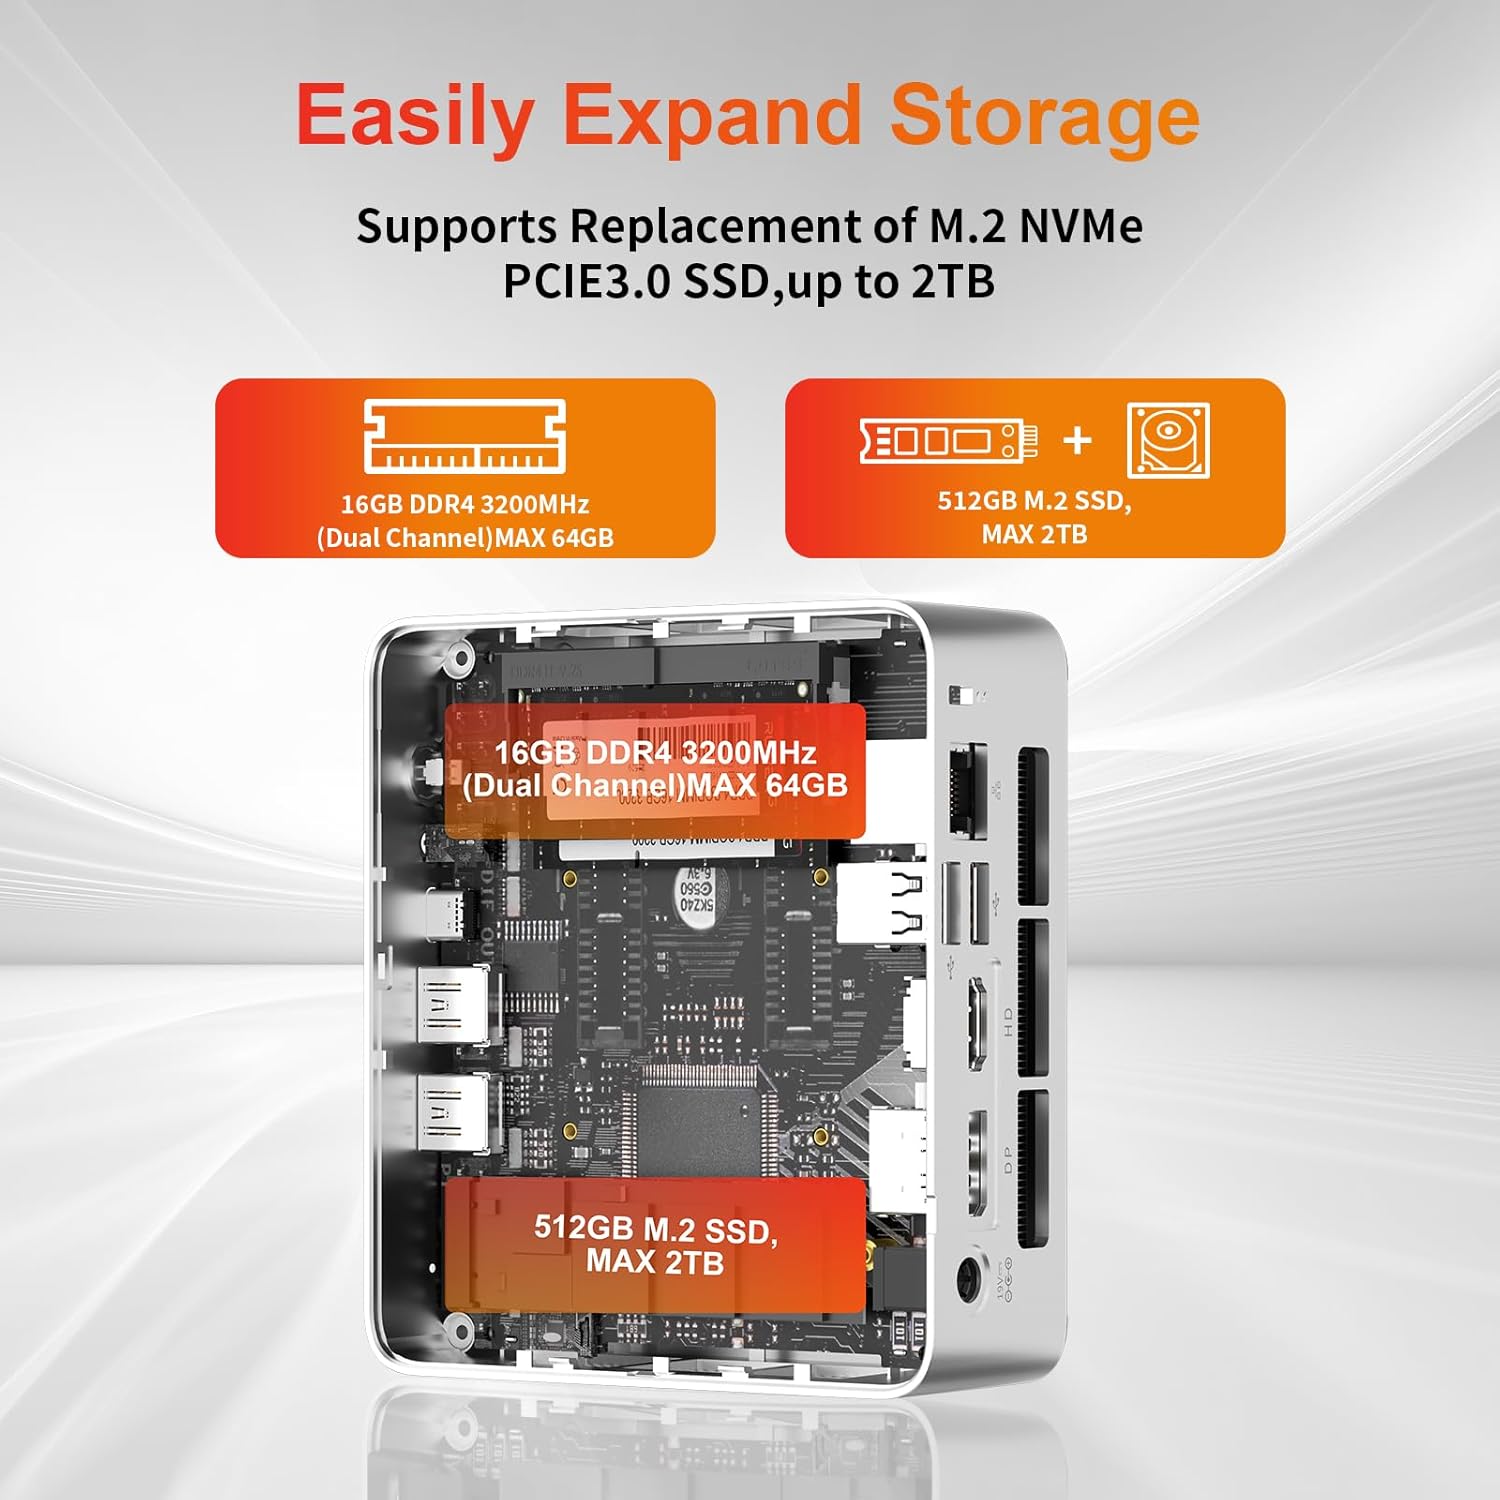
Image : Avant view of the Mini PC showing the Power Button, Type-C port, USB 3.2 ports, and 3.5mm Audio Jack.

Image : Arrière view of the Mini PC showing the DC IN, DP1.2, HDMI2.0, USB 2.0 ports, and RJ45 LAN port.
- Connexion électrique : Branchez l'adaptateur secteur au port DC IN du Mini PC, puis branchez l'adaptateur à une prise de courant.
- Mise sous tension : Appuyez sur le bouton d'alimentation situé à l'avant du mini PC. Le système démarrera.
- La configuration initiale: Suivez les instructions à l'écran pour terminer la configuration initiale de Windows 11 Pro, notamment la langue, la région, la connexion réseau et la création du compte utilisateur.
- Connexion réseau:
- Wired: Connect an Ethernet cable to the RJ45 LAN port for a stable wired connection.
- Sans fil: During Windows setup or via Windows settings, connect to your Wi-Fi network using the built-in WiFi 6.
Mode d'emploi
Fonctionnement de base
- Marche/Arrêt : Press the power button to turn on the PC. To shut down, use the Windows Start menu options (Shut down, Restart, Sleep). A short press on the power button can put the PC to sleep. A long press (approx. 5 seconds) will force a shutdown.
- Affichage de sortie : The Mini PC supports up to three 4K displays simultaneously via DP, HDMI, and USB-C. Connect your monitors and configure display settings in Windows.

Image: A user working with a triple monitor setup, demonstrating the Mini PC's multi-display capability.
- Connectivité USB : Utilize the USB 2.0 and USB 3.0 ports for connecting external devices such as external hard drives, USB flash drives, printers, and other peripherals. The Type-C port also supports data transfer and display output.
- Audio: Branchez des écouteurs ou des haut-parleurs à la prise audio 3.5 mm.
Utilisation avancée
- Extension de stockage : The Mini PC supports replacement of the M.2 NVMe PCIe 3.0 SSD up to 2TB. It also supports memory expansion up to 64GB DDR4.

Image: Diagram illustrating the internal components and options for expanding storage (M.2 SSD up to 2TB) and RAM (DDR4 up to 64GB).
- Montage VESA : Use the included VESA mount bracket to attach the Mini PC to the back of a compatible monitor or to a wall mount, saving desk space.
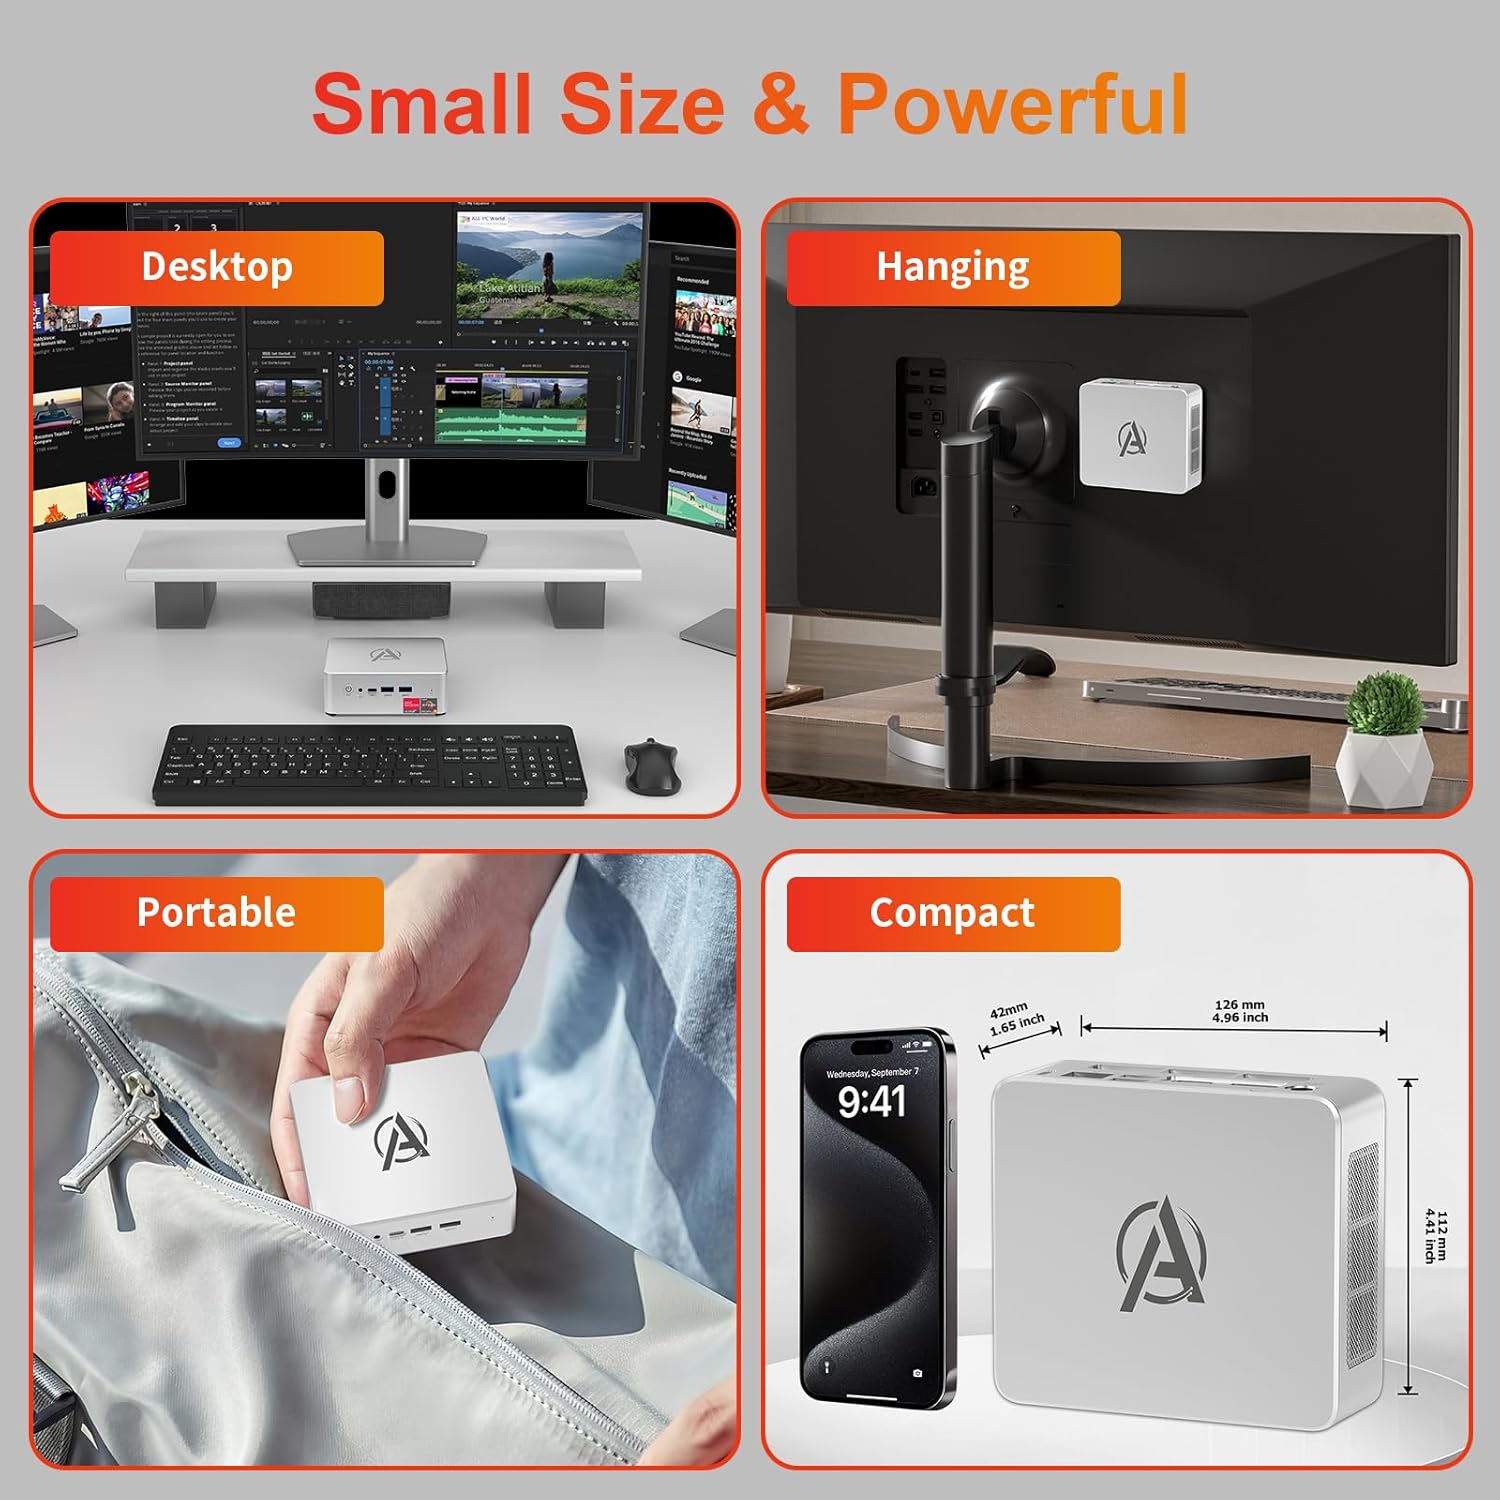
Image: Various usage scenarios for the Mini PC, including desktop, VESA-mounted behind a monitor, portable, and compact size comparison.
Entretien
- Nettoyage: Use a soft, dry cloth to clean the exterior of the Mini PC. Do not use liquid cleaners or aerosols. Ensure ventilation openings are free from dust.
- Mises à jour logicielles : Vérifiez et installez régulièrement les mises à jour Windows et les mises à jour des pilotes pour garantir des performances et une sécurité optimales.
- Gestion de la chaleur : Ensure the Mini PC is placed in a well-ventilated area. Avoid blocking the air vents. The intelligent cooling system is designed for low noise and efficient heat dissipation.

Image: Diagram illustrating the internal cooling fan and heat sink, showing airflow for efficient heat dissipation.
- Gestion du stockage: Nettoyer périodiquement les déchets inutiles files and applications to maintain system performance.
Dépannage
- Pas d'alimentation :
- Vérifiez que l'adaptateur secteur est bien connecté à la fois au mini PC et à la prise de courant.
- Assurez-vous que la prise de courant est fonctionnelle.
- Essayez une autre prise de courant.
- Pas d'affichage :
- Verify that the HDMI/DP/USB-C cable is securely connected to both the Mini PC and the monitor.
- Vérifiez que le moniteur est allumé et réglé sur la source d'entrée appropriée.
- Essayez un autre câble d'affichage ou un autre moniteur si possible.
- Performances lentes :
- Fermez les applications inutiles qui s'exécutent en arrière-plan.
- Vérifiez et installez les mises à jour Windows ou les mises à jour de pilotes en attente.
- Assurez-vous qu'il y a suffisamment d'espace libre sur le SSD.
- Surveillez l'utilisation du processeur et de la mémoire vive dans le Gestionnaire des tâches afin d'identifier les processus gourmands en ressources.
- Problèmes de connectivité réseau :
- For wired connections, ensure the Ethernet cable is properly connected and the router is working.
- For Wi-Fi, check if the Wi-Fi adapter is enabled and connected to the correct network. Restart your router/modem.
- Blocages/plantages du système :
- Redémarrez le mini PC.
- Ensure the system is not overheating (check ventilation).
- Run a system diagnostic or check Windows Event Viewer pour les messages d'erreur.
Caractéristiques
| Modèle | AWOW BA7 Mini PC |
| Processeur | AMD Ryzen 5 7430U (6 cœurs, 12 threads, jusqu'à 4.3 GHz) |
| Graphique | Carte graphique AMD Radeon intégrée |
| BÉLIER | 16 Go de mémoire DDR4 (extensible jusqu'à 64 Go) |
| Stockage | 512GB PCIe 3.0 M.2 SSD (Expandable up to 2TB) |
| Système opérateur | Windows 11 Pro |
| Sortie vidéo | DP1.2 (4K@60Hz), HDMI2.0 (4K@60Hz), USB-C (4K@60Hz) - Supports Triple Display |
| Connectivité | WiFi 6, Bluetooth 5.2, 1000Mbps RJ45 LAN |
| Ports | 2x USB 3.2, 2x USB 2.0, 1x Type-C (Full Function), 1x DP1.2, 1x HDMI2.0, 1x RJ45 LAN, 1x 3.5mm Audio Jack, 1x DC IN |
| Dimensions | 126 mm x 112 mm x 42 mm (environ 4.96 x 4.41 x 1.65 pouces) |
| Poids | 398 g (appareil uniquement) Image: The Mini PC with its dimensions (126mm x 112mm x 42mm) and weight (398g) labeled. |
Garantie et assistance
AWOW provides comprehensive support for its products.
- Garantie: This product includes a 12-month service period from the date of purchase, covering manufacturing defects.
- Support technique : Lifetime technical support is available for all AWOW products.
- Contact: For technical assistance, warranty claims, or any product-related inquiries, please visit the official AWOW website ou contactez leur service client.

Image: AWOW brand message emphasizing fulfillment, lifetime technical support, and 12-month service.