Vetroo M06
Vetroo M06 Micro-ATX/Mini-ITX Gaming PC Case Instruction Manual
Modèle : M06
Introduction
This manual provides detailed instructions for the installation, operation, and maintenance of your Vetroo M06 Micro-ATX/Mini-ITX Gaming PC Case. Please read this manual thoroughly before beginning assembly to ensure proper setup and optimal performance.

Image: The Vetroo M06 Micro-ATX/Mini-ITX Gaming PC Case in black, showcasing its mesh front panel and side window, viewvu sous un angle.
Caractéristiques principales
- Conception compacte : Micro-ATX / Mini-ITX form factor with a high-airflow mesh front panel, designed for space-efficient builds.
- Refroidissement optimisé : Supports up to five 120mm fans and a 240mm top-mounted liquid radiator for efficient thermal management.
- Compatibilité GPU : Peut accueillir des cartes graphiques jusqu'à 355 mm de longueur.
- Flexible PSU Mounting: Features an adjustable power supply installation area with a maximum length of 160mm.
- Connectivité moderne : Front panel includes USB Type-C and USB 3.0 ports for convenient peripheral access.
Contenu du colis
Veuillez vérifier que tous les composants sont présents avant de procéder à l'installation :
- Vetroo M06 PC Case
- Accessory Box (screws, standoffs, cable ties)
- SFX PSU Bracket (1x)
- Manuel de l'utilisateur (ce document)
Caractéristiques
| Fonctionnalité | Détail |
|---|---|
| Nom du modèle | M06 |
| Type de cas | Mini-Tour |
| Compatibilité de la carte mère | Micro-ATX, Mini-ITX |
| Dimensions du produit (L x l x H) | 15.55" x 7.87" x 13.07" (395 mm x 200 mm x 332 mm) |
| Poids de l'article | 13.37 livres (6.06 kg) |
| Matériel | Acrylonitrile Butadiene Styrene (ABS), SPCC (0.8mm metal plate) |
| Longueur maximale du GPU | 355 mm |
| Hauteur maximale du refroidisseur de processeur | 165 mm |
| Longueur maximale du bloc d'alimentation | 160mm (Adjustable mounting) |
| Soutien des fans | Jusqu'à 5 ventilateurs de 120 mm |
| Support de radiateur | 1 x 240mm (Top) |
| Ports d'E / S avant | 1 x USB Type-C, 1 x USB 3.0, HD Audio, Power Button, Reset Button |

Image: Diagram illustrating the compact dimensions of the Vetroo M06 PC case, measuring 15.5 inches in depth, 7.8 inches in width, and 13.0 inches in height.

Image: A detailed diagram outlining the compatibility specifications for the Vetroo M06 PC case, including maximum CPU cooler height (165mm), GPU length (355mm), PSU length (160mm), and supported motherboard form factors (M-ATX/ITX).
Configuration et installation
Before starting, ensure you have a clean, static-free workspace. Refer to your component manuals for specific installation details.
1. Installation de la carte mère
- Remove the side panel(s) of the case.
- Install the necessary motherboard standoffs into the case tray according to your motherboard's form factor (Micro-ATX or Mini-ITX).
- Placez soigneusement votre carte mère sur les entretoises en alignant les trous de vis.
- Fixez la carte mère avec des vis.
2. Installation du GPU
- Remove the appropriate PCIe slot covers from the rear of the case.
- Insert your graphics card into the primary PCIe slot on your motherboard.
- Fixez la carte graphique au boîtier à l'aide de vis.
- Connect any required PCIe power cables from your power supply to the GPU.
3. Installation du bloc d'alimentation
- Determine the desired mounting position for your power supply. The Vetroo M06 supports adjustable PSU mounting.
- If using an SFX power supply, attach the included SFX bracket to the PSU.
- Slide the power supply into its designated bay and secure it with screws from the rear of the case.
- Route the necessary power cables to your components.

Image : Un interne view of the Vetroo M06 PC case highlighting the three adjustable mounting positions for ATX/SFX power supplies, along with an illustration of the included SFX bracket.
4. Storage Installation (HDD/SSD)
- Locate the designated mounting points for 3.5" HDDs and 2.5" SSDs.
- Secure your storage drives using the provided screws.
- Connect SATA data and power cables to each drive.
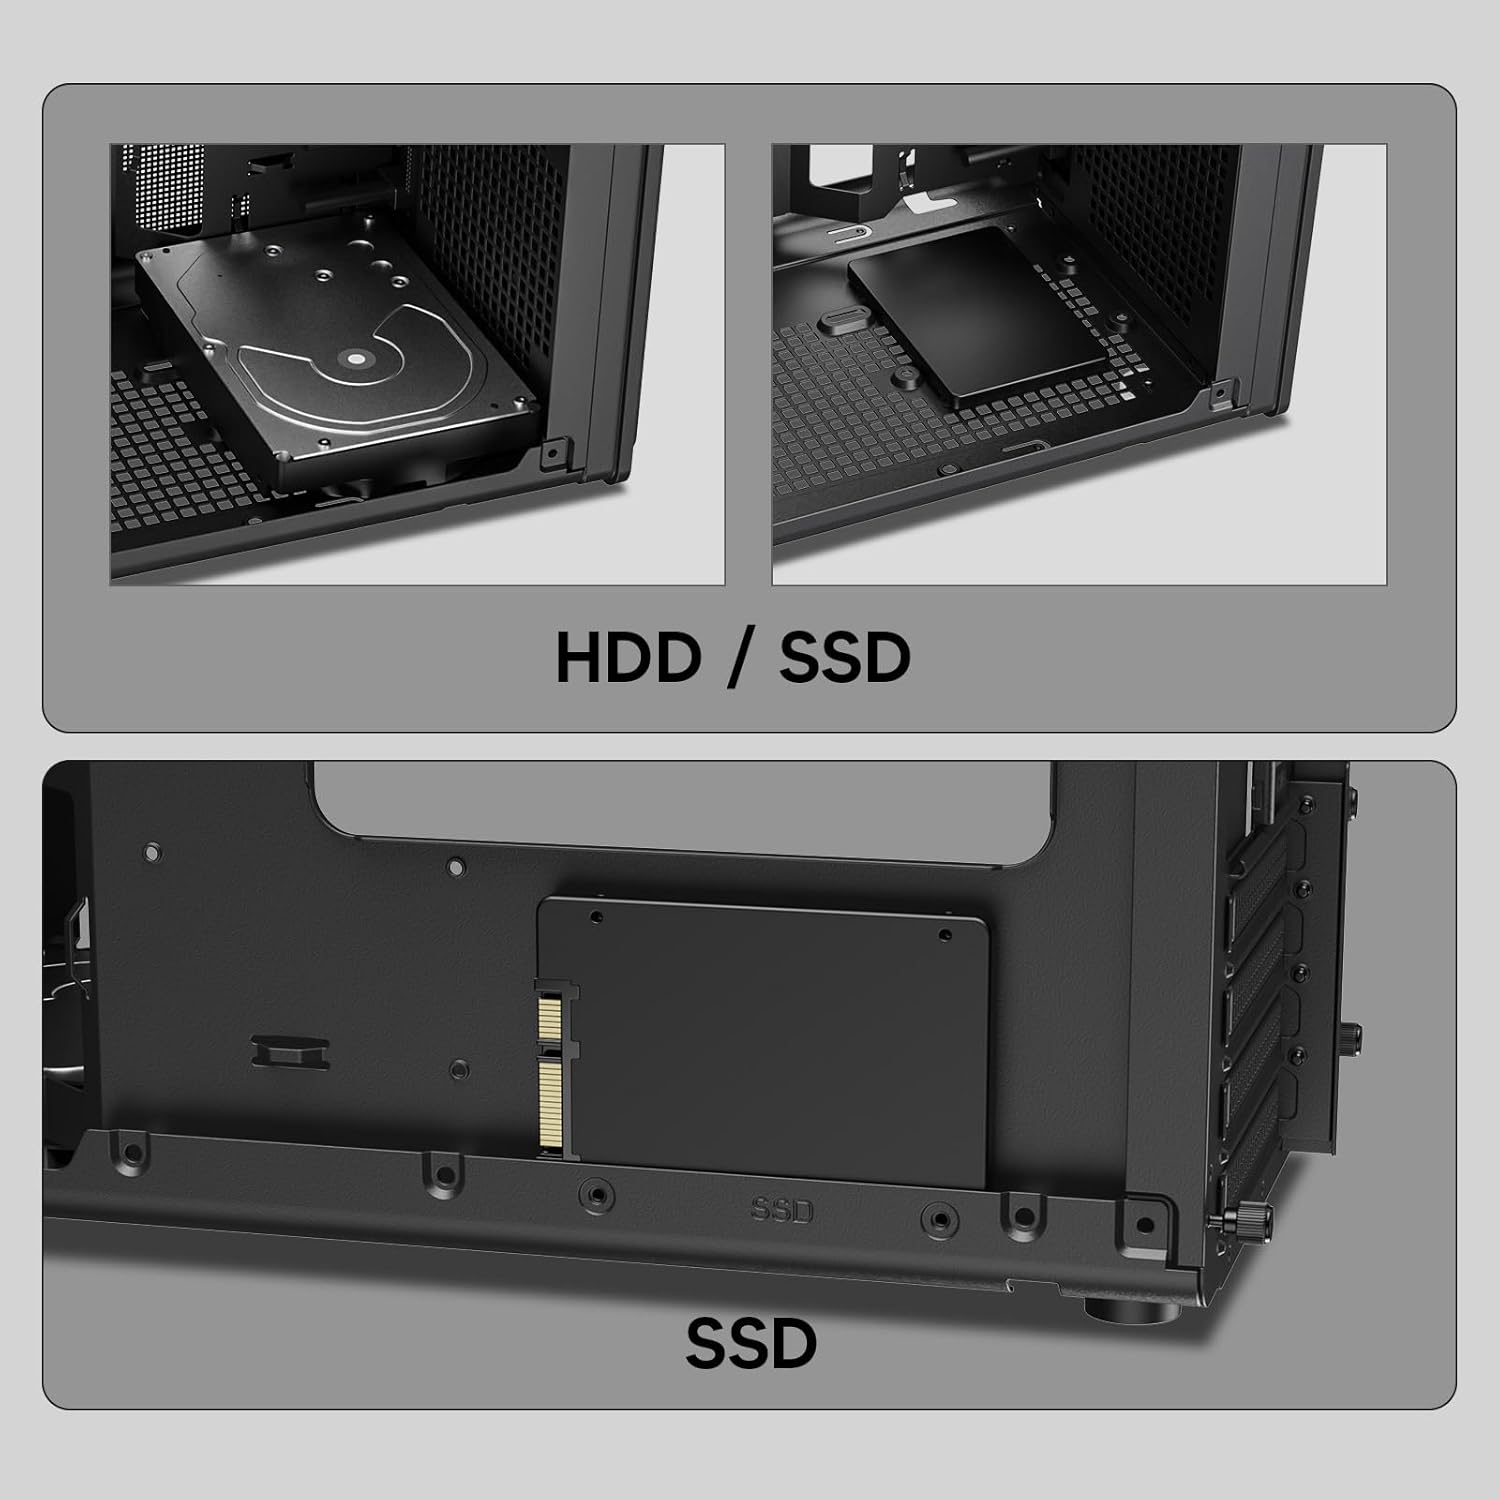
Image : Gros plan views of the Vetroo M06 PC case interior, demonstrating the mounting options for both 3.5-inch Hard Disk Drives (HDDs) and 2.5-inch Solid State Drives (SSDs).
5. Cooling System Installation (Fans/Radiator)
- Identify the fan mounting locations (up to five 120mm fans).
- Mount fans using appropriate screws, ensuring correct airflow direction.
- For liquid cooling, install a 240mm radiator at the top mounting position, securing it with screws.
- Connect fan and pump cables to your motherboard or fan controller.
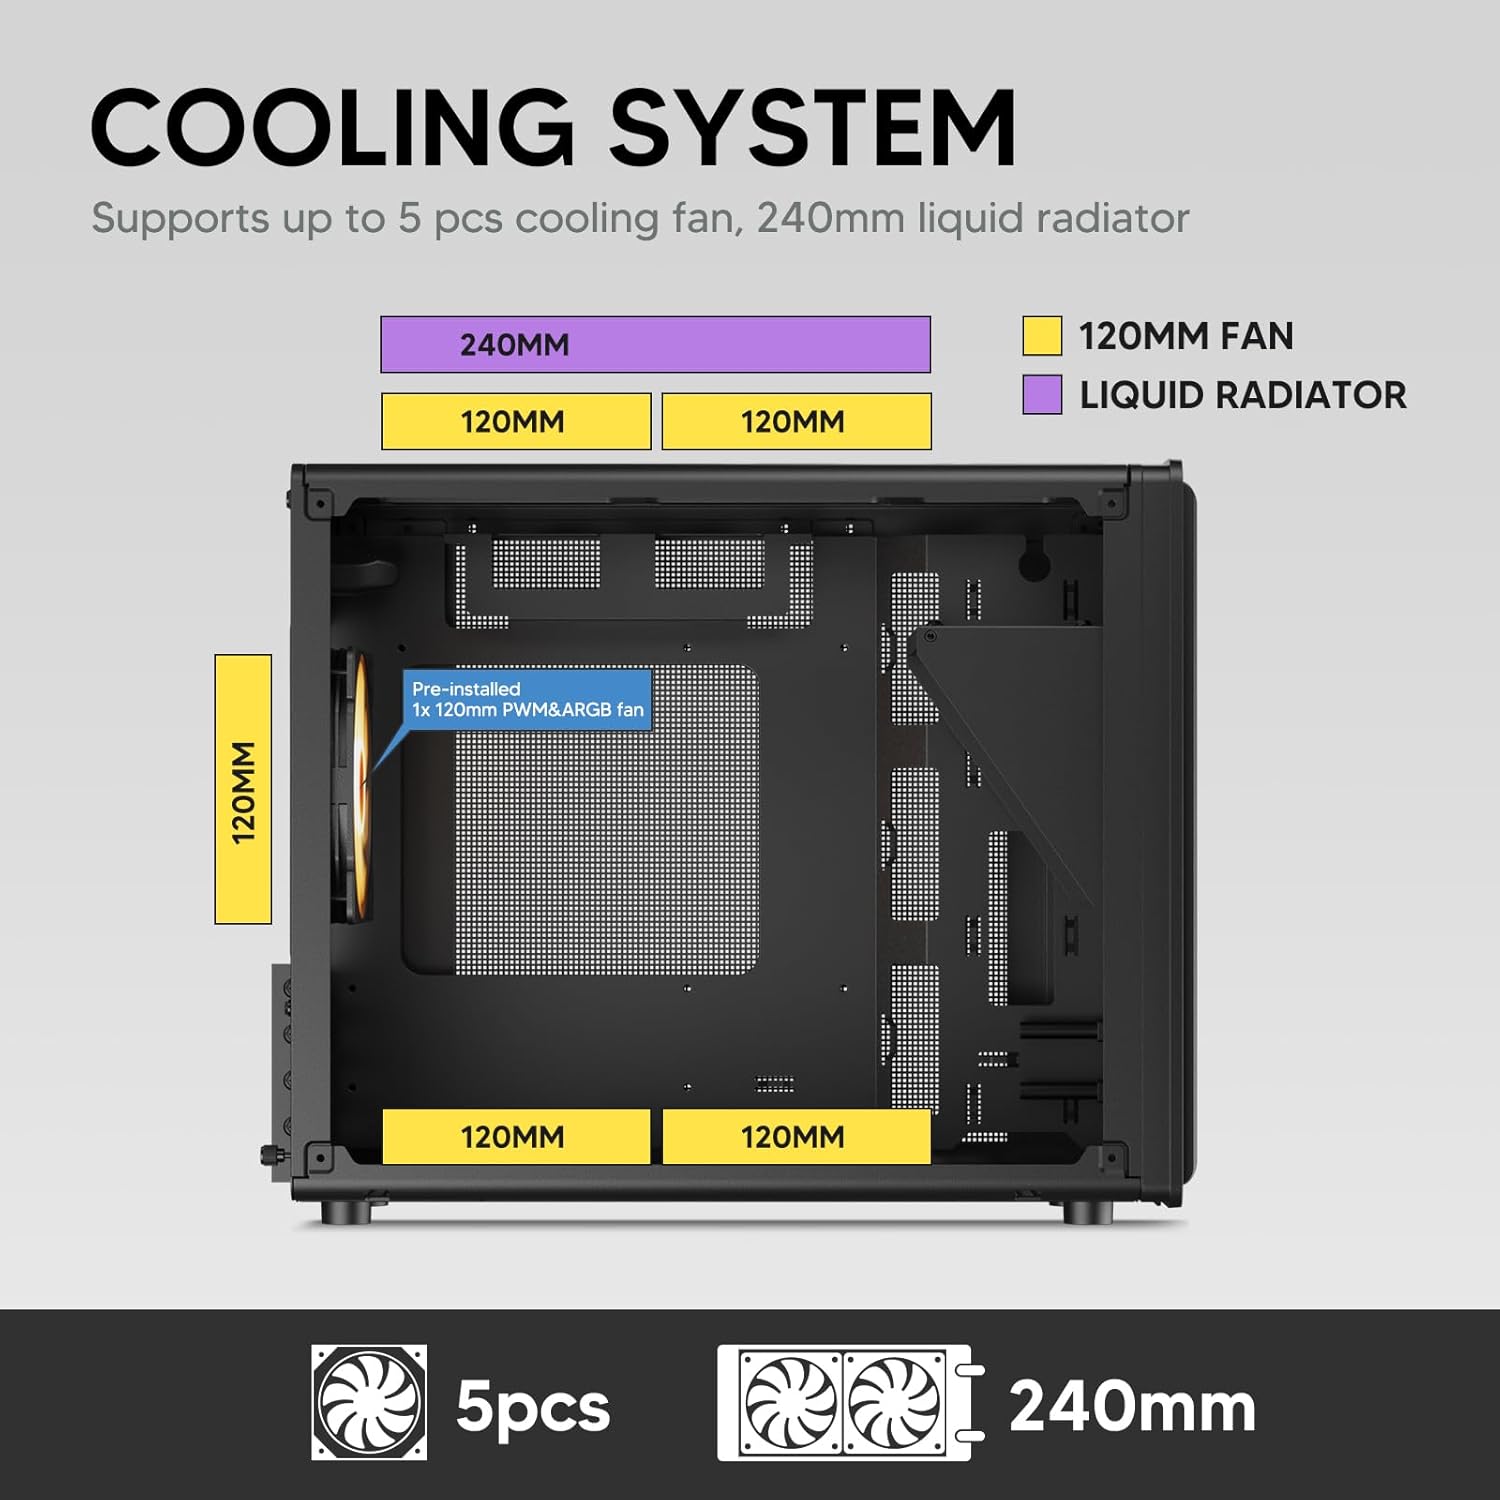
Image: A diagram illustrating the cooling system layout within the Vetroo M06 PC case, detailing the positions for up to five 120mm fans and a 240mm liquid radiator at the top.
6. Connexions du panneau d'E/S
- Connect the front panel cables (Power, Reset, USB 3.0, USB Type-C, HD Audio) to the corresponding headers on your motherboard. Refer to your motherboard manual for header locations.

Image: A close-up of the Vetroo M06 PC case's front I/O panel, clearly labeling the Power button, Reset button, USB 3.0 port, HD Audio jack, and USB Type-C port.
Mode d'emploi
Once all components are installed and cables are connected, replace the side panels. Connect your peripherals (monitor, keyboard, mouse) and power cable to the PSU. Press the power button on the front panel to start your system.
Gestion du flux d'air
The Vetroo M06 case features an excellent airflow design with mesh panels to facilitate optimal cooling. Ensure fans are installed to create a balanced airflow, typically with intake fans at the front/bottom and exhaust fans at the rear/top.

Image: An exploded diagram of the Vetroo M06 PC case, illustrating the intended airflow patterns with blue arrows indicating cool air intake and red arrows showing warm air exhaust through its mesh panels.
Entretien
Un entretien régulier contribue à prolonger la durée de vie des composants de votre PC et garantit des performances optimales.
- Nettoyage de la poussière : Nettoyez régulièrement les filtres à poussière et les composants internes à l'aide d'air comprimé. Assurez-vous que le système est hors tension et débranché avant tout nettoyage.
- Gestion des câbles: Verify that internal cables are neatly routed and do not obstruct airflow.
- Vérifications des composants : Ensure all screws are tight and components are securely seated.

Image: A close-up shot of the Vetroo M06 PC case, featuring a digital caliper measuring the thickness of the metal plate, which is specified as 0.8mm, highlighting the case's robust construction.
Dépannage
En cas de problème, reportez-vous aux étapes de dépannage courantes suivantes :
- Le système ne s'allume pas :
- Check all power connections, including the PSU to wall outlet, PSU to motherboard (24-pin and CPU 8-pin), and front panel power switch cable to motherboard.
- Assurez-vous que l'interrupteur du bloc d'alimentation est en position « MARCHE ».
- Aucune sortie d'affichage :
- Verify that your monitor is connected to the graphics card (not the motherboard's integrated graphics ports, unless you are using integrated graphics).
- Réinsérez la carte graphique et les modules de RAM.
- Problèmes de surchauffe :
- Assurez-vous que tous les ventilateurs du boîtier tournent et sont correctement orientés pour une circulation d'air optimale.
- Check CPU cooler installation and thermal paste application.
- Nettoyez les ventilateurs et les filtres de toute accumulation de poussière.
- Ports USB non fonctionnels :
- Verify that the front panel USB 3.0 and USB Type-C cables are correctly connected to the motherboard headers.
Garantie et assistance
Vetroo products are designed for quality and reliability. For warranty information and technical support, please visit the official Vetroo webConsultez leur site web ou contactez leur service client. Conservez votre preuve d'achat pour toute réclamation au titre de la garantie.
Vetroo Official Website: Vetroo Store on Amazon
For further assistance, please refer to the contact information provided with your product packaging or on the official Vetroo support channels.
Ask a question about this manual
Ask about setup, troubleshooting, compatibility, parts, safety, or missing instructions. Manuals+ will review the question and use this page’s manual context to help answer it.