
1. Introduction
The NGTeco NG-MB1 4-in-1 APP-Based Time Clock is a versatile attendance management system designed for small businesses. It offers multiple verification methods including facial recognition, fingerprint scanning, RFID card, and PIN entry to accurately track employee work hours. This manual provides detailed instructions for setting up, operating, maintaining, and troubleshooting your device.
2. Consignes de sécurité
- Ensure the device is installed indoors and away from direct sunlight, heat sources, and moisture.
- Utilisez uniquement l'adaptateur secteur fourni afin d'éviter tout dommage.
- N'essayez pas de démonter ou de réparer l'appareil vous-même. Contactez le service client pour obtenir de l’aide.
- Gardez l'appareil propre et exempt de poussière et de débris.
3. Contenu du colis
Vérifiez que tous les éléments sont présents dans le colis :
- NGTeco NG-MB1 Time Clock Unit
- Adaptateur secteur
- Support de montage mural
- Matériel de montage (vis, chevilles)
- Cartes RFID (multiples)
- USB Drive (for data transfer)
- Guide de démarrage rapide
- Contact Information Card
4. Produit terminéview
The NGTeco NG-MB1 Time Clock features a compact design with multiple input options for employee verification.
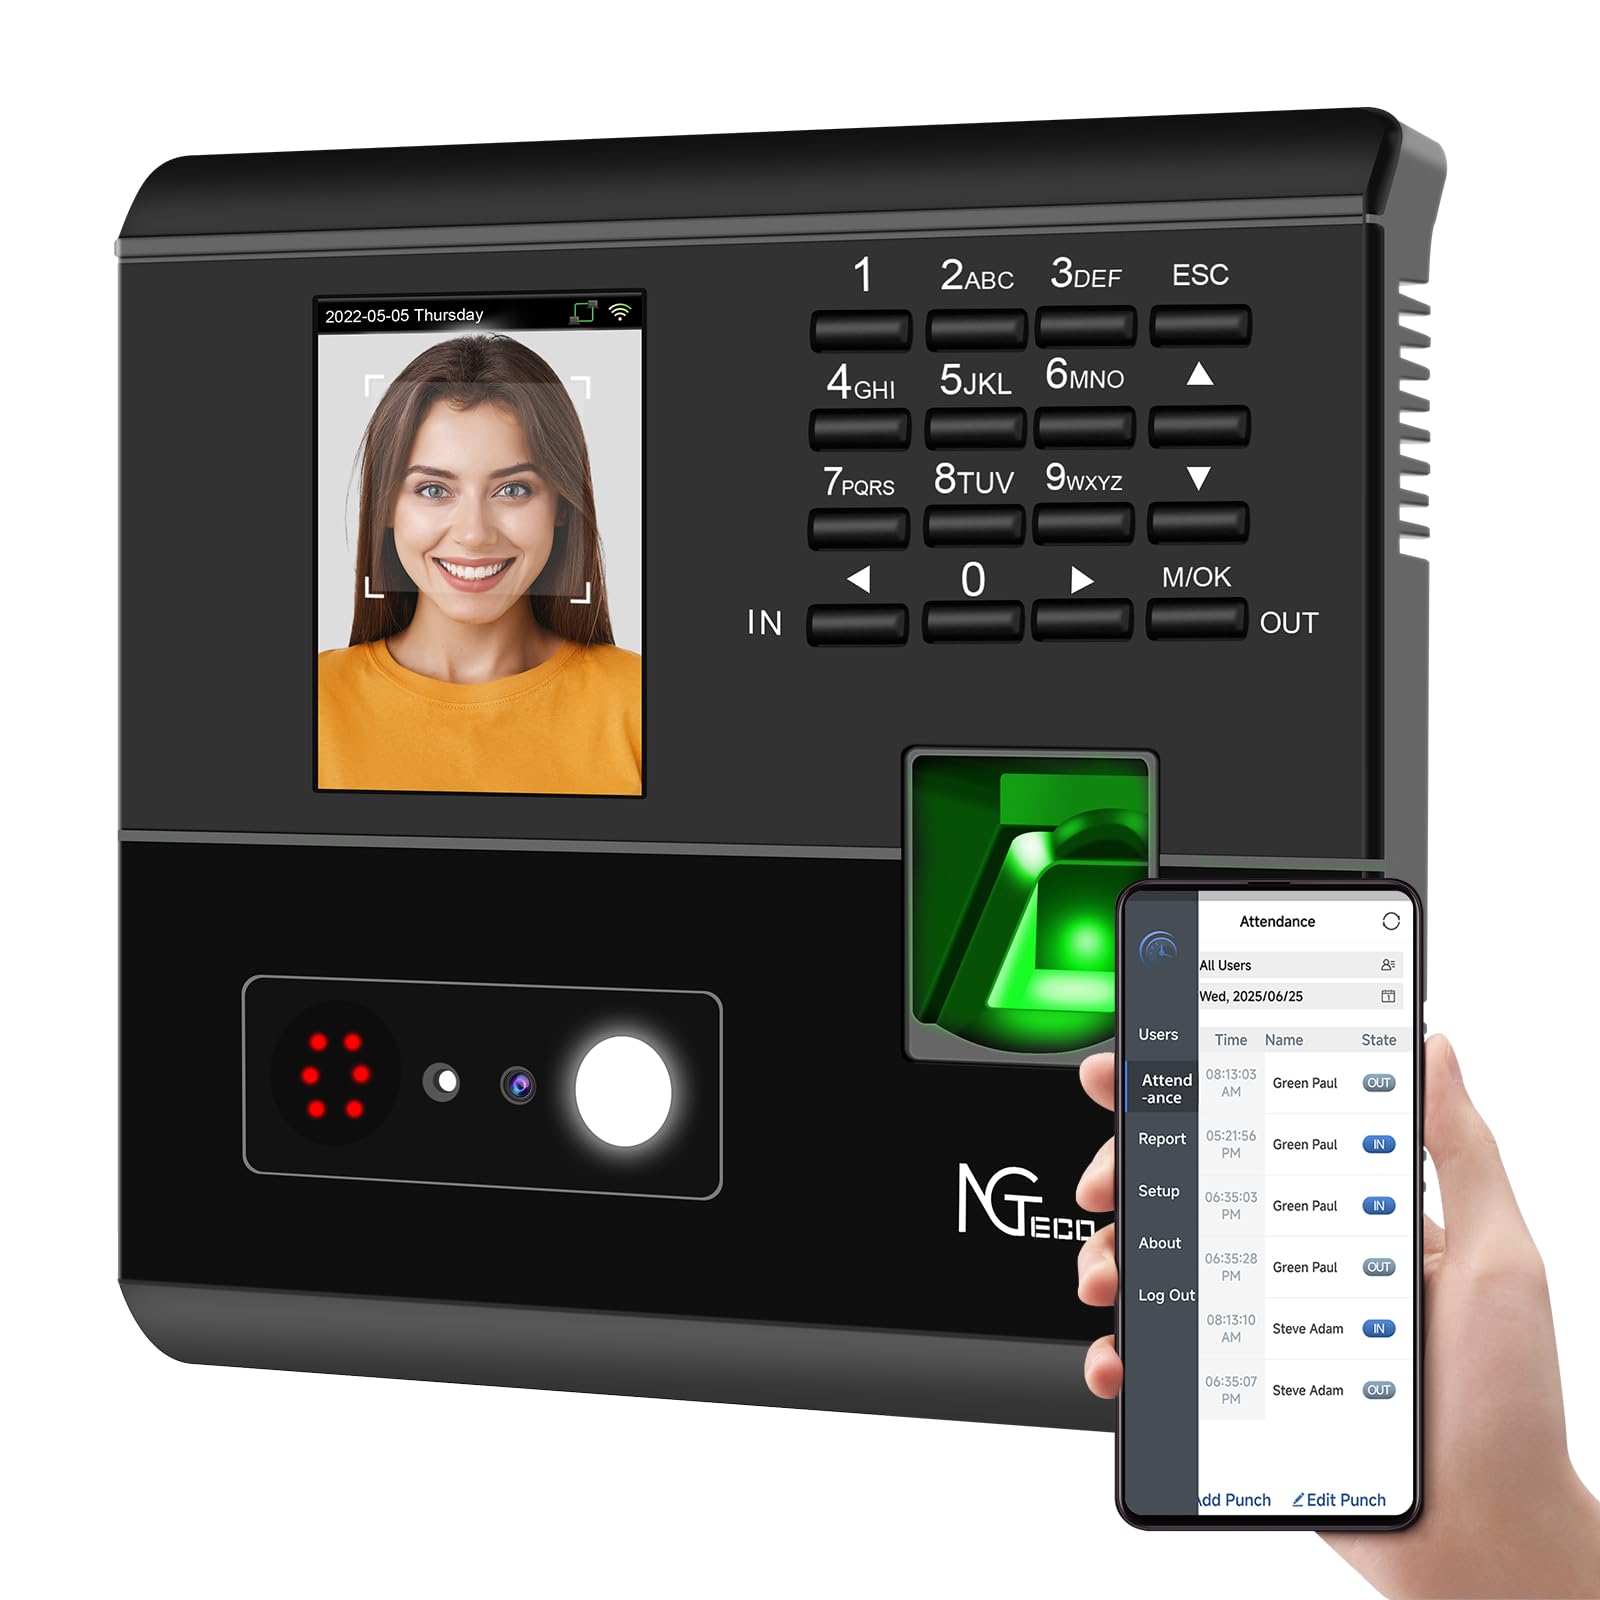
Figure 1 : Devant view of the NGTeco NG-MB1 Time Clock highlighting its four verification methods: Face Scan, Fingerprint, RFID Card, and Password.
Caractéristiques du panneau avant :
- Écran d'affichage : Shows time, date, user information, and menu options.
- Clavier: Numeric keys for PIN entry and navigation.
- Lecteur d'empreintes digitales: For biometric fingerprint verification.
- Face Recognition Camera: For facial recognition verification.
- RFID/Card Reading Area: For scanning RFID cards.
Side and Back Panel Features:

Figure 2 : Arrière view of the NGTeco NG-MB1 Time Clock, illustrating the power input, Ethernet port, and USB port for connectivity and data transfer.
- Port USB : For direct data transfer using a USB drive.
- Port d'alimentation: Se connecte à l'adaptateur secteur fourni.
- Port Ethernet: Pour connexion réseau filaire.
5. Installation
5.1 Installation de l'appareil
- Choose a suitable indoor location for mounting the time clock, ensuring it is at an appropriate height for all users.
- Use the provided mounting template to mark drill holes on the wall.
- Secure the wall mounting bracket using the supplied screws and anchors.
- Connect the power adapter and, if desired, an Ethernet cable to the device.
- Attach the time clock unit to the mounted bracket.
5.2 Téléchargement de l'application
Téléchargez le NGTeco Time App from your mobile device's app store (Apple App Store for iOS or Google Play Store for Android). This app is essential for managing users, attendance records, and generating reports.
Vidéo 1: This video demonstrates the two methods for registering employee information on the NGTeco Time Clock, including using the device directly and through the NGTeco Time App.
5.3 Connexion Wi-Fi
Pour connecter votre appareil à un réseau Wi-Fi :
- On the device, navigate to the [Comm] menu.
- Sélectionner [Réseau sans fil].
- Choisissez le réseau Wi-Fi souhaité dans la liste.
- Saisissez le mot de passe Wi-Fi à l'aide du clavier et confirmez.
- The device will attempt to connect to the network. A successful connection will be indicated on the screen.
Vidéo 2: This video provides a step-by-step guide on how to configure the Wi-Fi settings on your NGTeco Time Clock device.
6. Mode d'emploi
6.1 Ajout d'utilisateurs
Employees can be added directly on the device or through the NGTeco Time App.
Adding Users via Device:
- Appuyez et maintenez enfoncé le M/OK bouton pour accéder au menu principal.
- Accéder à [Utilisateurs] et sélectionnez [Ajouter un utilisateur].
- Entrez le ID de l'utilisateur, Prénom, Nom de familleet définissez le Rôle de l'utilisateur (e.g., Employee, Admin).
- Sélectionnez un Mode de vérification (Password, Fingerprint, Card, or Face).
- Follow the on-screen prompts to enroll the chosen verification method(s).
Adding Users via NGTeco Time App:
- Open the NGTeco Time App on your smartphone.
- Accédez au Utilisateurs section and tap Ajouter un utilisateur.
- Enter the employee's details including Prénom, Nom de famille, ÉPINGLE, et Autorisation niveau.
- Save and sync the data with the device.
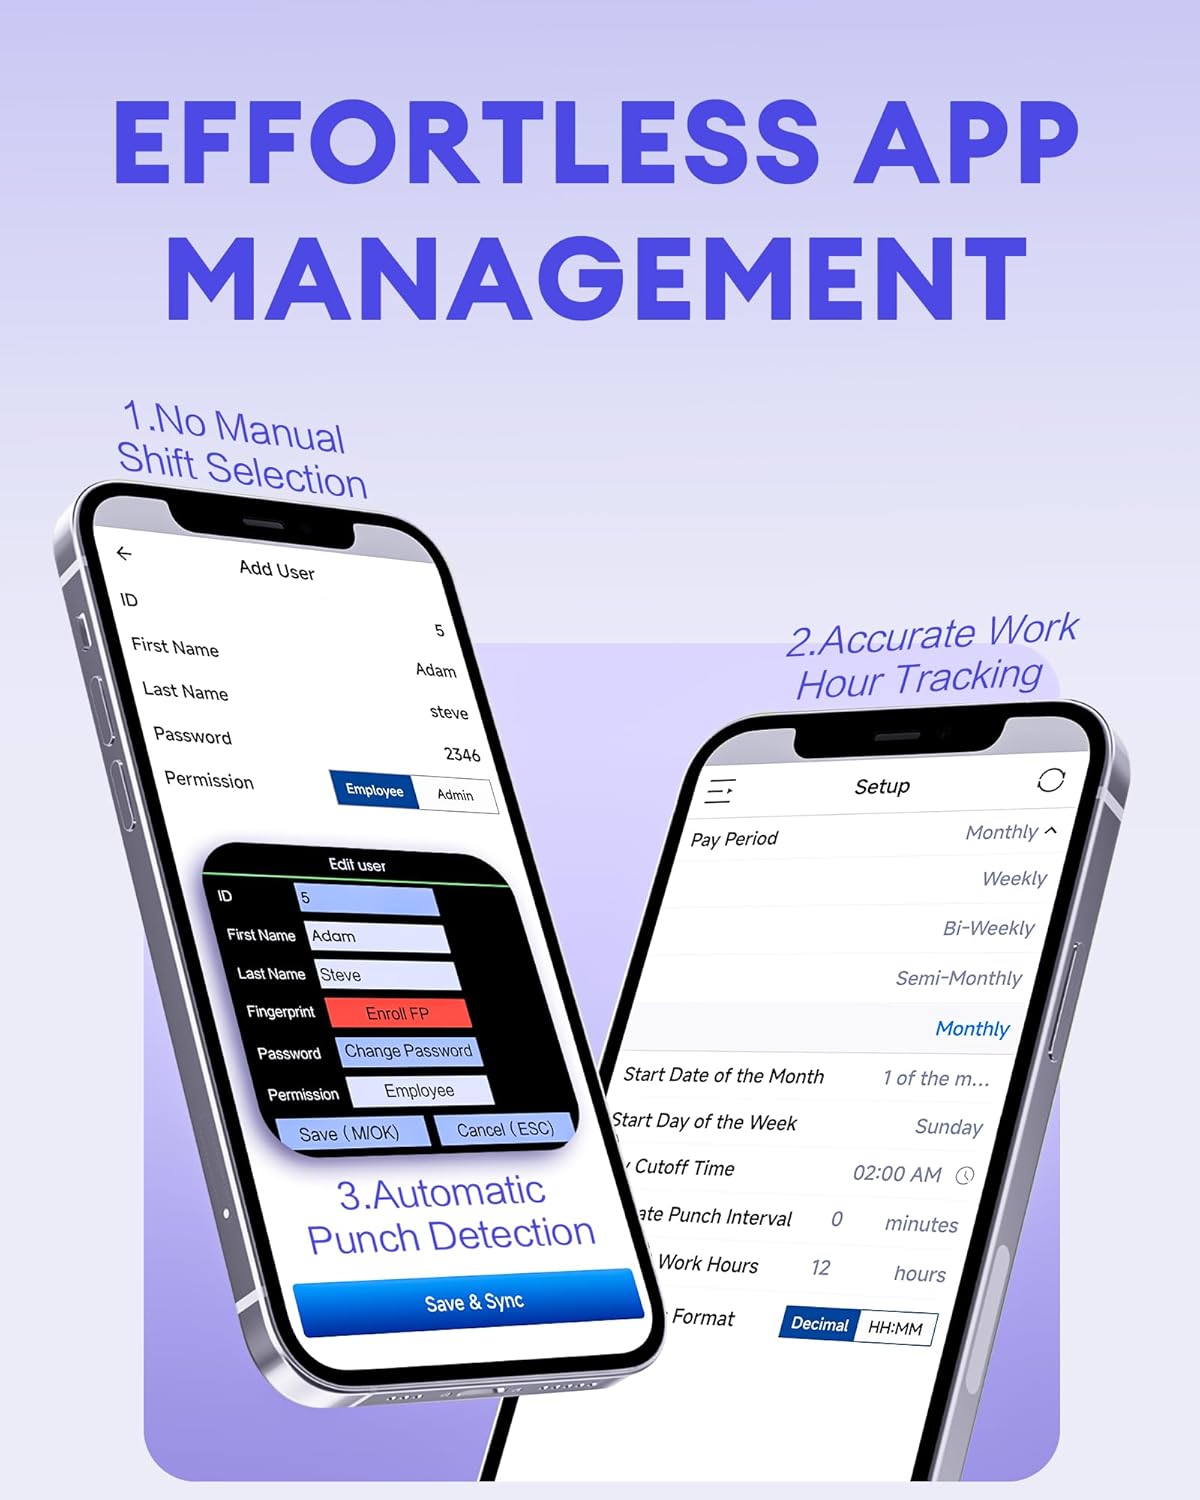
Figure 3 : The NGTeco Time App interface for effortless management, including adding users, setting up work hour tracking, and automatic punch detection.
6.2 Enrolling Biometrics and Cards
Inscription par empreintes digitales :
For optimal fingerprint recognition:
- Always use clean fingers and avoid angled or tilted finger positions during enrollment.
- Place your finger belly completely in the middle of the reader.
- Do not slide the finger while enrolling. Apply some pressure for 1 second until the result is shown.
- If a finger is dry, gently breathe on it to moisten it before scanning.

Figure 4 : Visual representation of the high-precision fingerprint module, emphasizing reliable, fast, and secure access.
Inscription en face à face :
Follow the on-screen instructions to position your face correctly in front of the camera for enrollment.
Inscription des cartes RFID :
When prompted, hold the RFID card near the designated reading area on the device until it is successfully registered.
6.3 Pointage à l'arrivée et au départ
The NGTeco NG-MB1 supports automatic detection for clocking in and out, eliminating the need to press specific 'IN' or 'OUT' keys. Simply present your chosen verification method (face, fingerprint, RFID card, or enter your PIN) to the device.
Vidéo 3: This video demonstrates the four recognition methods (Face, Fingerprint, RFID, PIN) for clocking in on the NGTeco Time Clock.
6.4 Managing Attendance Records
Attendance records can be modified directly on the device or through the NGTeco Time App.
Adding/Editing Missing Punches:
- Via l'appareil : Access the menu, navigate to [Time Data], alors [Add Missing Punch]. Select the user, date, time, and punch state (Check In/Check Out).
- Via l'application : In the NGTeco Time App, go to the Présence section. You can add a new punch or edit an existing one by selecting the user, date, time, and punch state.

Figure 5 : The NGTeco Time App's punch record correction feature, allowing easy fixes for errors or missing punches.
Vidéo 4: This video illustrates how to modify attendance records directly on the NGTeco Time Clock device and through the mobile application.
6.5 Génération de rapports
The NGTeco Time Clock supports various payroll cycles and offers multiple ways to download attendance reports.

Figure 6 : The NGTeco Time Clock supports various payroll cycles, including Monthly, Semi-Monthly, Bi-Weekly, and Weekly, for flexible attendance management.
Report Download Options:
- App Email Download: Use the NGTeco Time App to email detailed reports directly to your inbox.
- USB Drive Download: Insert the provided USB drive into the device's USB port to download attendance data.

Figure 7 : Illustration of the two convenient methods for downloading attendance reports: directly to a USB drive or via email through the NGTeco Time App.
7. Entretien
- Nettoyage: Regularly wipe the device's screen, keypad, and fingerprint sensor with a soft, dry cloth. Avoid using abrasive cleaners or liquids.
- Mises à jour logicielles : Check the NGTeco Time App or webConsultez ce site pour toute mise à jour de micrologiciel ou de logiciel disponible afin de garantir des performances et une sécurité optimales.
- Sauvegarde des données : Periodically back up your attendance data using the USB drive or through the app to prevent data loss.
8. Dépannage
- L'appareil ne s'allume pas : Assurez-vous que l'adaptateur secteur est correctement connecté à la fois à l'appareil et à une prise de courant fonctionnelle.
- Problèmes de connectivité Wi-Fi: Verify your Wi-Fi password and ensure the device is within range of your router. Restarting the device or router may help.
- Échec de la reconnaissance des empreintes digitales/du visage : Ensure the sensor/camera is clean. For fingerprints, ensure fingers are clean and placed correctly with adequate pressure. Re-enrollment may be necessary if issues persist.
- Problèmes de synchronisation d'applications : Check your device's internet connection and ensure the time clock is connected to the same Wi-Fi network as your phone.
- Missing Punches: Refer to Section 6.4 for instructions on adding or editing missing punches.
For further assistance, consult the Quick Start Guide or contact NGTeco customer support.
9. Spécifications
| Fonctionnalité | Détail |
|---|---|
| Marque | NGTéco |
| Numéro de modèle | NG-MB1 |
| Couleur | Noir |
| Type d'affichage | Numérique |
| Dossier spécial | Face/Fingerprint/Card/PIN |
| Dimensions du produit | 5 po L x 4 po H |
| Source d'énergie | Électrique avec fil |
| Technologie de connectivité | Wi-Fi |
| Poids de l'article | 0.79 kilogrammes |
| Type de matériau | Plastique ABS de qualité supérieure. |
10. Garantie et assistance
- Garantie: The NGTeco NG-MB1 comes with a 1-year manufacturer's warranty.
- Support technique : Enjoy free lifetime technical support from NGTeco's U.S.-based service team. Support is available Monday to Friday, 6 AM to 6 PM EST.
- For support, refer to the contact information provided in your Quick Start Guide or visit the official NGTeco website.