1. Introduction
Thank you for choosing the MYPIN Cordless Electric Pressure Washer. This manual provides essential information for the safe and effective use of your new pressure washer. Please read it thoroughly before operation and keep it for future reference.
Contenu du colis
Veuillez vérifier que tous les éléments listés ci-dessous sont inclus dans votre colis. Si des pièces sont manquantes ou endommagées, veuillez contacter le service client.
- Handheld Pressure Washer x 1
- Prise de charge x 1
- Faucet Connector x 1
- Buse 6 en 1 x 1
- Foam Bottle x 1
- 13L/3.4 Gallon Water Tank x 1
- Bucket Wheels x 4
- Connecteur rapide x 1
- 7M/275 inch Water Tank Hose x 1
- 5M/196 inch PVC Faucet Hose x 1
- Manuel d'utilisation x 1
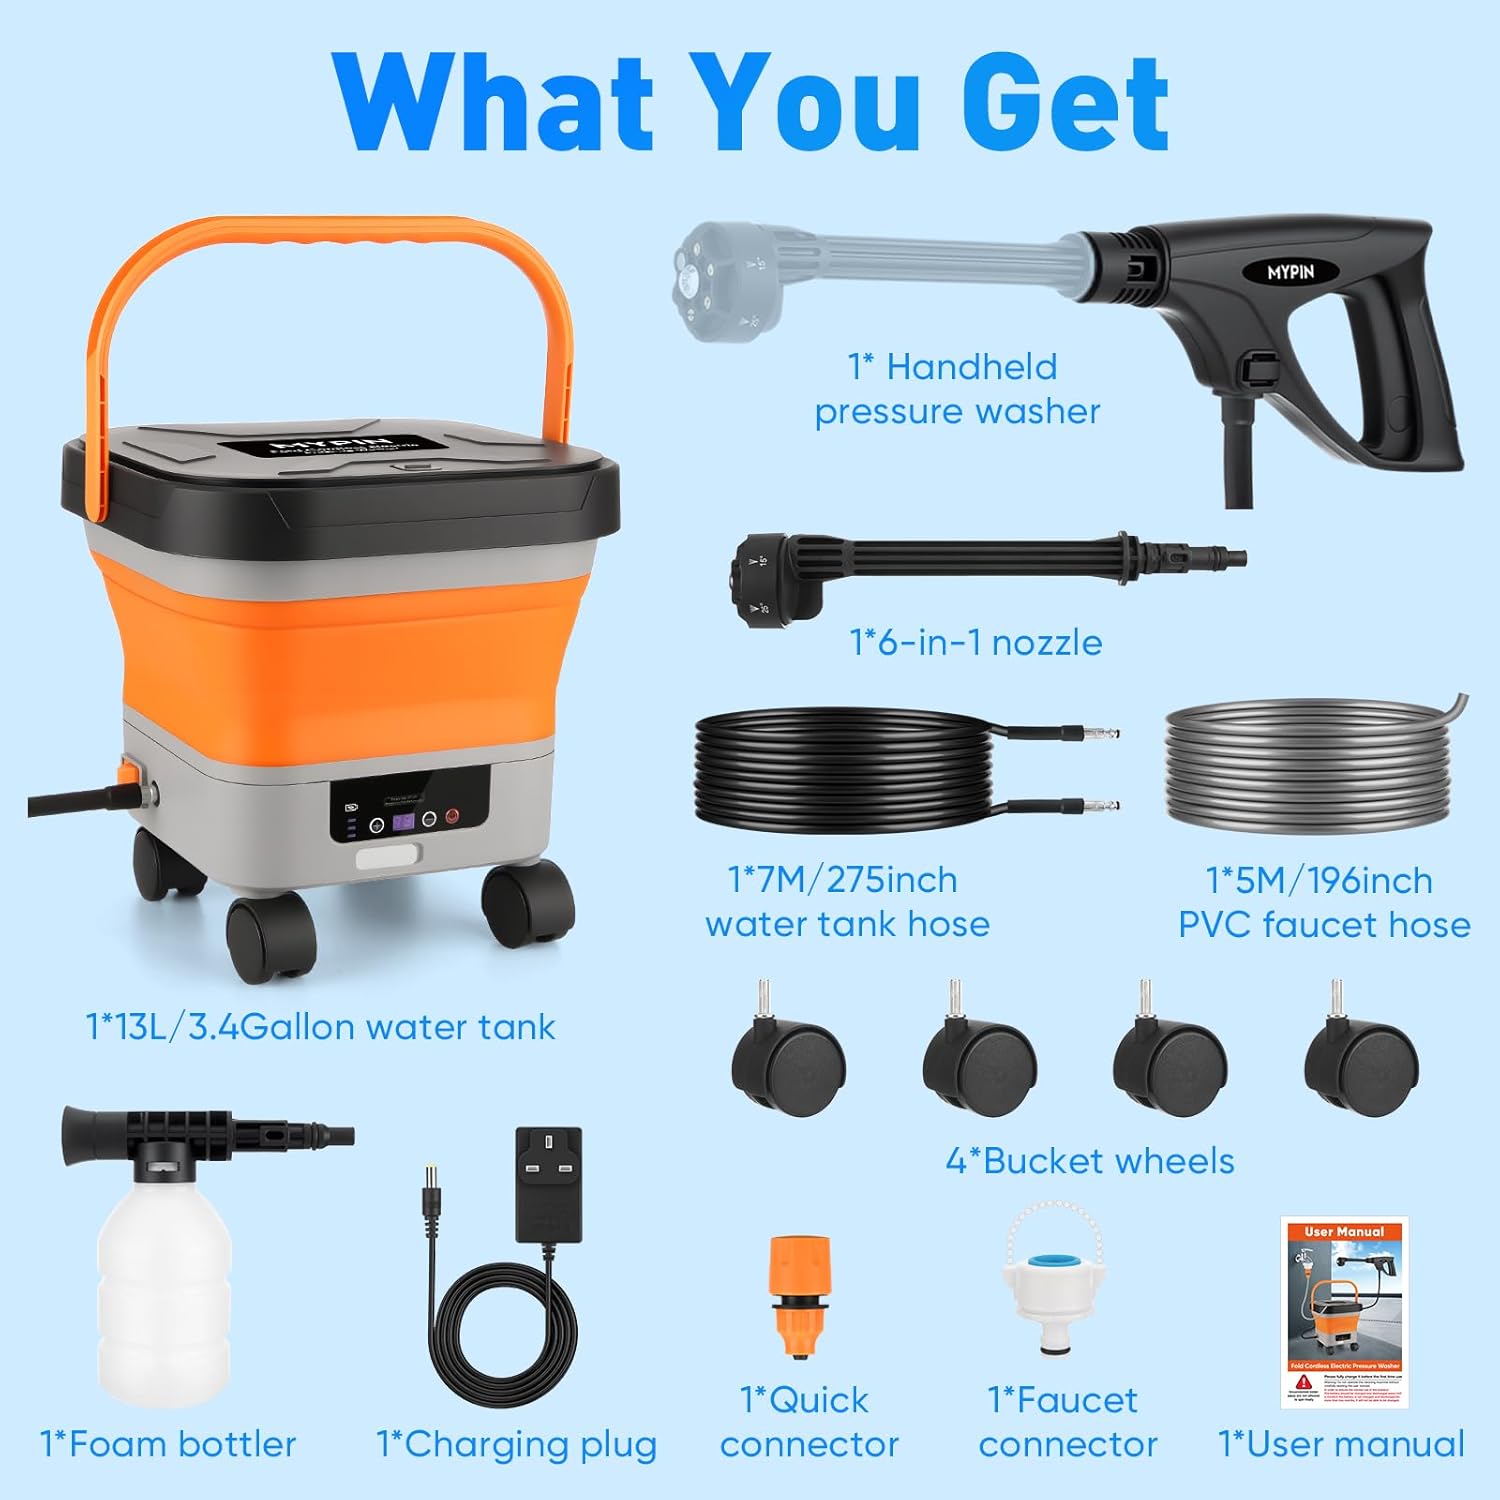
Figure 1.1 : All components included in the MYPIN Cordless Electric Pressure Washer package.
2. Consignes de sécurité
Always observe basic safety precautions when using this product to reduce the risk of injury, electric shock, or fire. Failure to follow these instructions may result in serious injury or property damage.
Consignes générales de sécurité
- Lisez toutes les instructions: Familiarisez-vous avec les commandes et le bon usage du nettoyeur haute pression.
- Portez l'équipement de sécurité approprié : Always wear eye protection, gloves, and appropriate footwear.
- Tenir les enfants et les animaux domestiques à l'écart : Ne laissez pas les enfants ou les personnes non formées utiliser le nettoyeur haute pression.
- Avoid direct spray: Never direct the water spray at people, pets, or electrical devices.
- Utiliser dans des zones bien ventilées: Assurez une ventilation adéquate pendant le fonctionnement.
- Vérifiez les dommages : Before each use, inspect the pressure washer, hoses, and connections for any signs of damage. Do not use if damaged.
- Stockage approprié : Store the pressure washer in a dry, secure location, out of reach of children.
3. caractéristiques du produit
The MYPIN Cordless Electric Pressure Washer is designed for versatile cleaning tasks with convenience and efficiency.
Caractéristiques principales
- Conception sans fil et portable : Features a foldable tank and lightweight washer for easy transport and storage, ideal for home and outdoor cleaning. The foldable water tank measures 9.5 x 9.5 x 7.9 inches when collapsed.
- Adjustable Pressure Levels: Offers 7 adjustable pressure levels with a maximum pressure of 660 PSI, allowing you to customize the water pressure for different cleaning needs and surfaces.
- Buse 6 en 1 : Equipped with a versatile 6-in-1 nozzle for various spray patterns, including 0°, 15°, 25°, 40°, Sector, and Shower modes.
- Écran LCD : An integrated LCD screen displays battery status and current pressure level, providing real-time operational information.
- Réservoir d'eau de grande capacité : Comes with a 3.4-gallon (13L) water tank, reducing the need for frequent refills during cleaning.
- Dual Hose Options: Includes a 7M (275-inch) water tank hose and a 5M (196-inch) PVC faucet hose for flexible water source options.
- Wheeled Tank: The water tank is fitted with 4 removable wheels for easy maneuverability.
- Longue durée de vie de la batterie : A full charge (3-4 hours) provides approximately 25-35 minutes of continuous cleaning time.

Figure 3.1 : The 6-in-1 nozzle offers multiple spray patterns for diverse cleaning tasks.

Figure 3.2 : The foam bottle attachment for deep cleaning with detergent.

Figure 3.3 : The foldable design of the water tank for easy storage and portability.

Figure 3.4 : The LCD display provides real-time information on battery and pressure levels.
4. Installation
Suivez ces étapes pour assembler et préparer votre nettoyeur haute pression pour sa première utilisation.
- Insérer les roues : Attach the four bucket wheels into the designated slots on the base of the water tank. Ensure they are securely locked in place.
- Install Tank Hose: Connect one end of the 7M water tank hose to the outlet port on the water tank.
- Connect to Washer Gun: Connect the other end of the 7M water tank hose to the inlet port on the handheld pressure washer gun.
- Install 6-in-1 Nozzle: Attach the 6-in-1 nozzle to the front of the washer gun. Twist until it clicks into place.
- Connect to Faucet (Optional): If using a direct water source, connect the 5M PVC faucet hose to a standard faucet using the quick connector and faucet connector. Then, connect the other end of the PVC faucet hose to the water tank's inlet.
- Remplissez le réservoir d'eau : Open the water tank and fill it with clean water. Ensure the tank is unfolded and stable.
- Charger la batterie: Before first use, fully charge the pressure washer battery using the provided charging plug. The LCD display will indicate charging status.

Figure 4.1 : Step-by-step assembly and setup instructions.
5. Fonctionnement
Once assembled and charged, your MYPIN pressure washer is ready for use.
Fonctionnement du nettoyeur haute pression
- Mise sous tension : Press the power button on the pressure washer gun to turn it on. The LCD display will illuminate.
- Sélectionnez le niveau de pression : Use the pressure adjustment buttons (+/-) on the washer gun to select one of the 7 available pressure levels. The selected level will be shown on the LCD.
- Choisissez le modèle de pulvérisation : Rotate the 6-in-1 nozzle to select the desired spray pattern (e.g., 0° for concentrated cleaning, 40° for wider coverage, Shower for gentle rinsing).
- Commencer le nettoyage : Point the nozzle at the surface to be cleaned and press the trigger on the washer gun. Maintain a safe distance from the surface to avoid damage.
- Using the Foam Bottle: To apply detergent, fill the foam bottle with appropriate cleaning solution. Attach the foam bottle to the washer gun where the nozzle usually connects. Press the trigger to spray foam. After applying foam, remove the bottle and reattach the 6-in-1 nozzle for rinsing.
- Éteindre: Release the trigger and press the power button to turn off the pressure washer.

Figure 5.1 : Effective cleaning of a car using the pressure washer and wheeled tank.
6. Entretien
Un entretien régulier garantit la longévité et les performances optimales de votre nettoyeur haute pression.
Nettoyage et stockage
- Rincer après utilisation : After each use, run clean water through the pressure washer for a few minutes to flush out any remaining detergent or debris.
- Nettoyer la buse : Inspect and clean the nozzle for any blockages. Use a small pin or needle to clear any debris from the nozzle opening.
- Drainer l'eau: Empty any remaining water from the tank and hoses to prevent freezing in cold weather, which can cause damage.
- Essuyer : Wipe the exterior of the pressure washer and tank with a damp chiffon. N'utilisez pas de produits chimiques agressifs.
- Conserver correctement : Store the pressure washer, hoses, and accessories in a dry, cool, and protected area, away from direct sunlight and extreme temperatures. The foldable tank can be collapsed for compact storage.
- Entretien de la batterie: Store the battery in a partially charged state if not used for extended periods. Recharge periodically to maintain battery health.
7. Dépannage
If you encounter issues with your pressure washer, refer to the following common problems and solutions.
| Problème | Cause possible | Solution |
|---|---|---|
| Pressure washer does not turn on. | Battery is not charged. Power button not pressed. | Chargez complètement la batterie. Assurez-vous d'appuyer fermement sur le bouton d'alimentation. |
| Basse pression d'eau. | Water tank empty. Nozzle clogged. Hose kinked. | Refill water tank. Clean the nozzle. Straighten the hose. |
| Fuites d'eau au niveau des raccords. | Connections are loose. O-rings are damaged. | Tighten all connections. Inspect and replace damaged O-rings if necessary. |
| Motor runs but no water sprays. | Air in the system. Water inlet blocked. | Prime the pump by running water through it without the nozzle. Check water inlet filter for blockages. |
Si le problème persiste après avoir essayé ces solutions, veuillez contacter le service client pour obtenir de l'aide supplémentaire.
8. Spécifications
Detailed technical specifications for the MYPIN Cordless Electric Pressure Washer.
| Spécification | Valeur |
|---|---|
| Fabricant | Mon code PIN |
| Numéro de modèle du produit | MJ-CE0419&CE0419W |
| Dimensions du produit | 33.02 x 22.1 x 22.1 cm |
| Poids du produit | 4.55 kg |
| Marque | Mon code PIN |
| Source d'énergie | Alimenté par batterie (sans fil) |
| Couleur | Orange |
| Longueur du tuyau | 7 Meters (Water Tank Hose) |
| Pression maximale | 660 PSI |
| Capacité du réservoir d'eau | 13 litres / 3.4 gallons |
9. Garantie et assistance
MYPIN products are manufactured to high-quality standards. This product comes with a standard manufacturer's warranty against defects in materials and workmanship.
Informations sur la garantie
Please refer to the warranty card included in your package or visit the official MYPIN webConsultez le site pour connaître les conditions générales de garantie détaillées. Conservez votre reçu d'achat comme preuve d'achat pour toute réclamation au titre de la garantie.
Assistance clientèle
For technical assistance, troubleshooting, or to inquire about replacement parts, please contact MYPIN customer support. Contact details can typically be found on the product packaging or the official MYPIN website.