Introduction
Thank you for choosing the VEVOR Battery Powered Backpack Sprayer. This manual provides essential information for the safe and efficient operation, maintenance, and troubleshooting of your new sprayer. Please read this manual thoroughly before first use and retain it for future reference.

Image: The VEVOR Battery Powered Backpack Sprayer, showcasing its white and orange design with the spray wand attached.
Informations importantes sur la sécurité
AVERTISSEMENT : Le non-respect de ces consignes de sécurité peut entraîner des blessures graves ou des dommages matériels.
- Do not use pressurized liquids other than those recommended for this sprayer.
- Avoid contact with eyes. Always wear appropriate protective eyewear when operating the sprayer.
- Wear protective gloves and suitable clothing when handling chemicals.
- Keep the sprayer and all chemicals out of reach of children and pets.
- Ensure proper ventilation when spraying, especially with chemical solutions.
- Do not modify the sprayer or its components. Use only genuine VEVOR replacement parts.
- Débranchez toujours la batterie avant d'effectuer toute opération d'entretien ou de nettoyage.
Produit terminéview et composants
The VEVOR Battery Powered Backpack Sprayer is designed for efficient and comfortable spraying tasks. Familiarize yourself with the main components:

Image: Labeled diagram showing key components of the backpack sprayer, including nozzles, wide mouth lid, trigger handle, trigger-lock, battery compartment, switch & pressure adjuster, and voltage digital display.
- Réservoir: 3.2 Gallon (12 Liter) capacity for liquids.
- Compartiment à piles : Houses the removable 18V 2Ah lithium battery.
- Pressure Adjuster: Dial to control spray pressure from 0-90 PSI.
- Poignée de déclenchement : Activates the spray. Features a snap-on design for easy operation.
- Spray Wands: Includes two retractable wands (plastic steel and stainless steel) for varied reach.
- Buses : Five different nozzles for various spray patterns (Windproof, Fan-shaped, Shower-Head, Single Head Copper, Three-end mist).
- Bretelles rembourrées : Conçu de manière ergonomique pour un confort optimal.
Installation
1. Déballage et inspection
Carefully remove all components from the packaging. Inspect for any damage during transit. Ensure all parts listed in the manual are present.
2. Chargement et installation de la batterie
- Open the battery cap on the sprayer.
- Remove the 18V 2Ah lithium battery from its compartment.
- Connect the battery to the provided charger. Plug the charger into a standard electrical outlet.
- Allow the battery to fully charge. The charging indicator on the charger will change when complete (refer to charger manual for specific indicator details).
- Once charged, insert the battery back into the sprayer's battery compartment, ensuring it clicks securely into place. Close the battery cap.
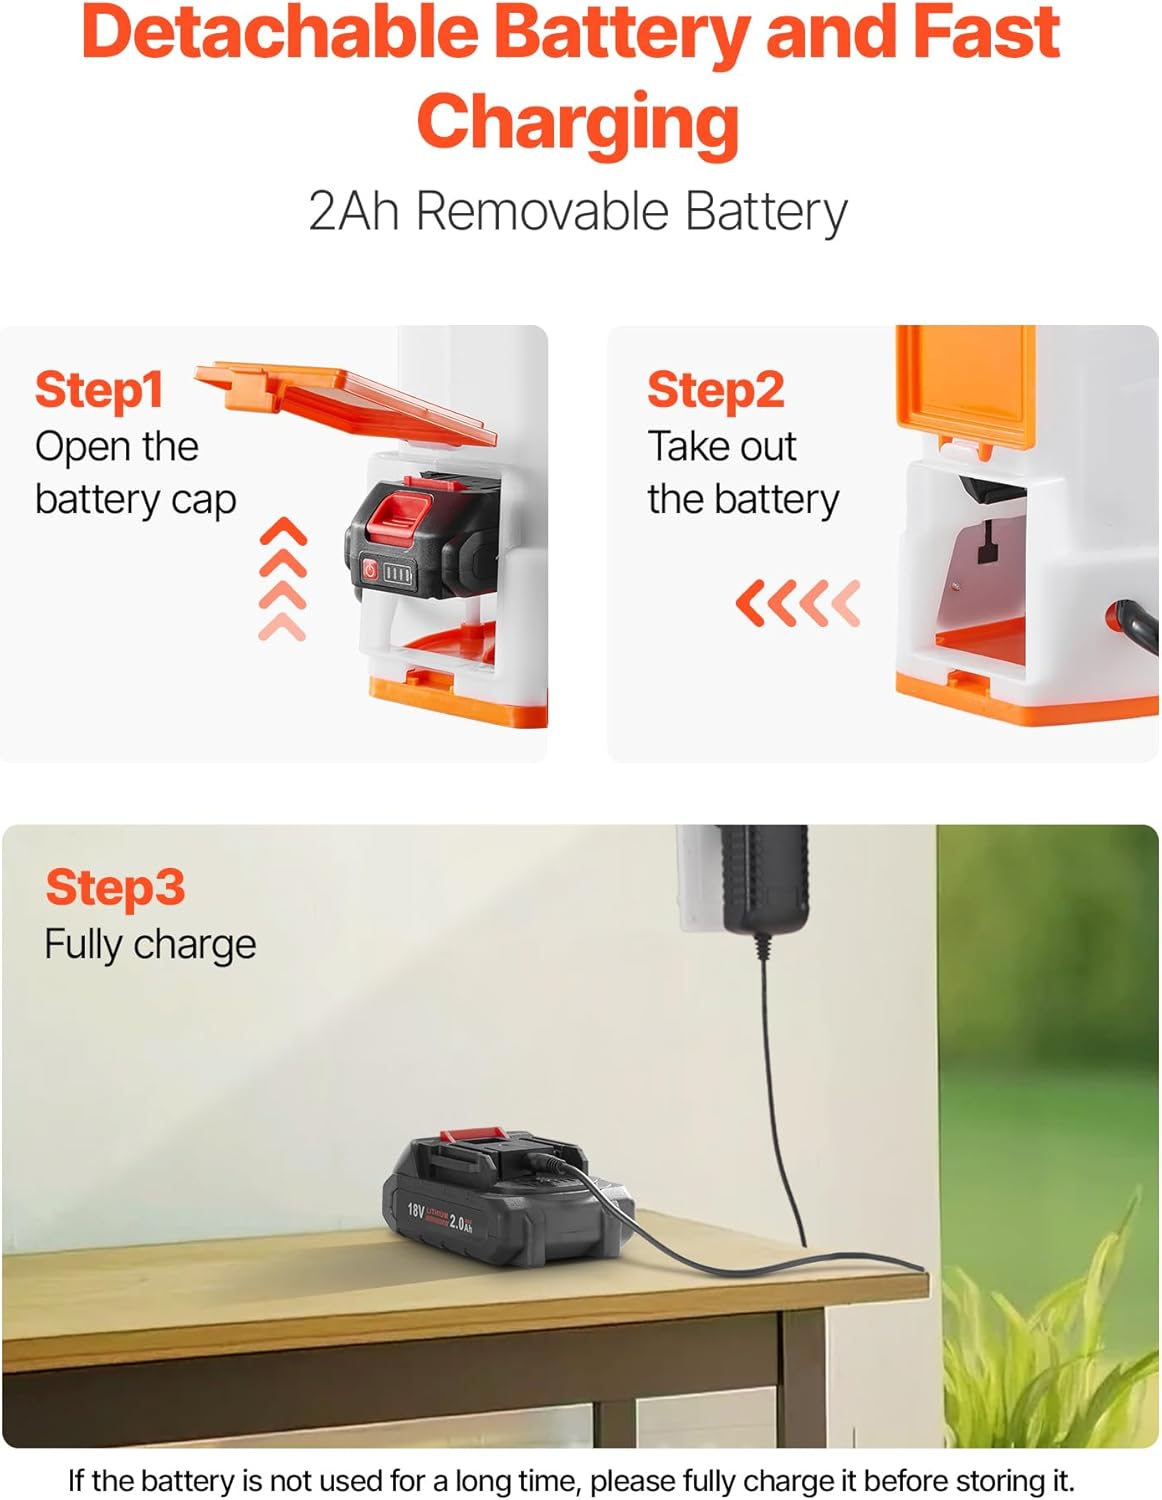
Image: A three-step visual guide demonstrating how to open the battery cap, remove the battery, and fully charge it using the provided charger.
3. Assembling the Wands and Nozzles
- Select the desired spray wand (plastic steel or stainless steel). Both are adjustable in length.
- Attach the chosen wand to the trigger handle by screwing it clockwise until secure. Use plumber's tape on threaded connections if necessary to prevent leaks.
- Select one of the five provided nozzles based on your spraying needs.
- Screw the selected nozzle onto the end of the spray wand. Ensure it is hand-tightened to prevent leaks.

Image: Comparison of the two retractable spray wands: an adjustable plastic steel wand (16-30 inches) and an adjustable stainless steel wand (21-39 inches).

Image: Visual representation of the five different nozzles included: Windproof, Fan-shaped, Shower-Head, Single Head Copper, and Three-end mist nozzles, each showing its unique spray pattern.
4. Remplissage du réservoir
- Assurez-vous que le pulvérisateur se trouve sur une surface stable et plane.
- Unscrew and remove the wide mouth lid from the top of the tank.
- Carefully pour the desired liquid (water, herbicide, fertilizer, etc.) into the tank. Do not overfill past the maximum fill line.
- Securely screw the lid back onto the tank, ensuring a tight seal to prevent leaks.
Opération
1. Mise sous/hors tension
Locate the power switch, typically near the pressure adjustment dial. Flip the switch to the 'ON' position to activate the pump. Flip to 'OFF' when done spraying or when moving the sprayer.
2. Réglage de la pression
The sprayer features an adjustable pressure dial (0-90 PSI). Rotate the dial clockwise to increase pressure and counter-clockwise to decrease pressure. Adjust the pressure according to the task and the type of liquid being sprayed.

Image : Gros plan view of the pressure adjustment dial, indicating a maximum pressure of 90 PSI and its adjustable nature.
3. Techniques de pulvérisation
- Once the tank is filled and the battery is installed, put on the backpack sprayer, adjusting the padded straps for comfort.
- Mettez l'interrupteur d'alimentation sur « ON ».
- Aim the nozzle at the target area.
- Squeeze the trigger handle to begin spraying. The trigger may have a lock feature for continuous spraying.
- Adjust the pressure dial as needed during operation to achieve the desired spray pattern and coverage.
- When finished, release the trigger and turn the power switch to 'OFF'.

Image: Four panels illustrating various applications of the sprayer: Garden, Lawn, Farm, and Pet bathing, demonstrating its versatility.
Entretien
1. Nettoyage après utilisation
Un nettoyage adéquat prolonge la durée de vie de votre pulvérisateur et prévient la contamination croisée des produits chimiques.
- Vider tout liquide restant dans le réservoir.
- Rinse the tank thoroughly with clean water. For chemical residues, follow the chemical manufacturer's cleaning recommendations.
- Fill the tank with clean water and spray it through the wand and nozzle to flush out the pump and hose.
- Nettoyez l'extérieur du pulvérisateur avec de l'eau.amp tissu.
- Remove and clean nozzles separately to prevent clogging.
2. Entretien et stockage des batteries
- Conservez toujours la batterie dans un endroit frais et sec, à l'abri de la lumière directe du soleil et des températures extrêmes.
- If the battery is not used for a long time, please fully charge it before storing it to maintain battery health.
- Rechargez la batterie périodiquement (par exemple, tous les 3 à 6 mois), même si vous ne l'utilisez pas, afin d'éviter une décharge profonde.
3. Stockage à long terme
- Ensure the sprayer is thoroughly cleaned and dry before storing.
- Store the sprayer in a dry, frost-free location.
- Remove the battery from the sprayer for long-term storage.
- Store the spray wand and nozzles in a way that prevents damage.
Dépannage
Cette section aborde les problèmes courants que vous pourriez rencontrer avec votre pulvérisateur.
| Problème | Cause possible | Solution |
|---|---|---|
| Le pulvérisateur ne s'allume pas. | Batterie non chargée ou mal installée. | Ensure battery is fully charged and properly seated in the compartment. Check power switch is ON. |
| No spray or low pressure. | Clogged nozzle or wand; low battery; air in pump; pressure dial set too low. | Clean nozzle and wand. Recharge battery. Prime pump by spraying water. Adjust pressure dial to higher setting. |
| Fuites au niveau des connexions. | Loose connections; worn O-rings; damaged hose. | Tighten all connections. Inspect and replace O-rings if damaged. Check hose for cracks or punctures. |
| Jet irrégulier. | Partially clogged nozzle; incorrect nozzle for task. | Clean nozzle thoroughly. Select appropriate nozzle for desired spray pattern. |
Caractéristiques
Detailed technical specifications for the VEVOR Battery Powered Backpack Sprayer:
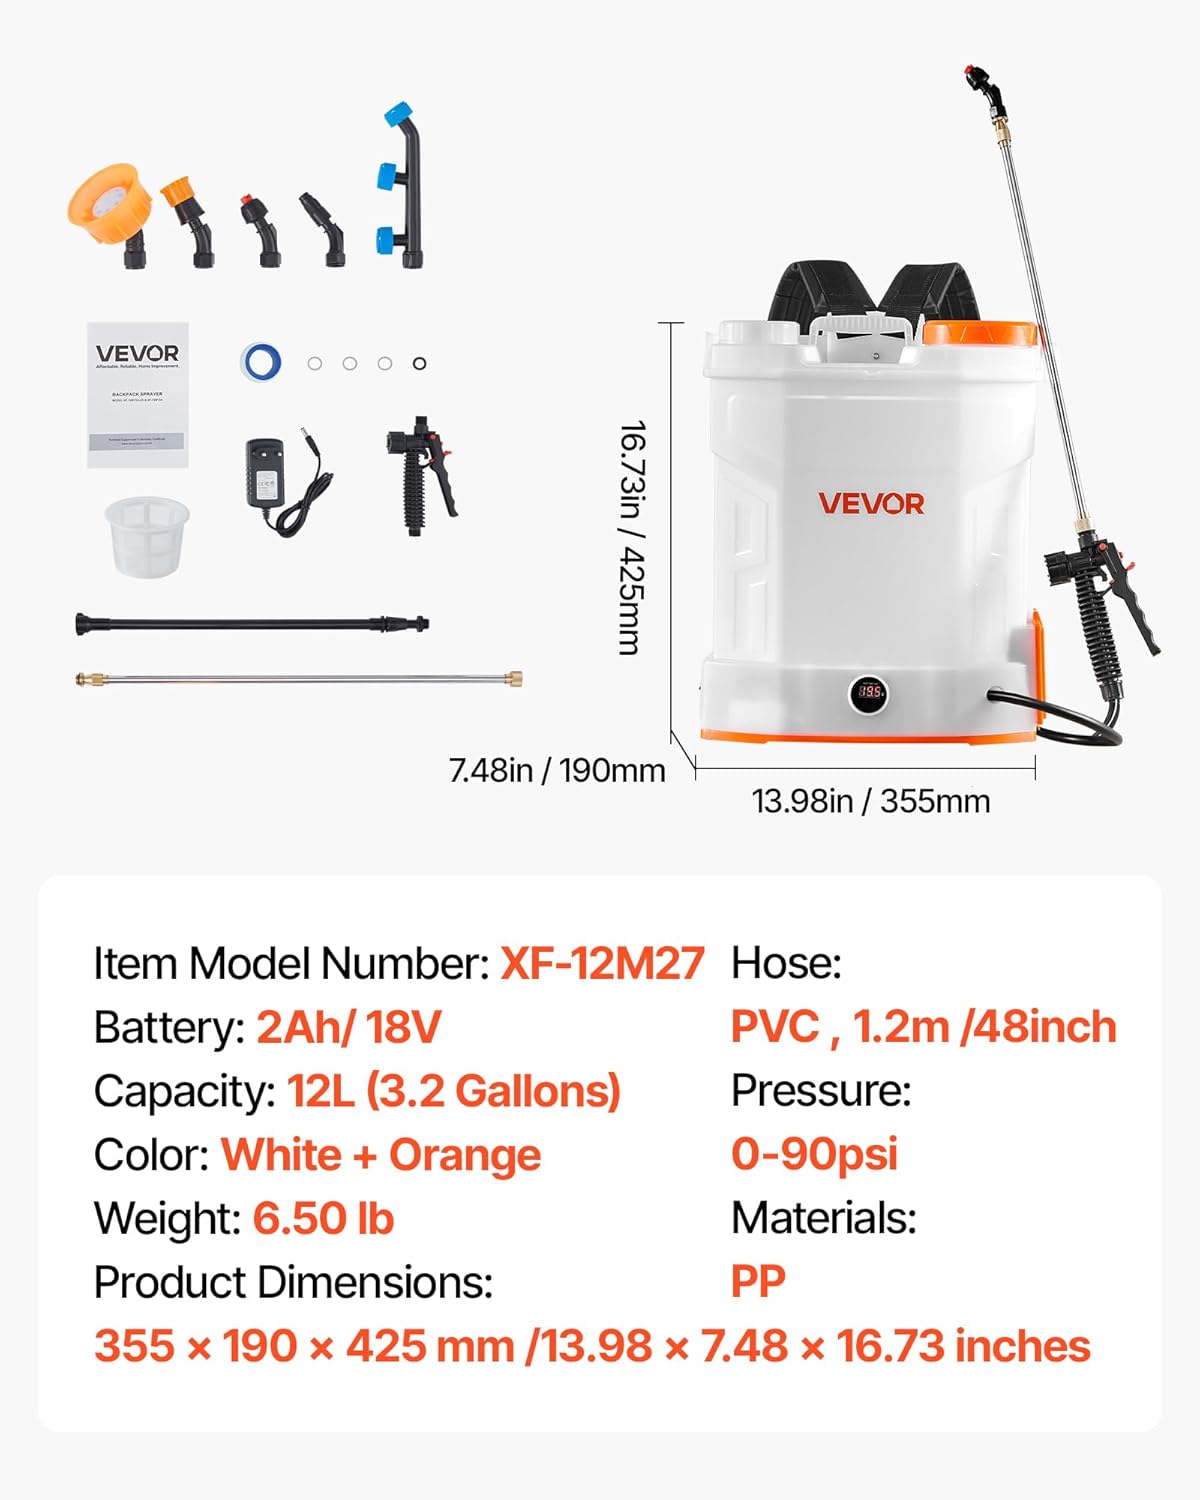
Image: A graphic displaying key specifications including item model number, battery type, capacity, color, weight, product dimensions, hose length, pressure range, and materials.
- Numéro de modèle de l'article : XF-12M27-US
- Batterie: Batterie lithium-ion 18 V 2 Ah (incluse)
- Capacité: 12 litre (3.2 gallon)
- Couleur: Blanc + orange
- Poids de l'article : 2.9 kg (6.50 lb)
- Dimensions du produit : 35.51 x 35.51 x 42.49 cm (13.98 x 7.48 x 16.73 pouces)
- Longueur du tuyau : 1.2 meters (48 inches) PVC
- Pression maximale : 90 PSI
- Source d'alimentation : Alimenté par batterie
- Matériels: PP (Polypropylène)
Garantie et assistance
Les produits VEVOR sont conçus pour offrir durabilité et performance. Pour plus de détails sur la garantie, veuillez consulter la carte de garantie fournie avec votre produit ou visiter le site officiel de VEVOR. website. If you encounter any issues or require technical assistance, please contact VEVOR customer support through their official channels. Always provide your model number (XF-12M27-US) and purchase details when seeking support.