1. Introduction
This manual provides essential information for the safe and effective installation, operation, and maintenance of your GreenGoo Recoil Starter. Please read these instructions carefully before attempting any installation or use. Keep this manual for future reference.
2. Consignes de sécurité
Always prioritize safety when working with power equipment and replacement parts.
- Ensure the lawnmower engine is completely off and cool before beginning any work.
- Débranchez le fil de la bougie pour éviter tout démarrage accidentel.
- Portez un équipement de protection individuelle approprié, tel que des gants et des lunettes de protection.
- Use the correct tools for the job to avoid damage to the part or injury.
- If you are unsure about any step, consult a qualified technician or refer to your lawnmower's specific service manual.
3. Compatibilité
This GreenGoo Recoil Starter is designed for compatibility with:
- Lawnmower Models: Dunsch LEA RIWALL 11099-40A3, 12099-40A3
- Type de moteur: Ducar DS325
Please verify your lawnmower's model and engine type before installation to ensure proper fit and function.
4. Contenu du colis
Your GreenGoo Recoil Starter package should contain:
- 1 x GreenGoo Recoil Starter Assembly (Model AV9610001)
5. Configuration et installation
Replacing a recoil starter typically involves removing the old unit and securing the new one. The exact procedure may vary slightly depending on your specific lawnmower model. Always refer to your lawnmower's owner's manual for detailed instructions.
Outils requis :
- Screwdriver (Phillips or flathead, depending on fasteners)
- Wrench or socket set (if bolts are used)
Étapes d'installation :
- Préparer la tondeuse à gazon : Ensure the engine is off, cool, and the spark plug wire is disconnected.
- Locate the Old Starter: The recoil starter is usually mounted on top or the side of the engine housing.
- Remove the Old Starter: Unscrew or unbolt the fasteners holding the old starter in place. Carefully lift it off the engine. Note how the starter engages with the engine's flywheel cup.
- Inspectez la zone : Clean any debris from the mounting surface and inspect the flywheel cup for damage.
- Install the New Starter: Position the new GreenGoo Recoil Starter, ensuring the starter pawls properly engage with the flywheel cup. Align the mounting holes.
- Secure the Starter: Insert and tighten the screws or bolts. Do not overtighten, as this can strip threads or crack the housing.
- Test d'engagement : Gently pull the starter cord a few times to ensure smooth engagement and retraction.
- Rebranchez la bougie d'allumage : Rebranchez le fil de bougie.
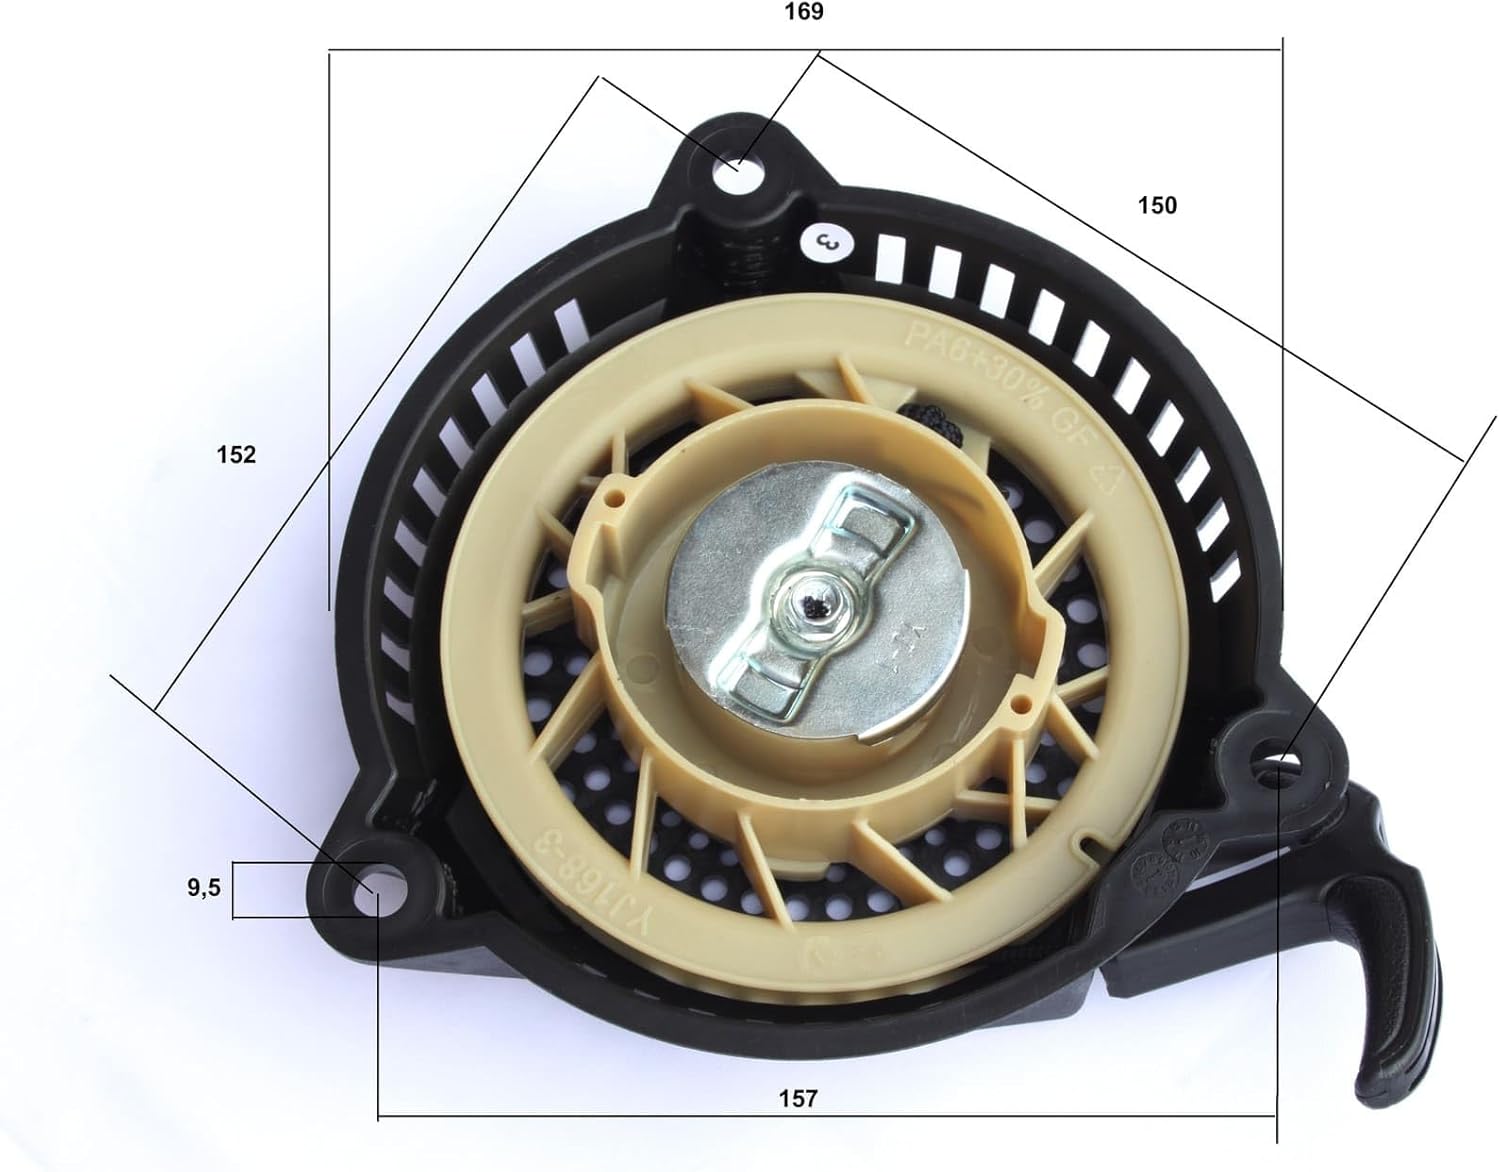
Figure 1 : Haut view of the GreenGoo Recoil Starter, showing the pull handle and housing design.

Figure 2 : Technical diagram illustrating various views and key dimensions of the recoil starter mechanism, including the black plastic housing and internal beige components. Dimensions are provided in millimeters.

Figure 3 : Côté view of the recoil starter, highlighting its profile and overall height dimension of 45mm.
6. Fonctionnement
To start your lawnmower using the recoil starter:
- Ensure the lawnmower is in a safe operating position on a level surface.
- Follow your lawnmower's specific starting procedure (e.g., prime bulb, choke setting, throttle position).
- Grasp the starter handle firmly.
- Pull the cord slowly until you feel resistance, then pull it quickly and smoothly with a full arm stroke. Do not pull the cord to its absolute maximum length or let it snap back.
- Répétez l'opération si nécessaire jusqu'à ce que le moteur démarre.
- Once the engine starts, allow the cord to retract fully and gently place the handle back into its guide.
7. Entretien
Proper maintenance extends the life of your recoil starter:
- Garder propre: Periodically clean the starter housing to prevent dirt and debris from interfering with the cord's retraction mechanism.
- Inspecter le cordon : Regularly check the starter cord for fraying, cuts, or excessive wear. Replace the cord if any damage is observed.
- Inspecter la poignée : Ensure the starter handle is securely attached and not damaged.
- Fonctionnement fluide : If the cord becomes difficult to pull or retracts slowly, it may indicate internal issues. Do not attempt to lubricate internal components unless specified by the manufacturer, as this can attract dirt.
8. Dépannage
| Problème | Cause possible | Solution |
|---|---|---|
| Le cordon ne se rétracte pas complètement. | Spring issue, debris inside, or cord damage. | Clean housing. If spring is broken, replacement of the entire starter assembly is usually required. |
| Cord is hard to pull. | Engine compression, internal starter friction, or debris. | Check engine for issues. Clean starter. Ensure proper engagement. |
| Engine does not start after pulling. | Not a starter issue; engine problem. | Refer to your lawnmower's engine troubleshooting guide (e.g., fuel, spark, compression). |
| Starter handle is loose or broken. | Usure normale. | Replace the starter assembly or the handle/cord if possible and compatible. |
9. Spécifications
- Dimensions du produit : 19 x 19 x 5 cm
- Numéro de pièce : AB9610001
- Type de source d'alimentation : Alimenté à la main
- Fabricant: GreenGoo
- Numéro de modèle de l'article : AV9610001
- ASIN: B0F2QXMWDR
10. Garantie et assistance
For warranty information or technical support, please refer to the GreenGoo official webConsultez le site web ou contactez votre revendeur. Conservez votre preuve d'achat pour toute réclamation au titre de la garantie.