1. Produit terminéview
The VCOROS VR1 Motorcycle Helmet Bluetooth Headset is designed to provide clear audio communication, music playback, and voice assistant functionality for motorcyclists. It features a slim design, robust connectivity, and durable construction suitable for various riding conditions.

Figure 1: VCOROS VR1 Main Unit and Speaker/Microphone Assembly

Figure 2 : Produit surview avec des composants étiquetés
- Bouton « + » : Augmenter le volume / Chanson suivante
- "-" Bouton: Baisser le volume / Chanson précédente
- Bouton Lecture/Pause : Answer/Hangup/Call Back/Reject, Play/Pause Music
- AI Assistant Button: Activer l'assistant vocal
- Bouton d'alimentation : Marche/Arrêt
- Indicateur de charge : LED rouge
- Bluetooth Working Indicator: LED bleue
- Interface haut-parleur/microphone : Connects headset components
- Port de charge de type C : Pour charger l'appareil
2. Contenu du colis
Veuillez vérifier que tous les éléments énumérés ci-dessous sont inclus dans votre colis :

Figure 3 : Accessoires inclus
- 1 x Bluetooth Headset Unit
- 1 x Set of Earphones with Soft Microphone
- 1 x Manuel d'utilisation
- 1 x Installation Clip Base
- 5 x Velcro Pads for Installation
- 1 x câble de chargement de type C
3. Installation
The VCOROS VR1 headset offers two primary installation methods: clip-on and velcro. For enhanced stability, it is recommended to use both the clip base and velcro pads together.
3.1. Preparing Your Helmet
Ensure the inner lining of your helmet is clean and dry where the headset and speakers will be mounted.
3.2. Installation des haut-parleurs
- Identify suitable locations inside your helmet for the speakers, typically within the ear pockets.
- Attach the velcro pads to the back of the speakers.
- Securely press the speakers into the helmet's ear pockets.
- Route the speaker wires discreetly under the helmet's padding to the desired location for the main unit.
3.3. Installation du microphone
The VR1 comes with a soft microphone, suitable for most full-face helmets. Position the microphone close to your mouth for optimal voice clarity, typically along the cheek pad or chin bar.
3.4. Installation de l'unité principale
- Méthode de fixation par clip : Slide the clip base between the helmet shell and the inner padding on the left side of the helmet. Ensure it is firmly secured.
- Velcro Method: Attach the adhesive velcro pad to the exterior of the helmet where you wish to mount the main unit.
- Slide the main unit onto the clip base or press it firmly onto the velcro pad until it is securely attached.
- Connect the speaker/microphone cable to the interface port on the main unit.
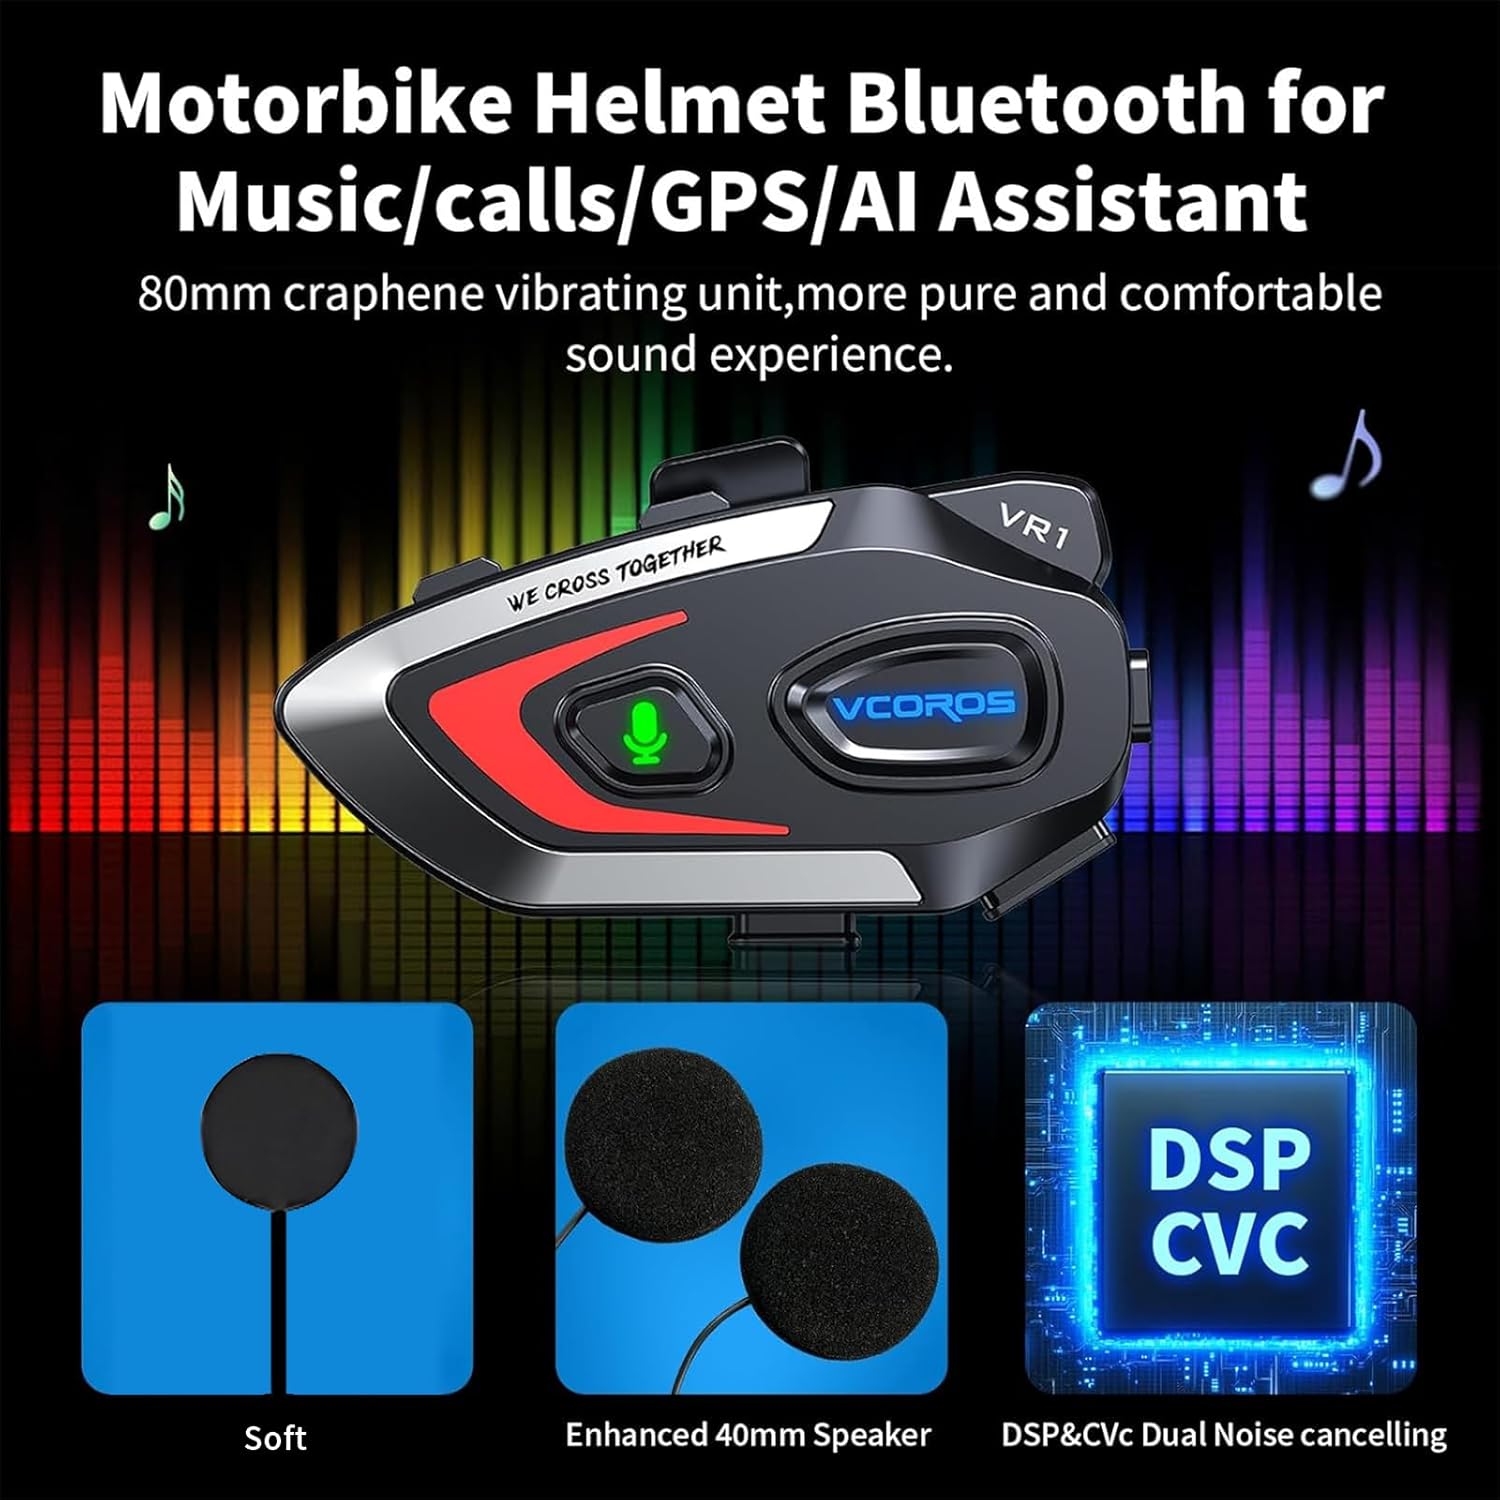
Figure 4 : Schéma d'installation
Note: For optimal stability, it is recommended to use both the clip base and the velcro pads together for mounting the main unit.
4. Fonctionnement
4.1. Marche/Arrêt
- Mise sous tension : Press and hold the Power button until the blue indicator light flashes and you hear a "Power On" voice prompt.
- Éteindre: Press and hold the Power button until the red indicator light flashes and you hear a "Power Off" voice prompt.
4.2. Couplage Bluetooth
- Assurez-vous que le casque est éteint.
- Press and hold the Power button for approximately 5-7 seconds until the blue and red indicator lights flash alternately, indicating pairing mode. You will hear a "Pairing" voice prompt.
- On your mobile device, enable Bluetooth and search for "VR1".
- Select "VR1" to connect. Once connected, the blue indicator light will flash slowly, and you will hear a "Connected" voice prompt.
4.3. Contrôle de la musique
- Lecture/Pause : Appuyez brièvement sur le bouton Lecture/Pause.
- Chanson suivante : Appuyez brièvement sur le bouton « + ».
- Chanson précédente : Appuyez brièvement sur le bouton « - ».
- Monter le son: Appuyez longuement sur le bouton « + ».
- Baisser le volume: Appuyez longuement sur le bouton « - ».
4.4. Gestion des appels
- Répondre à l'appel : Appuyez brièvement sur le bouton Lecture/Pause lorsqu'un appel entrant sonne.
- Fin d'appel : Appuyez brièvement sur le bouton Lecture/Pause pendant un appel.
- Rejeter l'appel : Appuyez longuement sur le bouton Lecture/Pause lorsqu'un appel entrant sonne.
- Recomposer le dernier numéro : Appuyez deux fois sur le bouton Lecture/Pause.
4.5. Assistant vocal IA
The VR1 supports AI voice control for both Android and Apple systems.
- Activer l'assistant vocal: Short press the AI Assistant button (microphone icon) to wake up your device's voice assistant (e.g., Siri, Google Assistant).

Figure 5: AI Voice Assistant in Use
5. Chargement et autonomie de la batterie
The VCOROS VR1 headset is equipped with a rechargeable lithium-ion battery, providing extended usage times.
- Temps de charge : Environ 2.5 heures pour une charge complète.
- Temps de travail continu : Up to 25 hours (music playback).
- Continuous Call Time: Jusqu'à 20 heures.
- Autonomie en veille : Jusqu'à 270 heures.
5.1. Instructions de chargement
- Connectez le câble de chargement Type-C fourni au port de chargement du casque.
- Connectez l'autre extrémité du câble à une source d'alimentation USB (par exemple, un ordinateur, un adaptateur mural).
- The charging indicator (red LED) will illuminate during charging and turn off once fully charged.

Figure 6 : Autonomie de la batterieview
6. Caractéristiques d'étanchéité à l'eau et à la poussière
The VCOROS VR1 headset boasts an IPX6 waterproof rating, ensuring reliable performance even in challenging weather conditions.
- Classement IPX6 : Protected against powerful water jets. This means the device can withstand heavy rain and splashes, making it suitable for use during motorcycle rides in various weather.
- The tightly structured and solid waterproof design effectively blocks dust and rain from invading the internal components, allowing for worry-free travel.

Figure 7: IPX6 Waterproof Demonstration
7. Qualité audio et réduction du bruit
Experience high-definition sound with the VCOROS VR1, featuring advanced audio technologies for clear communication and immersive music.
- Qualité sonore haute définition : Equipped with an 80mm graphene vibrating unit for a pure and comfortable sound experience.
- Double réduction du bruit : Adopts intelligent CVC and DSP dual filter noise reduction technology, effectively reducing ambient noise for clear audio transmission and reception, even at high speeds.
- Enhanced 40mm Speakers: Offre une sortie audio robuste et claire.

Figure 8: Audio Technology Details
8. Compatibilité
The VCOROS VR1 headset is designed for broad compatibility with various helmet types and smart devices.
- Compatibilité des casques : Suitable for all types of helmets, including Full-face, Modular, Off-road, Retro, and 3/4 helmets. The slim 0.3-inch thick headphones ensure a comfortable fit without pressing against the ears.
- Compatibilité des appareils : Connects wirelessly via Bluetooth 5.3 to smartphones, tablets, and other Bluetooth-enabled devices.

Figure 9 : Compatibilité des casques
9. Spécifications
| Fonctionnalité | Détail |
|---|---|
| Marque | VCOROS |
| Modèle | VR1 (Soft Mic) |
| Technologie de connectivité | Sans fil (Bluetooth 5.3) |
| Indice d'étanchéité | IPX6 |
| Suppression du bruit | CVC and DSP Dual Filter |
| Type de batterie | Lithium-ion rechargeable |
| Temps de charge | Environ 2.5 heures |
| Working Time (Music) | Jusqu'à 25 XNUMX heures |
| Temps de veille | Jusqu'à 270 XNUMX heures |
| Diamètre du haut-parleur | 40 mm |
| Headphone Thickness | 0.3 pouces (environ 7.6 mm) |
| Poids | 180 grammes |
| Appareils compatibles | Smartphones, tablettes |
10. Consignes de sécurité
Warning: Use with caution while riding. Do not distract yourself from driving.
- Always prioritize road safety. Using the headset should not impair your ability to hear ambient sounds or focus on driving.
- Adjust volume to a level that allows you to hear emergency vehicles and other important sounds.
- Do not attempt to install or adjust the headset while riding.
- Tenez l'appareil à l'écart des températures extrêmes, de la lumière directe du soleil et des matériaux corrosifs.
- Do not disassemble or modify the device. This may void the warranty and pose safety risks.
11. Dépannage
If you encounter any issues with your VCOROS VR1 headset, please refer to the following common solutions:
11.1. L'appareil ne s'allume pas
- Ensure the battery is charged. Connect the headset to a power source using the provided Type-C cable and allow it to charge for at least 30 minutes.
- Press and hold the Power button for a few seconds to confirm it's not just a short press.
11.2. Impossible de jumeler avec l'appareil
- Make sure the headset is in pairing mode (red and blue lights flashing alternately).
- Ensure Bluetooth is enabled on your mobile device and it is within range (typically 10 meters).
- Forget "VR1" from your device's Bluetooth settings and try pairing again.
- Restart both the headset and your mobile device.
11.3. Absence de son ou faible volume
- Vérifiez le niveau sonore du casque et de votre appareil connecté.
- Ensure the speaker wires are securely connected to the main unit.
- Verify that the speakers are correctly positioned within the helmet's ear pockets.
11.4. Poor Microphone Quality
- Ensure the microphone is positioned close to your mouth and not obstructed.
- Check for any damage to the microphone cable or connector.
11.5. Problèmes de charge
- Ensure the Type-C cable is fully inserted into the charging port.
- Essayez un autre adaptateur d’alimentation ou un autre port USB.
- Vérifiez que le câble de chargement n'est pas endommagé.
12. Garantie et assistance
VCOROS products are manufactured to high quality standards. For warranty information, technical support, or service inquiries, please contact VCOROS customer support through the retailer where you purchased the product or visit the official VCOROS website.
Veuillez conserver votre preuve d'achat pour les réclamations au titre de la garantie.