1. Introduction
This manual provides essential instructions for the installation, operation, and maintenance of your Renogy Rover 20A MPPT Charge Controller. Please read this manual thoroughly before installation and use to ensure optimal performance and safety. Keep this manual for future reference.

Figure 1.1: Renogy Rover 20A MPPT Charge Controller
The Renogy Rover 20A MPPT Charge Controller is designed to optimize the charging process from your solar panels to your battery bank. It features Maximum Power Point Tracking (MPPT) technology, ensuring high efficiency even under varying light conditions. This controller is compatible with 12V and 24V battery systems and supports various battery types, including Gel, Sealed, Flooded, and Lithium.
2. Consignes de sécurité
Veuillez respecter les consignes de sécurité suivantes lors de l'installation et du fonctionnement :
- Branchez toujours d'abord la batterie au régulateur de charge, puis le panneau solaire, et enfin la charge. Débranchez-les dans l'ordre inverse.
- Ensure all wiring is correctly sized and connections are secure to prevent loose connections that can cause excessive heating.
- Install the charge controller in a well-ventilated area, away from flammable materials and direct sunlight.
- Do not disassemble or attempt to repair the charge controller. Contact Renogy support for assistance.
- Portez un équipement de protection individuelle approprié, notamment une protection oculaire, lorsque vous travaillez avec des batteries et des systèmes électriques.
- Assurez-vous que le système voltage does not exceed the maximum input voltage of the controller (100V).
3. Contenu du colis
Vérifiez que tous les articles sont inclus dans votre colis :
- Contrôleur de charge solaire MPPT Renogy Rover 20A
- Câble du capteur de température
- Manuel de l'utilisateur (ce document)
4. caractéristiques du produit
The Renogy Rover 20A MPPT Charge Controller offers advanced features for efficient solar power management:
- Dual-Peak MPPT Technology: Achieves up to 99.9% tracking efficiency and 98% conversion efficiency, optimizing solar harvest even in partial shading or cloudy conditions.
- Compatibilité étendue avec les batteries : Supports Gel, Sealed, Flooded, and Lithium battery types.
- Compensation de température : Operates effectively across a wide temperature range (-40°F to 149°F) with automatic charging adjustments to protect batteries.
- Protections complètes : Includes TVS surge protection against lightning strikes, reverse polarity, overcharging, over-discharging, overload, and short-circuit protection.
- 4-Stage Chargement : Provides precise Bulk, Absorption, Float, and Equalization charging for lead-acid batteries, extending their lifespan.
- Lithium Battery Reactivation: Safely revives deeply discharged lithium batteries.
- LCD Display & Data Logging: Backlit LCD displays real-time voltage, current, and error information. Stores up to one year of performance data.
- Modbus Support: Integrates Modbus protocol for smart home solar kits and remote monitoring.
- Direct DC Load Output: Can directly power DC appliances and handle capacitive load surges. Features load scheduling via timer.
- App Monitoring (Optional): Compatible with the BT-2 module (sold separately) for monitoring via the Renogy DC Home App.
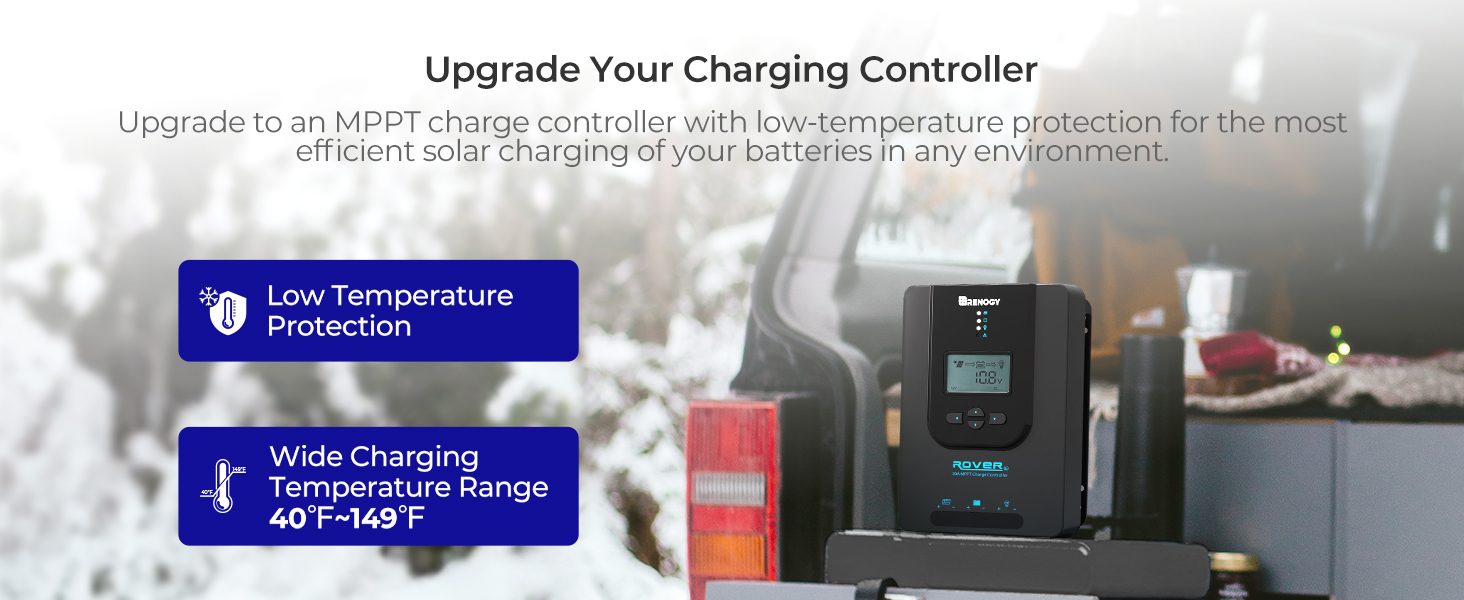
Figure 4.1: Maximizing Solar Harvest with 99% Tracking Efficiency

Figure 4.2: Charge Controller with Wide Temperature Adaptability (-40°F to 149°F)
5. Configuration et installation
Follow these steps for proper installation of your charge controller:
- Montage: Choose a dry, well-ventilated location for mounting the controller. Ensure there is sufficient clearance around the unit for heat dissipation. Mount vertically on a non-flammable surface.
- Séquence de câblage :
- Raccordez les câbles de la batterie aux bornes de la batterie sur le contrôleur de charge. Assurez-vous de respecter la polarité (+ sur + et - sur -).
- Raccordez les câbles du panneau solaire aux bornes PV du régulateur de charge. Veillez à respecter la polarité.
- Connect the load cables to the load terminals on the charge controller (optional). Ensure correct polarity.
- Capteur de température : Connect the included temperature sensor cable to the designated port on the controller. Place the sensor near the battery to enable accurate temperature compensation for charging.
- Mise sous tension initiale : Once all connections are secure, the controller will power on and display system information on the LCD.
Important: Always connect the battery first and disconnect the battery last to prevent damage to the controller.
6. Mode d'emploi
The LCD display and buttons allow you to monitor and configure the charge controller.
6.1. LCD Display Navigation
Use the buttons on the front panel to navigate through the display screens and adjust settings. Refer to the on-screen prompts for specific actions like 'Select' or 'Enter'.
6.2. Sélection du type de batterie
The controller automatically detects 12V/24V system voltages for non-lithium batteries. For lithium batteries, you must manually adjust the battery voltage setting through the controller's menu to ensure proper charging parameters.
6.3. Lithium Battery Activation
The controller includes a lithium battery activation function. This feature allows charging of deeply discharged lithium batteries that might otherwise be unresponsive.

Figure 6.1: Lithium Activation ON
To prevent over-activation and unnecessary activation, you can turn OFF the lithium activation function. This helps avoid potential damage to the battery if it is not intended for activation.

Figure 6.2: Lithium Activation OFF
6.4. Monitoring and Load Control
The LCD provides real-time data on solar input, battery status, and load output. You can also configure load settings, including timers for scheduled operation of connected DC appliances.
7. Entretien
Regular maintenance ensures the longevity and optimal performance of your charge controller:
- Inspecter les connexions : Vérifiez régulièrement le serrage et l'absence de corrosion de tous les raccords électriques. Assurez-vous qu'aucun fil n'est effiloché ou endommagé.
- Nettoyer le contrôleur : Veillez à ce que la manette reste propre et exempte de poussière et de débris. Essuyez sa surface avec un chiffon sec. N'utilisez ni liquides ni solvants.
- Ventilation: Veillez à ce que la zone d'installation reste bien ventilée afin d'éviter toute surchauffe.
- Inspection de la batterie : Regularly inspect your batteries for any signs of damage, swelling, or leaks.
8. Dépannage
Si vous rencontrez des problèmes avec votre contrôleur de charge, consultez les problèmes et solutions courants suivants :
| Problème | Cause possible | Solution |
|---|---|---|
| Le contrôleur ne s'allume pas | Loose battery connection, battery voltage trop bas | Check battery wiring and voltage. Ensure battery is connected first. |
| Pas de recharge solaire | Solar panel not connected, insufficient sunlight, incorrect polarity | Verify solar panel connections and polarity. Check for shading. |
| Chargement impossible | Load disconnected, overload, load timer active | Check load connections. Reduce load. Adjust load timer settings. |
| Vol incorrecttage lectures | Loose connections, faulty sensor | Check all wiring. Ensure temperature sensor is properly connected. |
For persistent issues or error codes not listed, please contact Renogy customer support.
9. Spécifications
| Spécification | Valeur |
|---|---|
| Marque | Rénogie |
| Modèle | Rover 20A MPPT |
| Courant de charge maximal | 20A |
| Vol systèmetage | 12V/24V Auto-Detect (DC) |
| Vol d'entrée PV max.tage | 100V |
| Efficacité du suivi | 99.9% |
| Efficacité de conversion | 98% |
| Type d'affichage | Écran LCD |
| Plage de température de fonctionnement | -40°F à 149°F (-40°C à 65°C) |
| Matériel | Acrylonitrile Butadiène Styrène (ABS), Plastique |
| Poids de l'article | 1.59 kilogrammes |
| Code UPC / GTIN | 840315237445 |
10. Garantie et assistance
The Renogy Rover 20A MPPT Charge Controller comes with a Garantie matériel et fabrication de 3 ans. This warranty covers defects in materials and manufacturing under normal use.

Figure 10.1: 3-Year Material and Workmanship Warranty
For warranty claims, technical assistance, or any questions regarding your product, please contact Renogy customer support. Keep your purchase receipt as proof of purchase for warranty services.
You can find more information and contact details on the official Renogy website: www.renogy.com