1. Introduction
This manual provides detailed instructions for the installation, operation, and maintenance of your ANNKE AU-DT81DX200-V1 4K 8-Channel Digital Video Recorder (DVR). This DVR is designed for security surveillance systems, offering 4K (8MP) high-definition live viewing and recording capabilities. It features advanced H.265+ video compression, AI human/vehicle detection, and supports various camera types for flexible integration.

Image 1.1: The ANNKE 4K 8CH DVR connected to a display, illustrating its 4K Ultra HD video capability.
2. Contenu du colis
Verify that all items listed below are included in your package. If any items are missing or damaged, contact ANNKE customer support.
- 1x ANNKE 4K 8CH DVR with 2TB Hard Drive
- 1 câble HDMI de 1.8 m (5.9 pi)
- 1 câble Ethernet de 1 m (3.2 pi)
- 1x Adaptateur secteur
- 1x souris USB
- 1x Manuel d'utilisation (ce document)
- 1 autocollant mural

Image 2.1: Visual representation of all components included in the ANNKE 4K 8CH DVR package.
3. Système terminéview
The ANNKE AU-DT81DX200-V1 DVR is a hybrid 5-in-1 system, supporting various camera technologies. It can operate in two primary modes:
- Mode DVR : Supports up to 8 BNC (TVI/AHD/CVI/CVBS) cameras and an additional 4 IP cameras.
- Mode NVR : Can be configured to support up to 12 IP cameras exclusively.
This flexibility allows for integration with existing analog systems while providing options for future IP camera expansion.
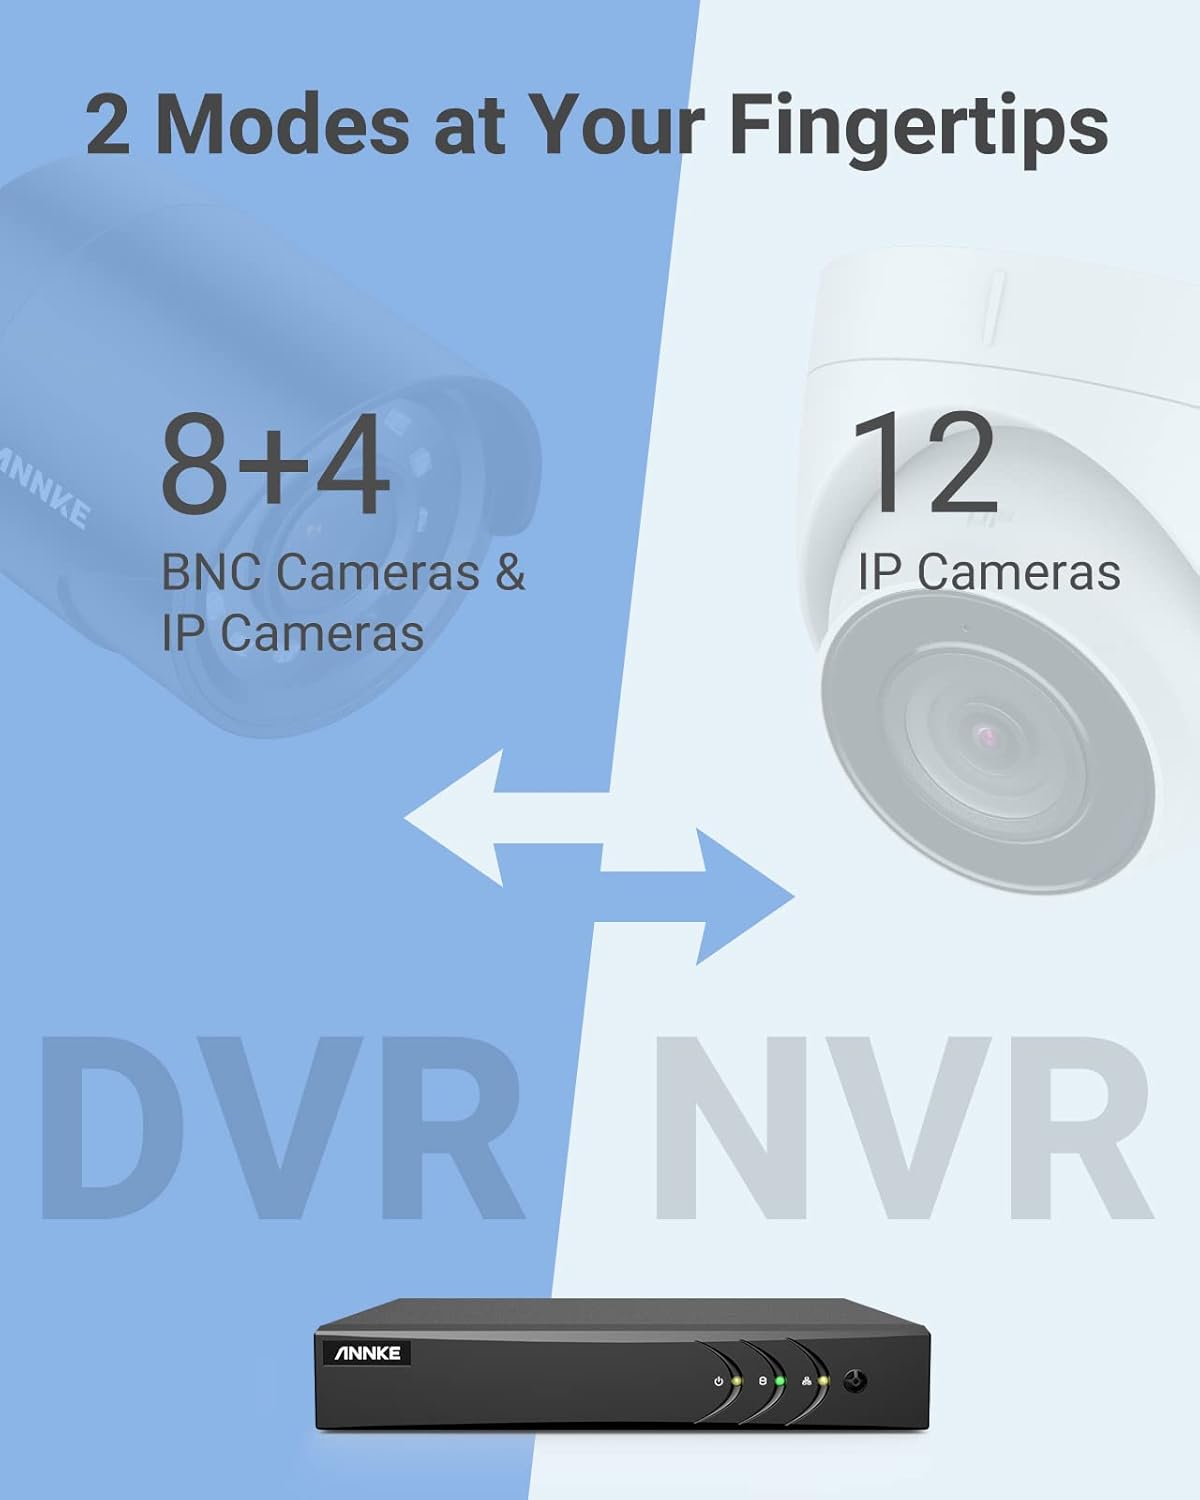
Image 3.1: Illustration of the DVR's dual operational modes, supporting both BNC and IP cameras or IP cameras exclusively.
4. Guide d'installation
4.1 Configuration physique
- Connecter les caméras : Connect your security cameras to the BNC video input ports on the back of the DVR. For IP cameras, connect them to your network switch/router, and ensure the DVR is also connected to the same network via the Ethernet cable.
- Connecter le moniteur : Connect a monitor to the DVR's HDMI or VGA output port using the provided HDMI cable or a VGA cable (not included).
- Connecter une souris USB : Branchez la souris USB sur l'un des ports USB du DVR.
- Connecter l'alimentation : Branchez l'adaptateur secteur à l'entrée d'alimentation du DVR, puis branchez-le à une prise de courant. Le DVR s'allumera automatiquement.
4.2 Configuration initiale
Au premier démarrage, l'enregistreur numérique vous guidera à travers un assistant de configuration initiale. Suivez les instructions à l'écran pour :
- Configurez un mot de passe robuste pour le compte administrateur.
- Configurer les paramètres réseau (le DHCP est recommandé pour la plupart des utilisateurs).
- Régler la date et l'heure.
- Scan and add IP cameras if applicable.
5. Utilisation du DVR
5.1 En direct View
Après la configuration initiale, le DVR affichera le flux en direct. view from connected cameras. Use the USB mouse to navigate the interface. Right-click to access the main menu.
5.2 Enregistrement
The DVR is pre-configured for continuous recording. You can customize recording schedules, motion-triggered recording, or alarm-triggered recording via the main menu under Enregistrement > Planification.
5.3 Lecture
Pour review enregistré footage:
- Du direct view, faites un clic droit et sélectionnez Lecture.
- Select the desired camera(s) and date.
- Use the timeline to navigate through recordings. Events (like motion detection) are often marked on the timeline for quick access.

Image 5.1: The DVR's playback interface, demonstrating how to locate and review Événements enregistrés sur une chronologie.
6. Fonctionnalités avancées
6.1 Détection humaine/véhicule par IA
The DVR incorporates deep learning-based motion detection 2.0, which can differentiate between human and vehicle movements. This significantly reduces false alarms caused by environmental factors such as leaves or light changes.
- Configuration: Enable and configure AI detection for each analog channel via the main menu under AI > Motion Detection 2.0.
- Événements intelligents : Supports line crossing and intrusion detection for specific areas.
- Alertes : Configure the DVR to send app push notifications, email alerts, or trigger a buzzer when human or vehicle motion is detected.
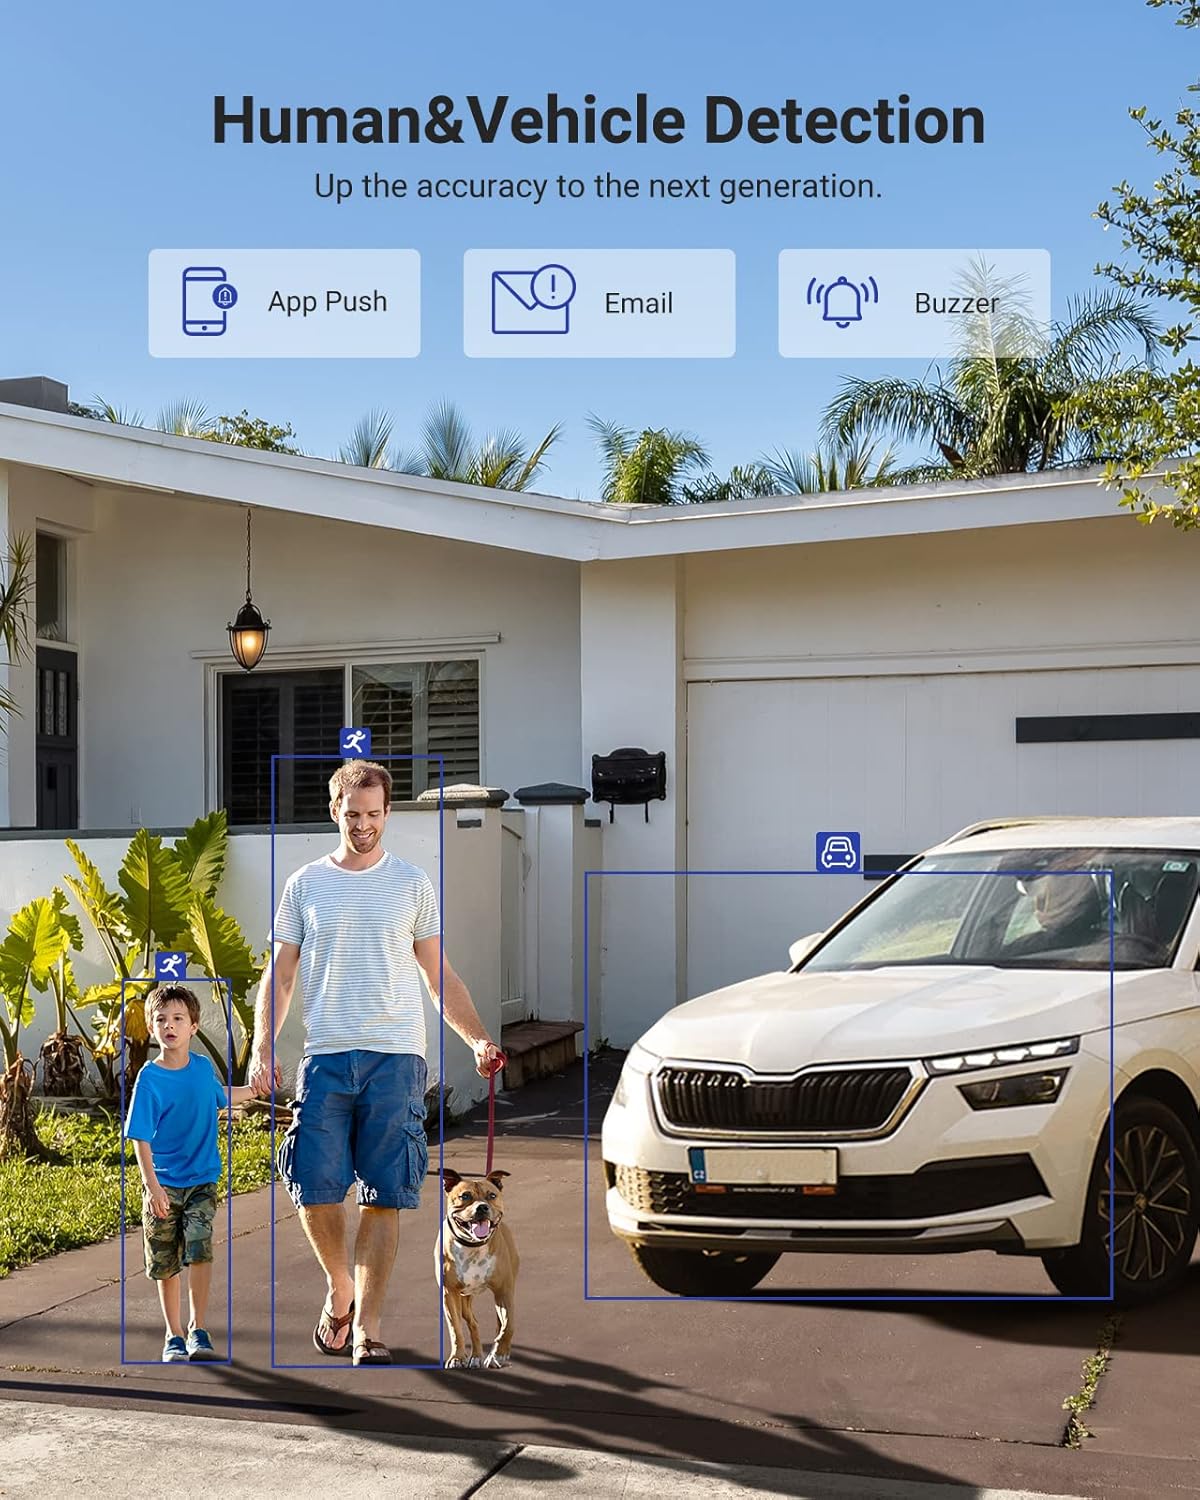
Image 6.1: Visual demonstration of the AI human and vehicle detection capability, showing how the system identifies and distinguishes between people and vehicles.
6.2 Accès à distance
Access your DVR remotely from anywhere using the ANNKE Vision App or a web navigateur.
- Application ANNKE Vision : Download the app from the App Store (iOS) or Google Play Store (Android). Register an account and add your DVR by scanning the QR code or entering its serial number.
- Web Navigateur: Access the DVR's web interface en saisissant son adresse IP dans un web navigateur sur votre ordinateur.
- Compatibilité: The system is compatible with various devices including smartphones, tablets, laptops, and personal computers. It also supports integration with Alexa for voice control.

Image 6.2: Remote access via the ANNKE Vision App, showing compatibility with mobile devices and Alexa.
7. Gestion vidéo
7.1 Compression vidéo H.265+
The DVR utilizes advanced H.265+ video compression technology. This technology significantly reduces file sizes, saving up to 80% of storage space compared to H.264 compression, while maintaining video quality. This allows for longer recording durations on the same 2TB hard drive.

Image 7.1: Comparison illustrating the storage efficiency of H.265+ compression versus H.264.
8. Compatibilité
The ANNKE AU-DT81DX200-V1 is a versatile 5-in-1 hybrid DVR, designed to be compatible with a wide range of security cameras:
- HD TVI Input: Supports 8 MP@15 fps, 5 MP@20 fps, 3K@20 fps, 4 MP@30 fps.
- AHD Input: Supports 5 MP@20 fps, 4 MP@30 fps, 1080p@25 fps, 1080p@30 fps.
- HD CVI Input: Supports 4 MP@30 fps, 4 MP@25 fps, 1080p@25 fps, 1080p@30 fps.
- Entrée CVBS : Supports PAL/NTSC standards.
- IPC Input: Supports up to 8MP IP cameras.
This broad compatibility ensures that the DVR can integrate with both older analog cameras and modern IP cameras, providing a flexible upgrade path for existing surveillance systems.

Image 8.1: The DVR's compatibility with various camera technologies, including TVI, CVI, AHD, and IP cameras.
9. Spécifications
| Fonctionnalité | Spécification |
|---|---|
| Marque | ANNKE |
| Numéro de modèle | AU-DT81DX200-V1 |
| Technologie de connectivité | Câblé |
| Résolution de capture vidéo | 4K (8MP) |
| Nombre de canaux | 8 (Analog) + 4 (IP) or 12 (IP) |
| Compression vidéo | H.265 Pro+/H.265 Pro/H.265/H.264+/H.264 |
| Types de caméras prises en charge | TVI, AHD, CVI, CVBS, IPC |
| Fonctionnalités de l'IA | Human Detection, Vehicle Detection, Line Crossing, Intrusion Detection |
| Capacité de stockage de la mémoire | 2 TB HDD (Up to 10 TB supported) |
| Accès à distance | ANNKE Vision App, Web Navigateur |
| Appareils compatibles | Appareils photo, ordinateurs portables, ordinateurs personnels, smartphones, tablettes |
| Source d'énergie | Électrique avec fil |
| Couleur | Noir |
| Dimensions de l'article | 17.13 x 12.4 x 3.86 pouces |
10. Entretien
Un entretien régulier garantit des performances optimales et une longue durée de vie à votre système DVR.
- Nettoyage: Keep the DVR free from dust. Use a soft, dry cloth to clean the exterior. Do not use liquid cleaners.
- Ventilation: Veillez à placer l'enregistreur numérique dans un endroit bien ventilé afin d'éviter toute surchauffe. Ne bloquez pas les ouvertures de ventilation.
- Mises à jour du micrologiciel : Consultez régulièrement le site officiel d'ANNKE. website for firmware updates. Keeping your DVR's firmware updated can improve performance, add new features, and enhance security.
- Sauvegarde des données : Sauvegardez régulièrement vos vidéos importantestage vers un périphérique de stockage externe.
- État du disque dur : The DVR's menu may offer options to check the health status of the installed hard drive. Monitor this periodically.
11. Dépannage
This section addresses common issues you might encounter with your DVR.
- Aucune sortie vidéo :
- Check HDMI/VGA cable connections to both the DVR and the monitor.
- Assurez-vous que le moniteur est réglé sur la bonne source d’entrée.
- Verify the DVR is powered on (power indicator light should be active).
- Aucun affichage de la caméra :
- Check camera power supply and video cable connections.
- For IP cameras, ensure they are on the same network as the DVR and properly added in the DVR's camera management settings.
- Verify camera compatibility with the DVR (refer to Section 8).
- L'accès à distance ne fonctionne pas :
- Assurez-vous que le DVR est connecté à Internet.
- Check network settings on the DVR (e.g., DHCP enabled, correct IP address).
- Verify the ANNKE Vision App is updated to the latest version.
- Ensure the DVR is properly added to your ANNKE Vision account.
- fausses alarmes de mouvement :
- Adjust the sensitivity of motion detection in the DVR settings.
- Utilize the AI Human/Vehicle Detection feature (Section 6.1) to filter out irrelevant movements.
- Define specific detection zones to exclude areas with frequent non-threatening movement.
If you continue to experience issues, please contact ANNKE customer support.
12. Garantie et assistance
Les produits ANNKE sont généralement couverts par une garantie limitée. Veuillez consulter la carte de garantie incluse dans votre emballage ou visiter le site officiel d'ANNKE. webConsultez ce site pour connaître les conditions générales de garantie détaillées spécifiques à votre région.
Pour toute assistance technique, question sur les produits ou réclamation au titre de la garantie, veuillez contacter le service client d'ANNKE via son site officiel. website or the contact information provided in your product documentation. Have your model number (AU-DT81DX200-V1) and purchase details ready when contacting support.
Officiel ANNKE Website: www.annke.com