1. Introduction
The Generic MyChron 6 S redefines karting telemetry with cutting-edge technology, offering unparalleled data analysis, precision GPS tracking, and wireless connectivity. Designed for serious drivers and racing teams, this latest evolution provides real-time performance insights, ensuring every lap is optimized. With a 6-axis IMU, second CAN expansion, high-contrast display, and up to 20 hours of battery life, the MyChron 6 S is the ultimate tool for fine-tuning your kart's performance.
Les principales caractéristiques comprennent :
- Integrated 25Hz GPS for high-precision tracking.
- Configurable display pages to show relevant data.
- 8 configurable RGB backlights and colors for personalized visibility.
- 2 configurable Alarm LEDs for critical alerts.
- 5 RGB configurable LEDs for each gear indication.
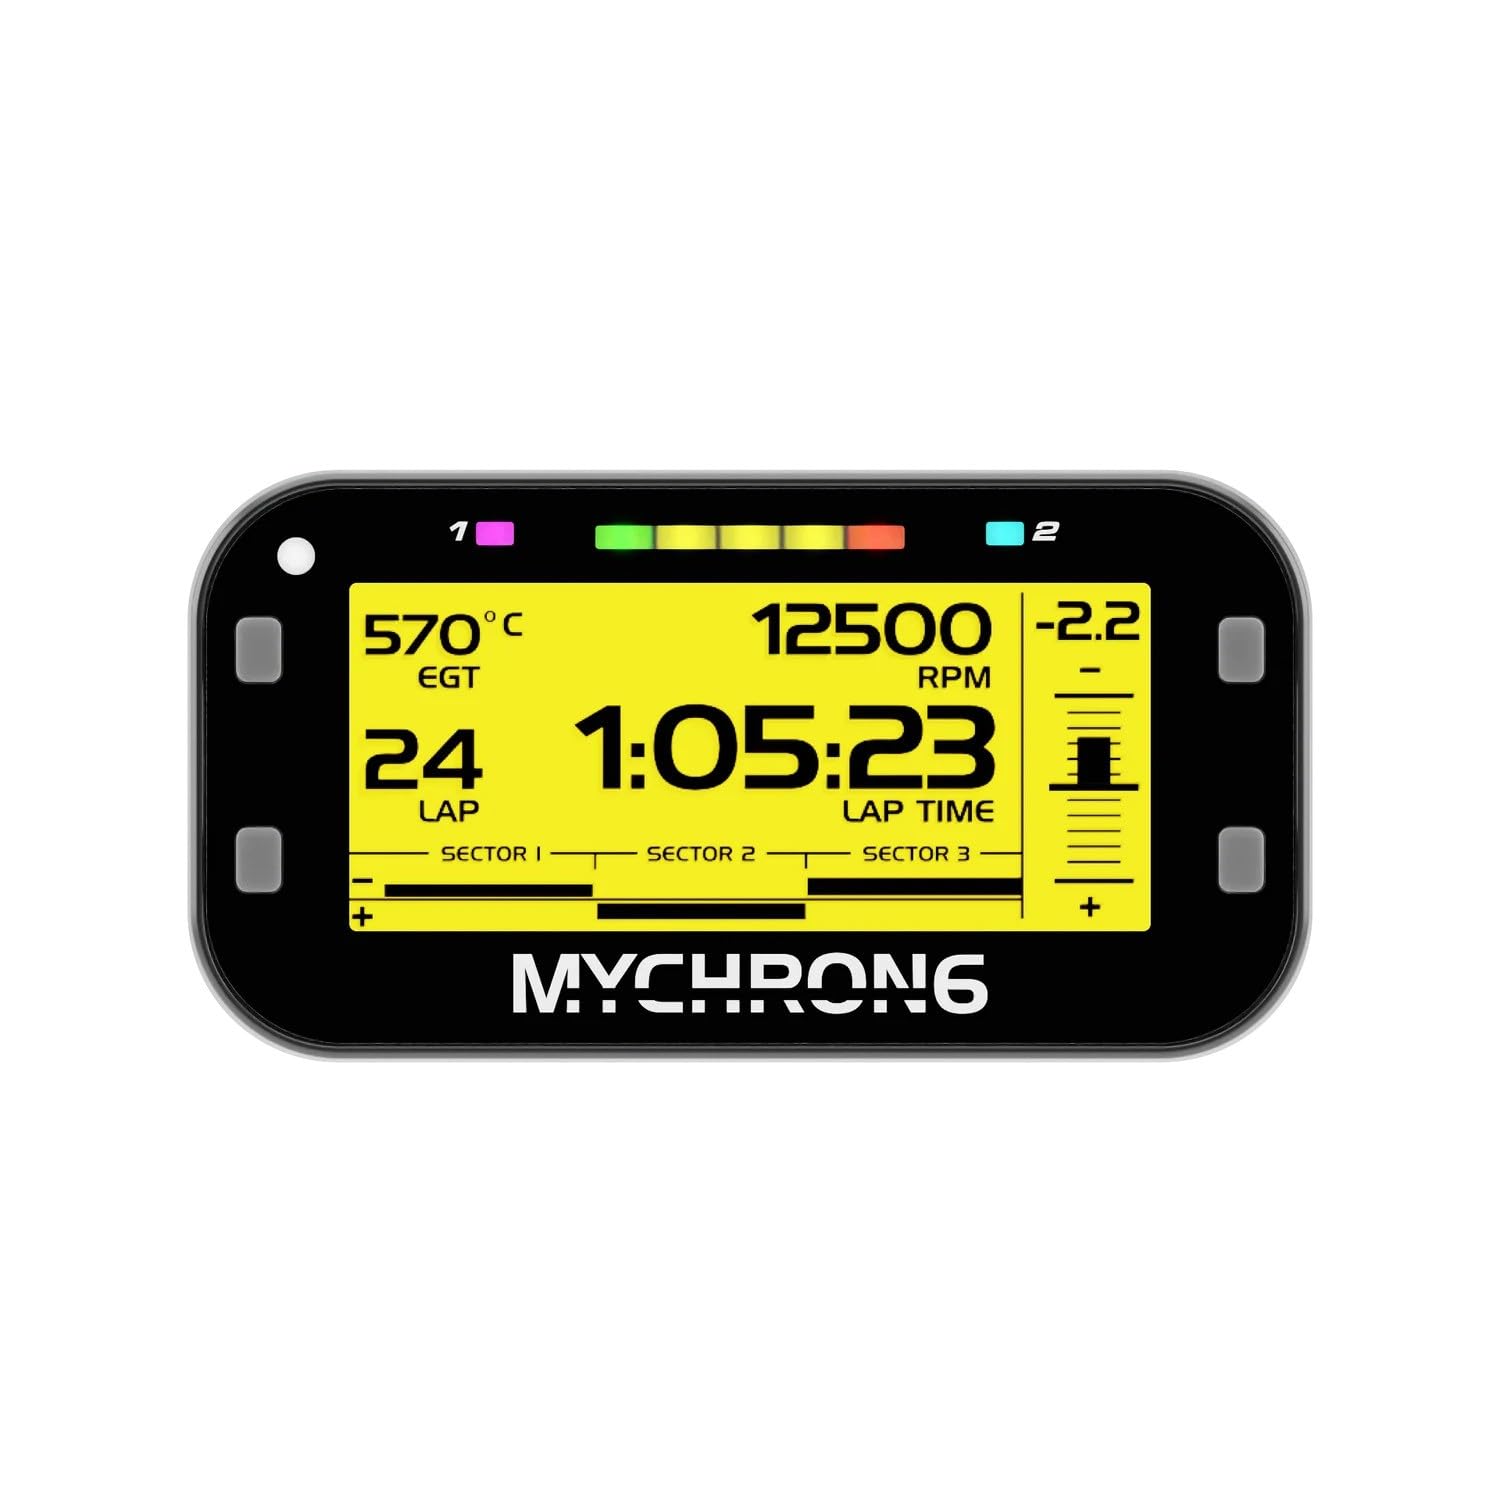
Figure 1 : Face avant view of the MyChron 6 S Kart Gauge, displaying various telemetry data.
2. Installation
2.1 Installation physique
Mount the MyChron 6 S securely on your kart's dashboard using appropriate mounting hardware. Ensure the device is positioned for clear visibility during operation. Connect the single temperature sensor to the designated 'TEMP' port on the back of the device. Ensure all connections are firm and properly seated to prevent data loss or malfunction.

Figure 2 : Arrière view of the MyChron 6 S, illustrating sensor and data ports.
2.2 Mise sous tension initiale
Press and hold the power button, typically located on the side of the device, until the display illuminates. The device will perform a self-check before entering the main operating screen.
2.3 Acquisition GPS
For optimal GPS performance, operate the device in an open area with a clear view of the sky. The device will automatically acquire GPS signal upon power-on. A stable GPS signal is indicated by a specific icon on the display.
2.4 Connectivité sans fil
The MyChron 6 S supports both Bluetooth and Wi-Fi connectivity. Utilize Bluetooth for pairing with compatible heart rate monitors. Wi-Fi is used for instant data transfer to a computer or cloud storage, and for device updates. Access these settings through the device's main menu to configure connections.
3. Mode d'emploi
3.1 Navigation de l'écran
Use the navigation buttons on the sides of the device to scroll through various configurable display pages. Each page can be customized to show different data parameters such as lap times, RPM, engine temperature, and heart rate. The high-contrast display ensures readability in various lighting conditions.

Figure 3: MyChron 6 S mounted on a kart steering wheel during operation.
3.2 Enregistrement des données
The MyChron 6 S automatically logs race data during operation. This data includes lap times, sector times, speed, RPM, temperatures, and GPS coordinates. Data can be transferred via Wi-Fi or USB-C to the RaceStudio 3 software for detailed analysis and performance review.
3.3 Personnalisation des pages d'affichage
The device allows for extensive customization of display pages, including the eight-color backlight and data layouts. These customizations can be performed directly on the device or through the RaceStudio 3 software on a computer.
3.4 Surveillance de la fréquence cardiaque
Connect a compatible Bluetooth heart rate monitor to the MyChron 6 S to track driver physiological data. This information can be displayed in real-time and logged for post-race analysis, aiding in driver performance optimization.
3.5 Race Modes
The MyChron 6 S supports various race modes, including configurations for both road and oval racing formats. Please note that the oval mode is exclusive to U.S. versions of the device. Select the appropriate mode from the settings menu before starting a session.
4. Entretien
4.1 Chargement de la batterie
The MyChron 6 S features a high-performance battery providing up to 20 hours of track time. To charge, connect the device to a power source using the provided USB-C cable. A charging indicator will appear on the display.
4.2 mises à jour du micrologiciel
Regularly check for and install firmware updates via Wi-Fi and the RaceStudio 3 software. Firmware updates often include performance enhancements, bug fixes, and new features. Keeping your device updated ensures optimal functionality.
4.3 Nettoyage
Clean the display and exterior of the device with a soft, damp chiffon. Évitez d'utiliser des nettoyants abrasifs, des solvants ou des produits chimiques agressifs, car ils peuvent endommager l'écran ou le câble.asing. Ensure all ports are dry before connecting cables.
5. Dépannage
- Aucun signal GPS : Ensure the device is used outdoors with a clear view of the sky. Allow several minutes for initial acquisition. If the issue persists, check for any obstructions or interference.
- Problèmes de transfert de données : Verify that the Wi-Fi connection is active and stable. Ensure the RaceStudio 3 software on your computer is updated and correctly configured. If using USB-C, check the cable connection and try a different port.
- L'écran ne répond pas : If the display becomes unresponsive, perform a soft reset by holding the power button for approximately 10 seconds until the device restarts. If issues persist, ensure the battery is charged.
- Lectures de capteurs inexactes : Check all sensor connections to ensure they are secure and free from damage. Calibrate sensors if necessary through the device settings or RaceStudio 3.
6. Spécifications
| Fonctionnalité | Détail |
|---|---|
| Nom du modèle | MyChron 6 S |
| ASIN | B0DX8MP794 |
| Marque | Générique |
| Autonomie de la batterie | Jusqu'à 20 heures |
| Capacité de stockage de la mémoire | 4 Go |
| Technologie de connectivité | Bluetooth, Wi-Fi, USB-C |
| Type de carte | Mondial |
| Type de montage | Support de tableau de bord |
| Système opérateur | Windows (for companion software) |
| Type d'écran tactile | Capacitif |
| Type de service de véhicule | Kart |
| Commande vocale | Boutons |
7. Garantie et assistance
For technical support, warranty information, or service inquiries regarding your Generic MyChron 6 S Kart Gauge, please contact the manufacturer or your authorized dealer. Refer to the official product website for the latest support resources, FAQs, and contact details.


