1. Introduction
Thank you for choosing the MINING DSO152 Portable Digital Oscilloscope. This device is a compact, handheld tool designed for measuring and analyzing electrical signals. It features a 2.5MS/s real-time sampling rate, 200kHz analog bandwidth, and a 2.8-inch LCD screen, making it suitable for both periodic analog and non-periodic digital signals. This manual provides essential information for safe and effective use of your oscilloscope.
2. Consignes de sécurité
- Lisez attentivement toutes les instructions avant d’utiliser l’appareil.
- N’exposez pas l’appareil à l’humidité, à la pluie ou à des températures extrêmes.
- Évitez les chocs violents ou de faire tomber l'appareil.
- Use only the provided or recommended accessories and charging cables.
- Ne tentez pas de démonter ou de modifier l'appareil. Confiez toute réparation à un personnel qualifié.
- Ensure proper grounding when connecting to circuits, if applicable.
3. Contenu du colis
Vérifiez que tous les éléments sont présents dans votre colis :
- MINING DSO152 Portable Digital Oscilloscope
- Oscilloscope Probe (with alligator clips)
- Câble de chargement USB (Type-C)
- Dragonne

Image: The DSO152 oscilloscope unit, a probe with alligator clips, a USB Type-C charging cable, and a wrist strap.
4. Produit terminéview
4.1 Principales caractéristiques
- Haute performance : s en temps réelampling rate of 2.5 MS/s and 200 kHz analog bandwidth.
- Déclenchement polyvalent : Supports Single, Normal, and Auto trigger modes for various signal types.
- One-Key AUTO Function: Automatically displays measured waveforms without complex adjustments.
- Affichage clair : Equipped with a 2.8-inch high-resolution 320*240 LCD screen.
- Alimentation portable : Built-in 1000 mAh lithium battery provides approximately 4 hours of continuous use on a full charge.
- Port USB Type-C : Supports firmware upgrades and charging.
- Support pliable : Integrated stand for convenient desktop use.

Image: The DSO152 oscilloscope shown with its integrated foldable stand extended for desktop viewing.

Image : Une image transparente view of the DSO152 highlighting its built-in 1000mAh lithium battery, emphasizing its portability and long endurance.
4.2 Identification des composants
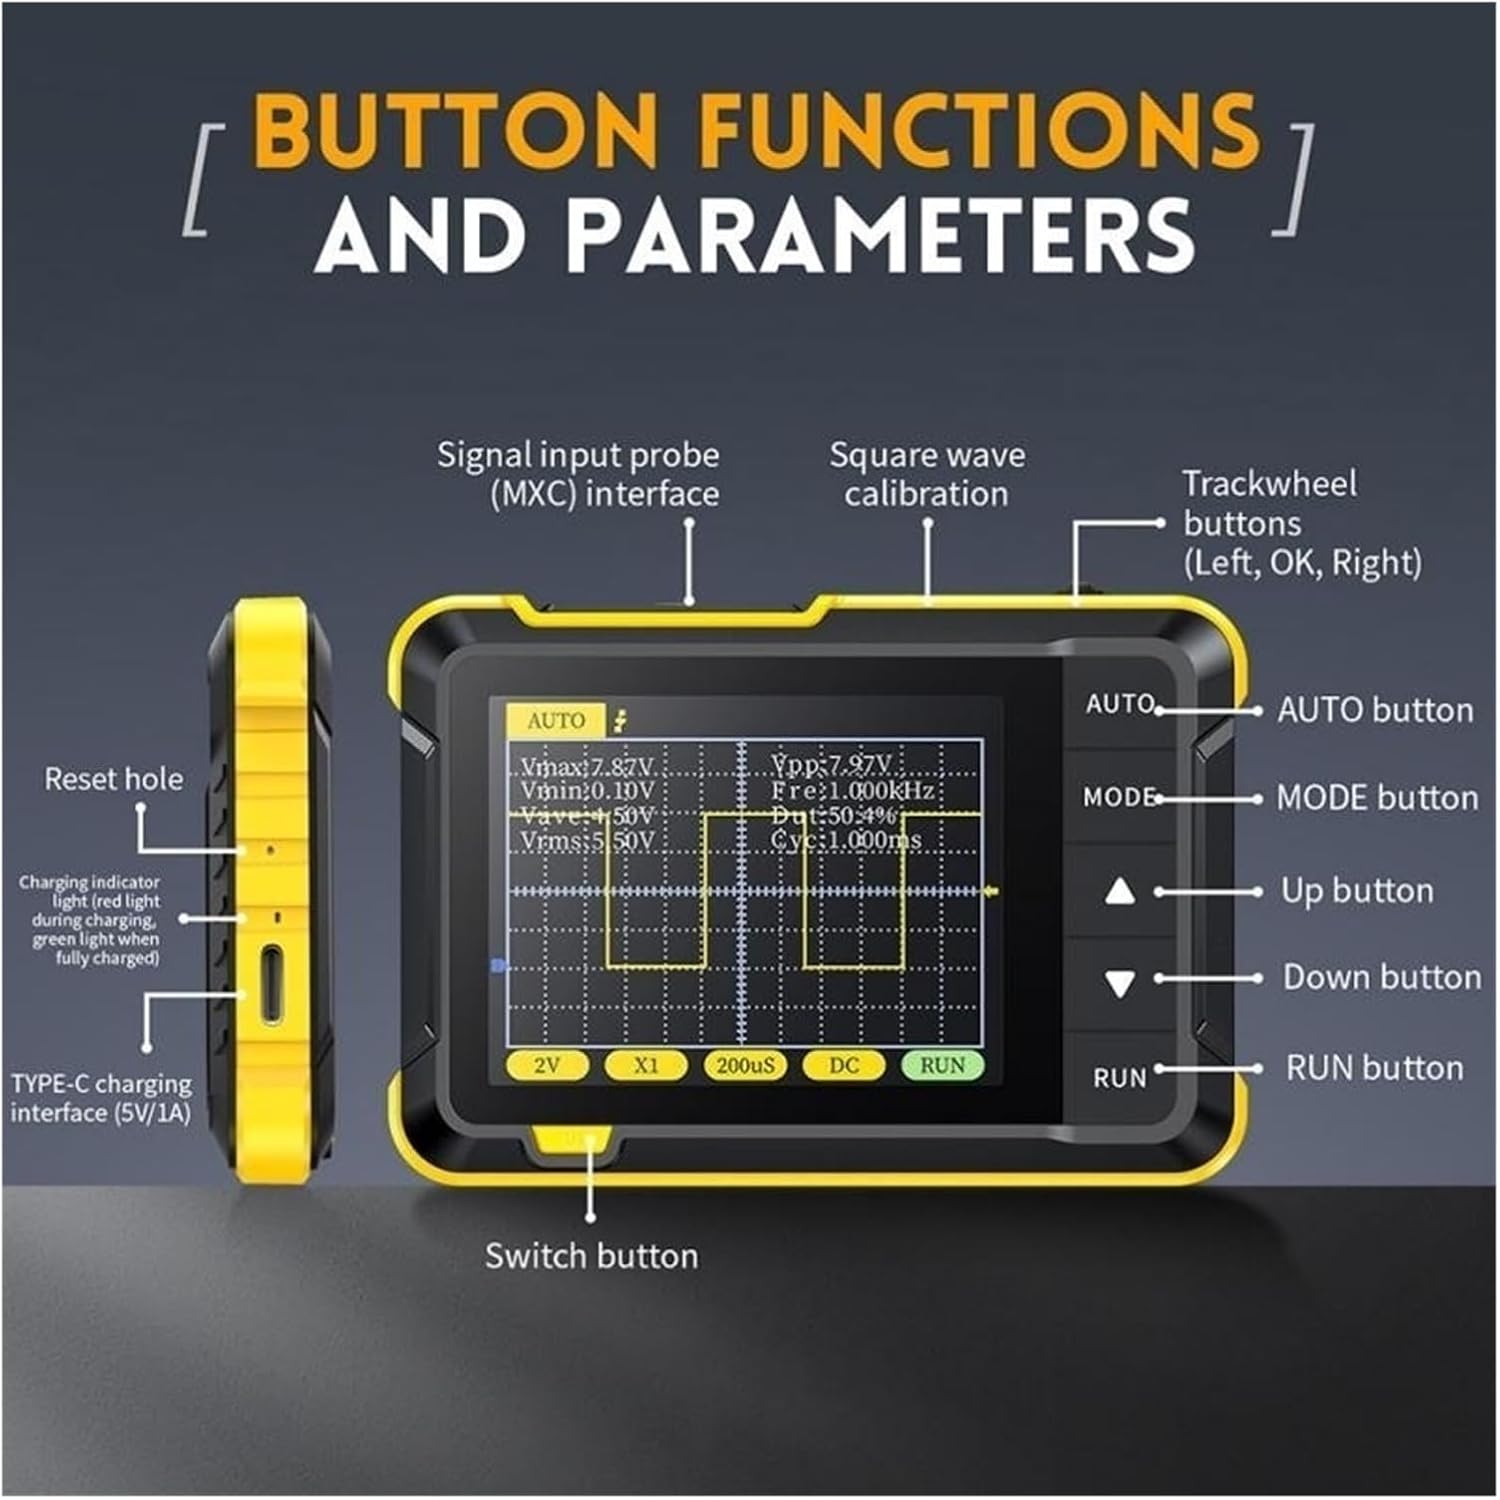
Image: Diagram illustrating the button functions and parameters of the DSO152. Labels include Signal input probe (MXC) interface, Square wave calibration, Trackwheel buttons (Left, OK, Right), AUTO button, MODE button, Up button, Down button, RUN button, Switch button, Reset hole, Charging indicator, and TYPE-C charging interface (5V/1A).

Image : Gros plan views of the DSO152 highlighting its highly sensitive keys, foldable stand, Type-C port for charging and firmware upgrades, and a gear toggle button design for adjustments.
5. Installation
5.1 Chargement de l'appareil
- Connect the provided USB Type-C cable to the charging port on the side of the oscilloscope.
- Connectez l'autre extrémité du câble USB à un adaptateur secteur USB 5V/1A (non inclus) ou à un port USB d'ordinateur.
- Le voyant de charge s'allumera en rouge pendant la charge et deviendra vert une fois la charge complète.
- Une charge complète prend généralement environ 4 heures.
5.2 Fixation de la sonde
- Locate the signal input (MXC) interface on the top of the oscilloscope.
- Connect the oscilloscope probe to this interface.
- Attach the alligator clip of the probe to the ground reference of the circuit you are testing.
- Connect the probe tip to the signal point you wish to measure.
6. Mode d'emploi
6.1 Mise sous/hors tension
- Mise sous tension : Press and hold the 'Switch' button (located on the side) for a few seconds until the screen illuminates.
- Éteindre: Press and hold the 'Switch' button again until the screen turns off.
6.2 Basic Measurement (AUTO Mode)
The DSO152 features a convenient one-key AUTO function for quick waveform display.
- Ensure the probe is correctly connected to the signal source.
- Press the 'AUTO' button. The oscilloscope will automatically adjust the vertical sensitivity, time base, and trigger settings to display a stable waveform.
- The screen will show key parameters such as Vmax, Vmin, Vavg, Vrms, Frequency (Fre), Duty Cycle (Dut), and Cycle (Cyc).
6.3 Réglages manuels
For more precise control, you can manually adjust settings:
- Bouton MODE : Press the 'MODE' button to cycle through different measurement modes or display options.
- Boutons haut/bas : Use the 'Up' and 'Down' arrow buttons to navigate menus or adjust selected parameters.
- Trackwheel Buttons (Left, OK, Right): These buttons are typically used for fine-tuning selections or confirming actions. The 'OK' button often confirms a selection.
- Bouton EXÉCUTER : Toggles between running (live waveform display) and freezing (pausing) the waveform.
6.4 Square Wave Calibration
The device includes a square wave calibration function:
- Fréquence: 1KHz
- Cycle de service: 50%
Refer to the on-screen menu or specific instructions for accessing and utilizing the calibration signal.
7. Entretien
- Nettoyage: Utilisez un chiffon doux et sec pour nettoyer l'appareil. N'utilisez pas de nettoyants abrasifs ni de solvants.
- Stockage: Rangez l'oscilloscope dans un endroit frais et sec, à l'abri de la lumière directe du soleil et des températures extrêmes.
- Entretien de la batterie: Pour prolonger la durée de vie de la batterie, évitez de la décharger complètement et fréquemment. En cas de stockage prolongé, rechargez-la à environ 50 % tous les deux ou trois mois.
- Mises à jour du micrologiciel : Vérifiez le fabricant website for any available firmware updates. Updates can typically be performed via the USB Type-C port.
8. Dépannage
- L'appareil ne s'allume pas : Ensure the battery is charged. Connect to a power source using the USB cable and try again.
- Aucune forme d'onde affichée :
- Check if the probe is correctly connected to both the oscilloscope and the signal source.
- Ensure the signal source is active.
- Press the 'AUTO' button to automatically adjust settings.
- Adjust vertical sensitivity (V/Div) and time base (s/Div) manually.
- Check trigger settings (Mode, Level).
- Forme d'onde instable : Adjust the trigger level and trigger mode (e.g., from Auto to Normal or Single) to stabilize the waveform.
- Lectures incorrectes : Ensure the probe is properly calibrated and connected. Verify the input coupling (AC/DC) is appropriate for your signal.
- Appareil non réactif : Use a small pin to press the 'Reset hole' on the side of the device to perform a soft reset.
9. Spécifications
| Fonctionnalité | Spécification |
|---|---|
| SampTaux de ling | 2.5 MS/s |
| Bande passante analogique | 200 kHz |
| Sensibilité verticale | 10mV/Div - 20V/Div (1-2-5 progression) |
| Plage de base de temps | 10µs/Div - 50s/Div (1-2-5 progression) |
| Méthode de déclenchement | Auto / Normal / Simple |
| Méthode de couplage | CA / CC |
| Afficher | 2.8 inch LCD, 320*240 PPI |
| Chargement USB | 5 V/1 A (Type C) |
| Capacité de la batterie au lithium | 1000 mAh |
| Calibrage à onde carrée | Frequency: 1KHz; Duty Cycle: 50% |
| Dimensions | 99 x 68.3 x 19.5 mm |
| Poids | 400 gramme |
| Fabricant | EXPLOITATION MINIÈRE |
| Numéro de modèle | 234439615 |
10. Garantie et assistance
This product is covered by a standard manufacturer's warranty. For specific warranty terms, conditions, and duration, please refer to the documentation provided with your purchase or contact your retailer. For technical support, troubleshooting assistance, or inquiries regarding your MINING DSO152 oscilloscope, please contact the seller or manufacturer directly through their official support channels.