
Introduction
Thank you for choosing the APORO T18 Portable 30W UHF Wireless Voice AmpAmplificateur. Cet appareil est conçu pour fournir un son clair et puissant. amplification for various applications, including teaching, training, conferences, and public speaking. Featuring a 30W output, UHF wireless microphone, long-lasting battery, and multiple playback options, the T18 offers versatility and convenience. Please read this manual carefully to ensure proper use and maintenance of your device.
Contenu du colis
Veuillez vérifier que le colis contient les éléments suivants :
- 1 x APORO T18 Wireless Voice Amplifier
- 1 x micro-cravate sans fil
- 1 câble audio 3.5 mm
- 1 x câble de chargement USB
- 1 x Adaptateur secteur (chargeur)
- 1 x Waist Strap
- 1 x Manuel d'utilisation (ce document)
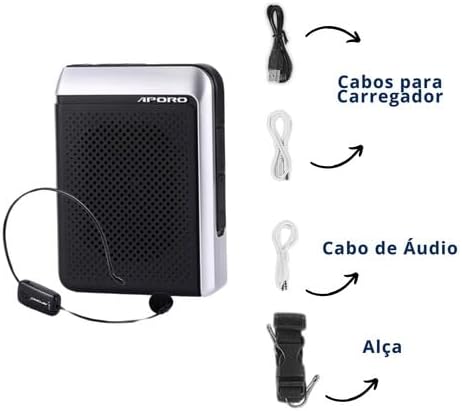
Figure 1 : All items included in the APORO T18 package. This image displays the main amplifier unit, the wireless microphone, various cables (USB, 3.5mm audio), a power adapter, and a waist strap.
Produit terminéview
The APORO T18 features a compact and durable design with intuitive controls. Familiarize yourself with the device's components:

Figure 2 : Devant view of the APORO T18 Portable Voice Amplifier with the wireless microphone headset. The amplifier has a black mesh speaker grille and silver-colored sides, with the APORO logo visible.

Figure 3 : Haut view of the APORO T18 control panel, highlighting the 'REC' button for recording. The display shows 'UHF', indicating the wireless mode. Recording requires an SD card or USB drive.

Figure 4 : Illustration of the APORO T18's battery capabilities: 4000 mAh battery, providing up to 10 hours of music playback or 20 hours of voice amplification.

Figure 5 : The APORO T18 features silicone protection against dust and splashes, enhancing its durability. Water droplets are depicted around the device to illustrate this feature.

Figure 6 : The APORO T18 offers versatile wearing options, including a belt clip for hands-free use. The image shows the device attached to a belt and a close-up of the belt clip mechanism.
Installation
1. Chargement de l'appareil
- Connectez le câble de chargement USB au amplifier's charging port.
- Connectez l'autre extrémité du câble USB à l'adaptateur secteur fourni.
- Branchez l'adaptateur secteur sur une prise électrique standard.
- Le voyant de charge s'allumera. Une charge complète prend généralement entre 4 et 6 heures.
- Une fois la charge complète, le voyant peut changer de couleur ou s'éteindre. Débranchez le chargeur.
2. Appairage du microphone sans fil
- Assurez-vous que les deux amplifier and the wireless microphone are powered off.
- Allumez le amplifier.
- Turn on the wireless microphone. The microphone's indicator light should blink, indicating it's in pairing mode.
- Le amplifier and microphone should automatically pair. The microphone's indicator light will become solid when successfully paired.
- If pairing fails, refer to the troubleshooting section or try restarting both devices.
3. Inserting SD Card or USB Drive (for recording/playback)
- Locate the SD card slot or USB port on the amplifier.
- Gently insert the SD card or USB drive into the respective slot/port until it clicks into place or is firmly seated.
- Ensure the device is inserted correctly to avoid damage.
Mode d'emploi
1. Marche/Arrêt
Appuyez et maintenez enfoncé le bouton d'alimentation (Ⓘ) for a few seconds to turn the amplifier allumé ou éteint.
2. Contrôle du volume
Utilisez le bouton Volume + (+) et baisser le volume (-) buttons to adjust the ampniveau de lification.
3. Utilisation du microphone
- Wear the wireless lapel microphone comfortably.
- Ensure the microphone is positioned correctly for optimal voice pickup.
- Ajustez le amplifier's volume to a comfortable level, avoiding feedback (a high-pitched squeal).
4. Fonction d'enregistrement
- Insert an SD card or USB drive into the amplifier.
- Appuyez sur le REC Appuyez sur le bouton pour démarrer l'enregistrement. Un indicateur d'enregistrement peut s'afficher à l'écran.
- Appuyez sur le REC à nouveau pour arrêter l'enregistrement.
- Les enregistrements sont sauvegardés sur le périphérique de stockage inséré.
5. Radio FM
- Appuyez sur le bouton Mode pour passer en mode radio FM.
- Use the Previous/Next track buttons to scan for radio stations.
- Le amplifier supports loop playback modes for FM radio.
6. Connexion AUX
- Connect one end of the 3.5mm audio cable to the AUX input port on the amplifier.
- Connect the other end to the audio output of your computer, smartphone, or other compatible device.
- Le ampL'amplificateur diffusera le son provenant de l'appareil connecté.
7. Lecture USB/SD
- With an SD card or USB drive inserted, press the Mode button to select the appropriate playback mode.
- Use the Previous/Next track buttons to navigate through files.
- Appuyez sur le bouton Lecture/Pause pour contrôler la lecture.
Entretien
- Nettoyage: Utilisez un chiffon doux et sec pour nettoyer le amplifier's surface. Do not use abrasive cleaners or solvents.
- Entretien de la batterie: Pour prolonger la durée de vie de la batterie, évitez de la décharger complètement trop souvent. Chargez l'appareil régulièrement, même en cas de non-utilisation prolongée.
- Stockage: Stocker le ampConserver l'amplificateur dans un endroit frais et sec, à l'abri de la lumière directe du soleil et des températures extrêmes.
- Protection: While the device offers splash protection, avoid submerging it in water or exposing it to heavy rain.
Dépannage
| Problème | Cause possible | Solution |
|---|---|---|
| Aucun son de amplifier | Device is off; Low battery; Volume too low; Microphone not paired/connected; Incorrect mode selected. | Turn on device; Charge battery; Increase volume; Re-pair microphone; Select correct input mode (UHF, AUX, SD/USB). |
| Feedback (squealing sound) | Microphone trop près de ampAmplificateur ; Volume trop élevé. | Augmentez la distance entre le microphone et ampAmplificateur ; Baissez le volume. |
| Le microphone sans fil ne se connecte pas. | Microphone battery low; Out of range; Interference. | Charge microphone; Ensure microphone is within 20 meters of amplifier; Move away from other wireless devices. |
| L'enregistrement ne fonctionne pas. | No SD card/USB drive inserted; Storage device full; Storage device not formatted correctly. | Insert a compatible SD card or USB drive; Delete old files; Format storage device (refer to device manual for formatting instructions if available, or use a computer). |
| Durée de vie de la batterie courte | Batterie incomplètement chargée ; batterie ancienne ; utilisation intensive. | Ensure full charge; Consider battery replacement if very old; Reduce volume when possible. |
Caractéristiques
| Fonctionnalité | Détail |
|---|---|
| Marque | APORO |
| Modèle | T18 |
| Puissance de sortie | 30 watts |
| Technologie de connectivité | AUX, Bluetooth, USB, Wi-Fi (UHF Wireless) |
| Capacité de la batterie | 4000 XNUMX mAh (Lithium) |
| Temps de charge | 4-6 heures |
| Durée d'utilisation | 12-15 heures (amplification), 10 hours (music playback) |
| Portée sans fil | Up to 20 meters (UHF) |
| Réponse en fréquence | 50 - 18,000 Hz |
| Niveau de bruit | 50 dB |
| Impédance | 16 ohms |
| Matériel | Plastique |
| Couleur | Noir |
| Dimensions (L x l x H) | 30 x 100 x 170 mm (3 x 10 x 17 cm) |
| Poids | 321 gramme |
| Médias pris en charge | SD Card, USB Drive |
| Fonctionnalités supplémentaires | FM Radio, Noise Reduction, Recording Function, Dust and Splash Protection |
Garantie et assistance
The APORO T18 Portable Voice Amplifier comes with a manufacturer's warranty of 1 year from the date of purchase. This warranty covers defects in materials and workmanship under normal use.
For technical support, warranty claims, or further assistance, please contact your retailer or the APORO customer service department. Please retain your proof of purchase for warranty validation.
For more information, visit the official APORO webconsultez le site ou contactez leurs services d'assistance.