
1. Produit terminéview
The AirheadStorm 450W 80A MPPT Solar Charge Controller is designed for efficient and reliable charging across a wide range of applications. It features advanced Maximum Power Point Tracking (MPPT) technology to optimize power conversion, achieving an efficiency rate of 98%. This controller supports various battery types, including lead-acid, lithium, LiFePO4, and gel batteries, offering flexibility for different energy storage solutions.
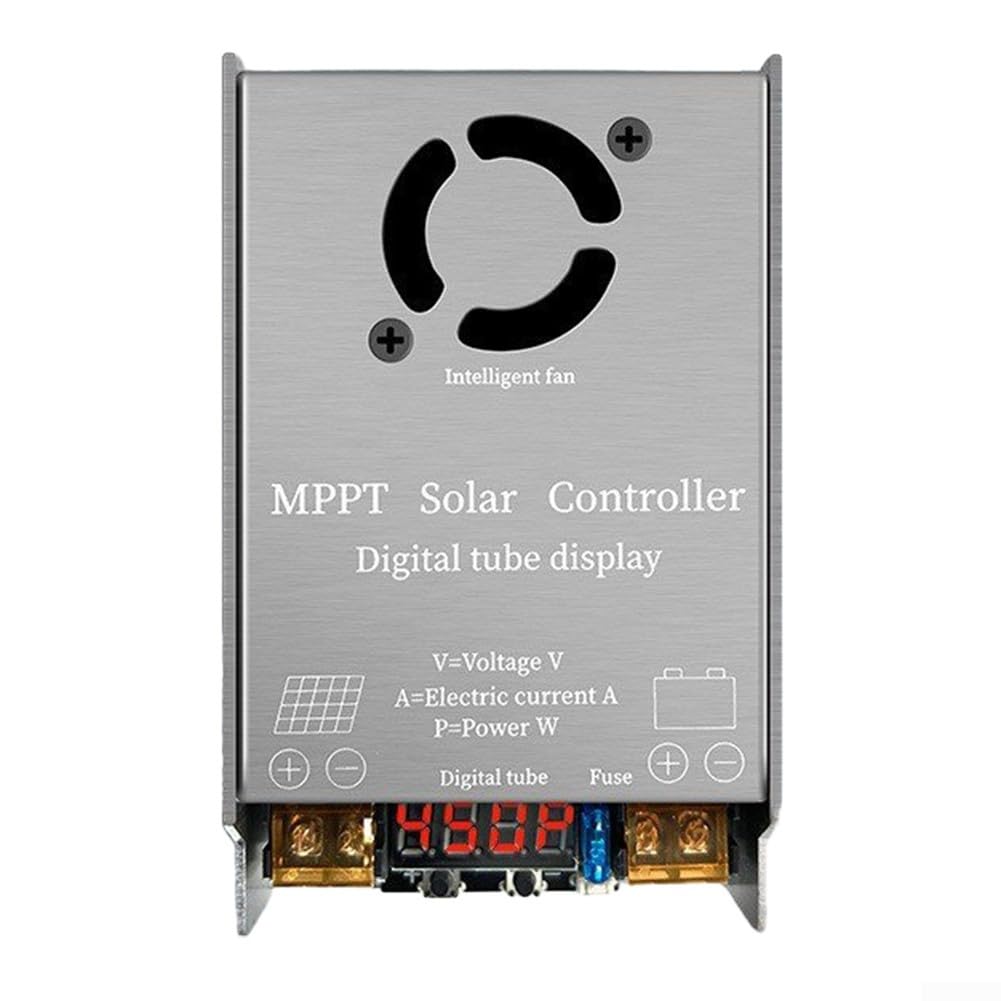
Figure 1 : Face avant view of the MPPT Solar Charge Controller, showing input/output terminals and digital display.
The controller is built with a sturdy magnesium aluminum alloy shell, providing excellent durability and heat dissipation. It includes a user-friendly LED display for monitoring operational status and is equipped with several protective features to ensure safe and reliable operation.
2. Précautions de sécurité
- Do not use the solar controller under voltage overload or power overload conditions.
- Ensure the solar controller voltage is consistent with the battery voltage avant l'installation.
- All input and output lines of the solar controller use red for the positive pole and black for the negative pole. Observe correct polarity during connection.
- Keep connecting cables as short as possible to avoid potential power loss.
- Install the solar controller in a well-ventilated environment, as it is normal for the unit to generate heat during operation.
- Do not attempt to change or replace the internal 15A fuse yourself. Contact qualified personnel if fuse replacement is necessary.
- Avoid placing solar panels behind glass objects or allowing anything to cover them, as this reduces power generation.
3. Configuration et installation
Suivez ces étapes pour installer correctement votre contrôleur de charge solaire MPPT :
- Voltage Réglage : Before connecting any components, set the output voltage of the controller to match your battery bank's voltage (24V, 36V, 48V, 60V, or 72V). Refer to the operating instructions for voltage réglage.
- Connexion du panneau solaire : Connect the solar panel(s) to the controller's input terminals (VIN). Ensure correct polarity: red for positive (+), black for negative (-).
- Connexion de la batterie : After connecting the solar panel, connect the battery bank to the controller's output terminals (OUT). Again, ensure correct polarity: red for positive (+), black for negative (-).

Figure 2 : Angulaire view of the controller, highlighting the input (VIN) and output (OUT) connection points.
Important: The solar controller will not function correctly if the solar panel is not connected or if the connection order is reversed.
4. Fonctionnement
Once properly installed, the MPPT Solar Charge Controller will automatically begin optimizing the power transfer from your solar panels to your battery bank. The built-in LED display provides real-time information on the operational status, allowing you to monitor system performance at a glance.
4.1. Supported Battery Types
This controller is compatible with a wide range of battery chemistries, including:
- Batteries au plomb-acide
- Piles au lithium
- Batteries LiFePO4
- Batteries au gel
4.2. Vol.tage and Power Management
The controller accepts an input voltage range of 12V to 50V from solar panels and can output voltage from 24V to 72V to charge compatible battery banks. It manages a maximum current of 12A and has rated power outputs of 18V/300W and 36V/450W, ensuring robust performance for various energy requirements.
5. Entretien
To ensure the longevity and optimal performance of your solar charge controller, consider the following maintenance guidelines:
- Ventilation: The controller generates heat during operation. Ensure it is installed in a well-ventilated area to prevent overheating. Regularly check that the intelligent fan (if present) is free from obstructions.
- Relations: Periodically inspect all wiring connections for tightness and corrosion. Loose connections can lead to power loss or system malfunction.
- Nettoyage: Keep the controller's exterior clean and free of dust and debris. Use a dry, soft cloth for cleaning. Do not use liquid cleaners.
- Fusible: The controller is equipped with a 15A fuse for protection against electrical faults. Do not attempt to change or replace this fuse yourself. Unauthorized replacement can void the warranty and pose a safety risk.

Figure 3 : Haut view of the controller, showing the intelligent fan for heat dissipation.
6. Dépannage
Si vous rencontrez des problèmes avec votre régulateur de charge solaire, tenez compte des étapes de dépannage courantes suivantes :
- Aucune puissance de sortie :
- Check if the solar panel is properly connected to the controller. The controller requires solar input to operate.
- Verify that the battery bank is correctly connected to the output terminals with correct polarity.
- Assurez-vous que le volume d'entréetage from the solar panels is within the specified range (12V-50V).
- Faible efficacité de charge :
- Confirm that solar panels are exposed to strong, direct sunlight. Obstructions or placement behind glass can significantly reduce power.
- Vérifiez que les panneaux solaires ne sont pas ombragés.
- Ensure cable lengths are minimized to reduce resistance and power loss.
- Surchauffe:
- Verify that the controller is installed in a well-ventilated area.
- Ensure the fan (if applicable) is not blocked and is functioning correctly.
- Vol incorrecttage Lecture :
- Confirm that the controller's voltage setting matches the battery bank's nominal voltage.
If problems persist after following these steps, consult a qualified technician.
7. Spécifications
| Fonctionnalité | Spécification |
|---|---|
| Nom du produit | Contrôleur solaire MPPT |
| Vol d'entréetage | 12 V - 50 V |
| Volume de sortietage | 24V / 36V / 48V / 60V / 72V |
| Courant maximal | 12A |
| Puissance nominale | 18 V/300 W, 36 V/450 W |
| Batteries compatibles | Lead-acid, Lithium, LiFePO4, Gel |
| Taille (L*l*H) | 113 x 86 x 39 mm |
| Poids | 232 gramme |
| Efficacité de conversion | 98% |
| Niveau de protection | IP30 |
| Matériau de la coque | Alliage d'aluminium et de magnésium |
| Température de fonctionnement | -20℃ à 60℃ |
| Type d'affichage | DIRIGÉ |
| Fusible | 15A |

Figure 4: Side and bottom views of the controller, illustrating its compact dimensions and robust casing.