1. Introduction et plusview
This manual provides detailed instructions for the installation, operation, and maintenance of your JideTech 4K 8 Channel PoE Network Video Recorder (NVR). This NVR is designed for home security camera systems, supporting up to 12 channels and resolutions up to 12MP. It features Power over Ethernet (PoE) for simplified camera connections, remote access capabilities, and advanced video compression.
2. Contenu de la boîte
Veuillez vérifier le contenu de votre colis par rapport à la liste ci-dessous :
- 1x 8 Channel NVR PoE Unit
- 1x Manuel d'utilisation
- 1 adaptateur secteur NVR
- 1 câble réseau de 1 m
- Souris
- Vis (pour l'installation du disque dur)

Image: The JideTech 4K 8 Channel PoE NVR unit.
3. Instructions de configuration
3.1. Connexions physiques
Follow these steps to connect your NVR to your network and display:
- Connectez le NVR à une source d’alimentation à l’aide de l’adaptateur secteur fourni.
- Connect the NVR to your router using the included network cable.
- Connectez un moniteur au NVR à l'aide du port HDMI ou VGA.
- Connect the USB mouse to a USB port on the NVR for local control.
- Connect your PoE cameras to the NVR's PoE ports. For non-PoE cameras, connect them to your network via a router and ensure they are powered separately.
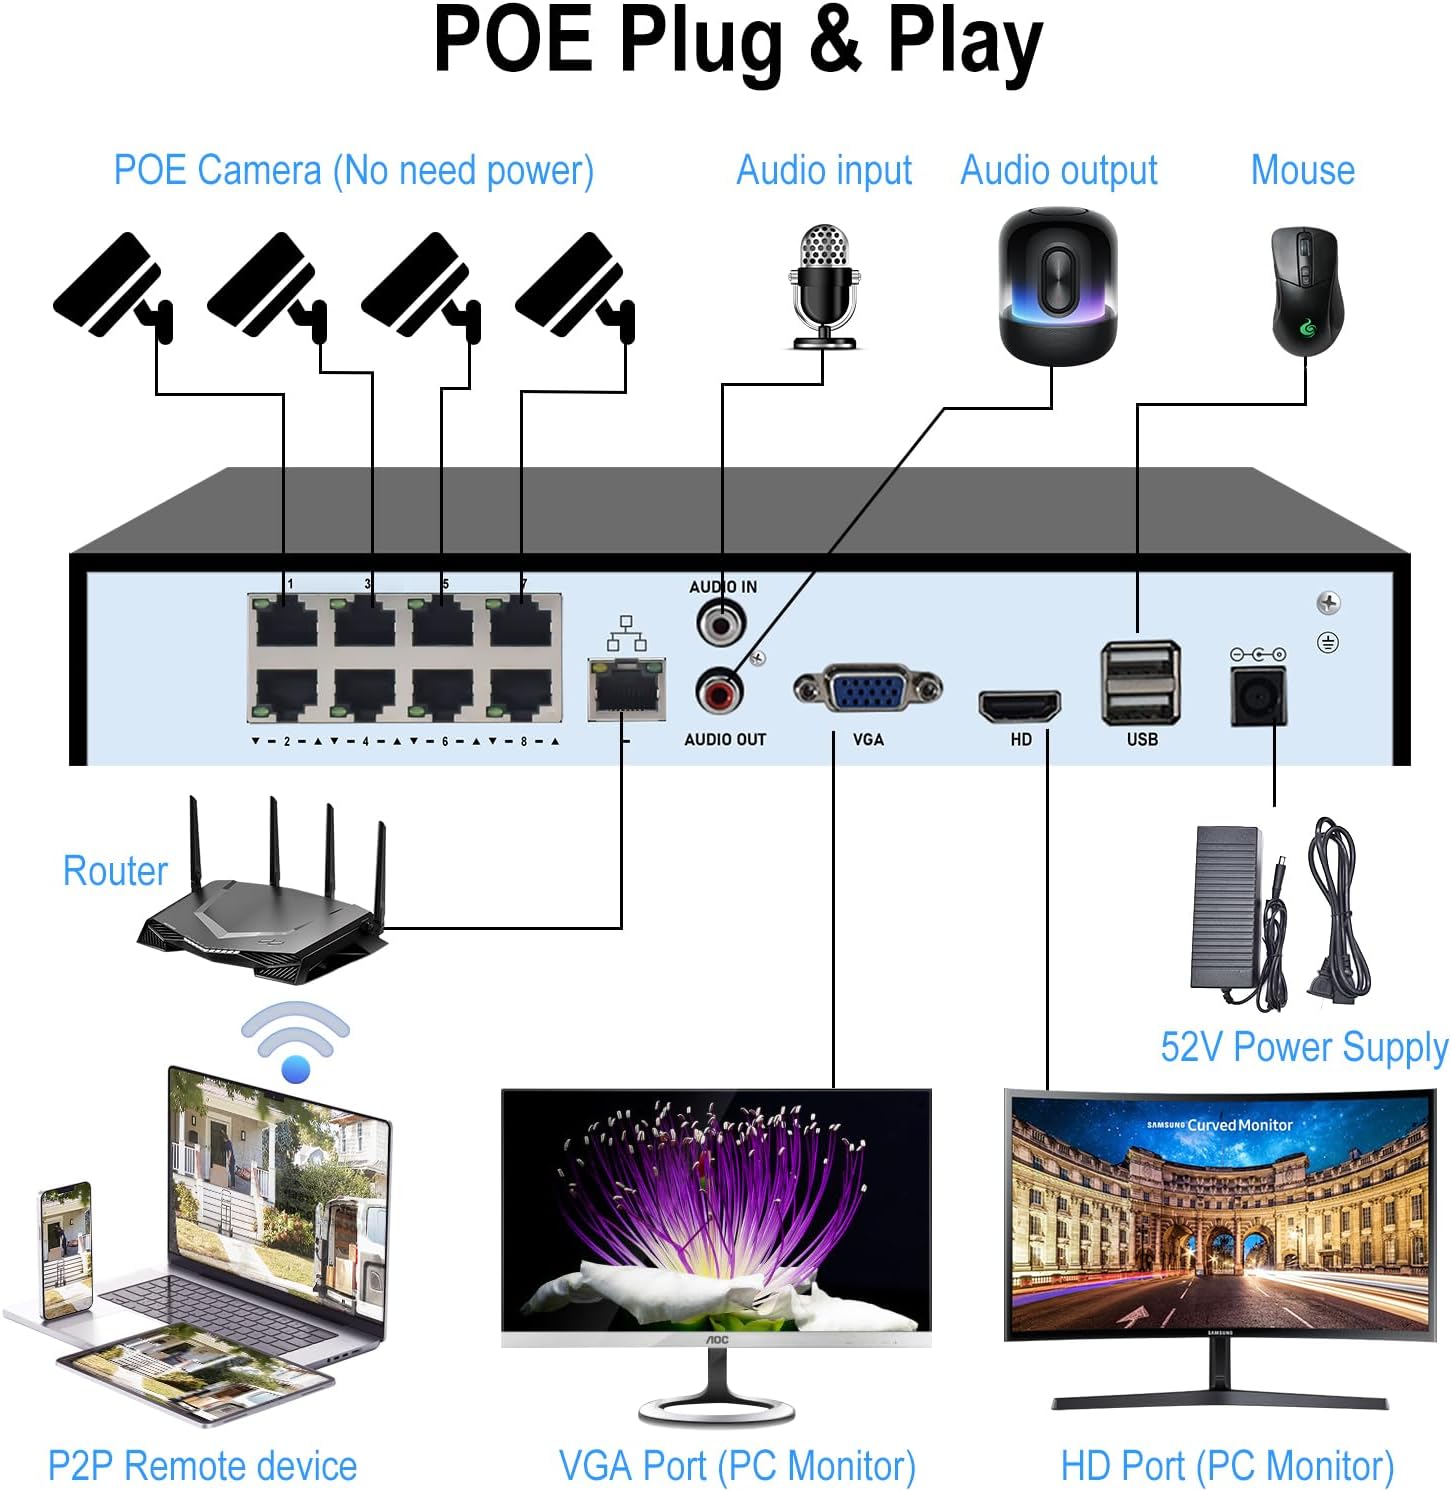
Image: Connection diagram illustrating how to connect PoE cameras, router, monitor, and mouse to the NVR.

Image: Diagram detailing the connection of a wired ONVIF camera to the NVR, requiring a power adapter and Ethernet cable.
3.2. Hard Drive Installation (HDD Not Included)
The NVR requires a 3.5-inch SATA hard drive (up to 14TB) for recording. Please follow these steps to install it:
- Dévissez et retirez le couvercle supérieur de l'unité NVR.
- Connectez le câble de données SATA et le câble d'alimentation du NVR au disque dur.
- Secure the hard drive inside the NVR chassis using the provided screws.
- Replace the NVR cover and fasten the screws.
Video: Instructions on how to install a hard drive into the NVR unit.

Image: The NVR unit shown with a hard drive, highlighting its maximum storage capacity of 14TB.
4. Mode d'emploi
4.1. Accès à distance
The NVR supports remote access via PC/Mac or the Videolink App for Android/iOS. Once connected to the internet, you can view foo en temps réeltage and playback recordings from anywhere.

Image: Illustration of remote access to the NVR system using various devices like a PC, tablet, and smartphone application.
4.2. Motion Detection and Smart Playback
Configure motion detection settings to receive instant notifications and email alerts on your phone when movement is detected. The smart playback feature allows you to quickly review recorded video at up to 16x speed to locate specific events.

Image: Depiction of the smart human detection feature, triggering app alerts when motion is detected.
5. Principales caractéristiques
- Résolution 4K Ultra HD : Supports recording, playback, and live view up to 12MP resolution. HDMI output up to 4K@30fps, VGA output up to 1080P@30fps.
- 12 Channel Expandable NVR: Built-in 8 PoE ports (IEEE802.3at, up to 30W per port) for 8 PoE cameras. Expandable to 12 channels with additional PoE switches.
- Compatibilité ONVIF : Works with most third-party ONVIF IP cameras.
- Compression vidéo avancée : Supports H.265+/H.265/H.264 formats, reducing storage space and bandwidth by up to 75%.
- Grande capacité de stockage: Equipped with 1 SATA interface, supporting a single hard drive up to 14TB (HDD not included).
- Motion Detection & Smart Playback: Instant notifications and email alerts for detected motion. Playback recording at up to 16x speed.
- Local & Remote Access: Easy configuration and control via PC/Mac or Videolink App (Android/iOS).
Video: Demonstration of how to connect a network video recorder surveillance system.
6. Spécifications
| Marque | JideTech |
| Numéro de modèle | 8CH-NVR |
| Technologie de connectivité | Ethernet, HDMI, USB, VGA |
| Appareils compatibles | IP Camera, PoE Camera |
| Dimensions du produit (L x l x H) | 9.88" x 8.42" x 1.57" |
| Capacité de stockage de la mémoire | Jusqu'à 14 To (disque dur non inclus) |
| Nombre de canaux | 8 (Extensible à 12) |
| Format du média : vidéo numérique | Disque dur |
| Entrée audio | RCA |
| Nombre total de ports USB | 2 |
| Entrée vidéo | HDMI, VGA |
| Poids de l'article | 2.8 livres |
7. Entretien
To ensure optimal performance and longevity of your NVR, consider the following maintenance tips:
- Nettoyage régulier : Keep the NVR unit free from dust and debris. Use a soft, dry cloth for cleaning. Ensure ventilation openings are not blocked.
- Mises à jour du micrologiciel : Vérifiez périodiquement les instructions du fabricant. website for firmware updates. Keeping your NVR's firmware up-to-date can improve performance, add new features, and enhance security.
- Sauvegarde des données : Regularly back up important recordings to an external storage device or cloud service to prevent data loss.
- Conditions environnementales : Operate the NVR within recommended temperature and humidity ranges to prevent damage. Avoid direct sunlight and excessive heat.
8. Dépannage
If you encounter issues with your JideTech NVR, refer to the following common troubleshooting steps:
- Pas d'alimentation :
- Ensure the power adapter is securely connected to both the NVR and a working power outlet.
- Vérifiez le bon fonctionnement de la prise de courant en y branchant un autre appareil.
- Aucune sortie vidéo :
- Check HDMI/VGA cable connections between the NVR and the monitor.
- Vérifiez que le moniteur est allumé et réglé sur la source d'entrée appropriée.
- Essayez un autre câble HDMI/VGA ou un autre moniteur si possible.
- Caméras non affichées :
- For PoE cameras, ensure they are properly connected to the NVR's PoE ports and receiving power.
- For non-PoE cameras, verify they are powered on and connected to the same local network as the NVR.
- Check camera IP addresses and ensure they are not conflicting.
- Confirm cameras are ONVIF compatible and added correctly to the NVR system.
- Problèmes d'accès à distance :
- Assurez-vous que le NVR est connecté à Internet.
- Verify network settings (IP address, gateway, DNS) on the NVR.
- Check firewall settings on your router that might be blocking access.
- Ensure the Videolink App or PC software is up-to-date.
- Problèmes d'enregistrement :
- Confirm a hard drive is installed and properly formatted by the NVR.
- Vérifiez l'état du disque dur dans les paramètres système du NVR.
- Vérifiez que les calendriers d'enregistrement sont correctement configurés.
If these steps do not resolve your issue, please contact JideTech customer support for further assistance.
9. Garantie et assistance
JideTech offers comprehensive support for its products. For specific warranty details, please refer to the documentation included with your purchase or visit the official JideTech website.
Des plans de protection supplémentaires sont disponibles à l'achat :
- Plan de protection de 2 ans
- Plan de protection de 3 ans
- Protection complète (facturation mensuelle)
For technical support, troubleshooting, or any product-related inquiries, please contact JideTech customer service.