1. Introduction
The Brilliant Evolution LED Wireless Ultra Thin Light provides versatile and convenient lighting solutions for various indoor applications. Featuring RGB multi-color settings, adjustable brightness, and a remote control with timer functions, these battery-operated lights are designed for easy installation and enhanced ambiance in spaces such as cabinets, closets, and work areas.
2. Consignes de sécurité
- Ne mélangez pas des piles neuves et usagées.
- Ne mélangez pas des piles alcalines, standard (carbone-zinc) ou rechargeables (nickel-cadmium).
- Insérez toujours les piles correctement en respectant la polarité (+ et -).
- Retirez les piles si le produit n'est pas utilisé pendant une période prolongée.
- Gardez les piles hors de portée des enfants.
- Ce produit est destiné à un usage intérieur uniquement. Ne pas exposer à l'eau ni à une forte humidité.
- Do not attempt to disassemble or modify the light unit or remote control.
3. Contenu du colis
Veuillez vérifier que tous les articles sont présents dans votre colis :
- LED Wireless Ultra Thin Light units (2 pack)
- Télécommande
- Pilot discs (adhesive mounting discs)
4. Composants du produit
The Brilliant Evolution LED Wireless Ultra Thin Light system consists of the light bar units and a dedicated remote control. Each light bar is designed to be ultra-thin for discreet placement and houses multiple LEDs capable of producing white and RGB colors. The remote control allows for comprehensive management of light functions.

Figure 4.1: Complete product package showing light bars, remote, and mounting discs.

Figure 4.2: Light bar dimensions and adhesive disc details.
5. Configuration et installation
5.1 Installation de la batterie
Each light unit requires 3 AAA batteries (not included). The remote control also requires batteries (typically 2 AAA, check remote compartment for specific type). Ensure correct polarity when inserting batteries.
- Locate the battery compartment on the back of each light unit and the remote control.
- Ouvrez le couvercle du compartiment.
- Insert the required batteries, matching the + and - indicators.
- Fermez bien le couvercle du compartiment.
5.2 Montage des lampes
The lights are designed for tool-free installation using the included pilot discs.
- Choose a clean, dry, and smooth surface for mounting.
- Peel the protective backing from one side of a pilot disc.
- Adhere the disc firmly to the desired mounting location. Apply pressure for several seconds to ensure good adhesion.
- The light unit has integrated magnets. Align the light unit with the adhered pilot disc so that the magnets attach to the disc.
- Ensure the infrared eye on the light unit (if present) is facing a direction where it can receive signals from the remote control.
6. Mode d'emploi
The Brilliant Evolution LED Wireless Ultra Thin Light is operated using the provided remote control.
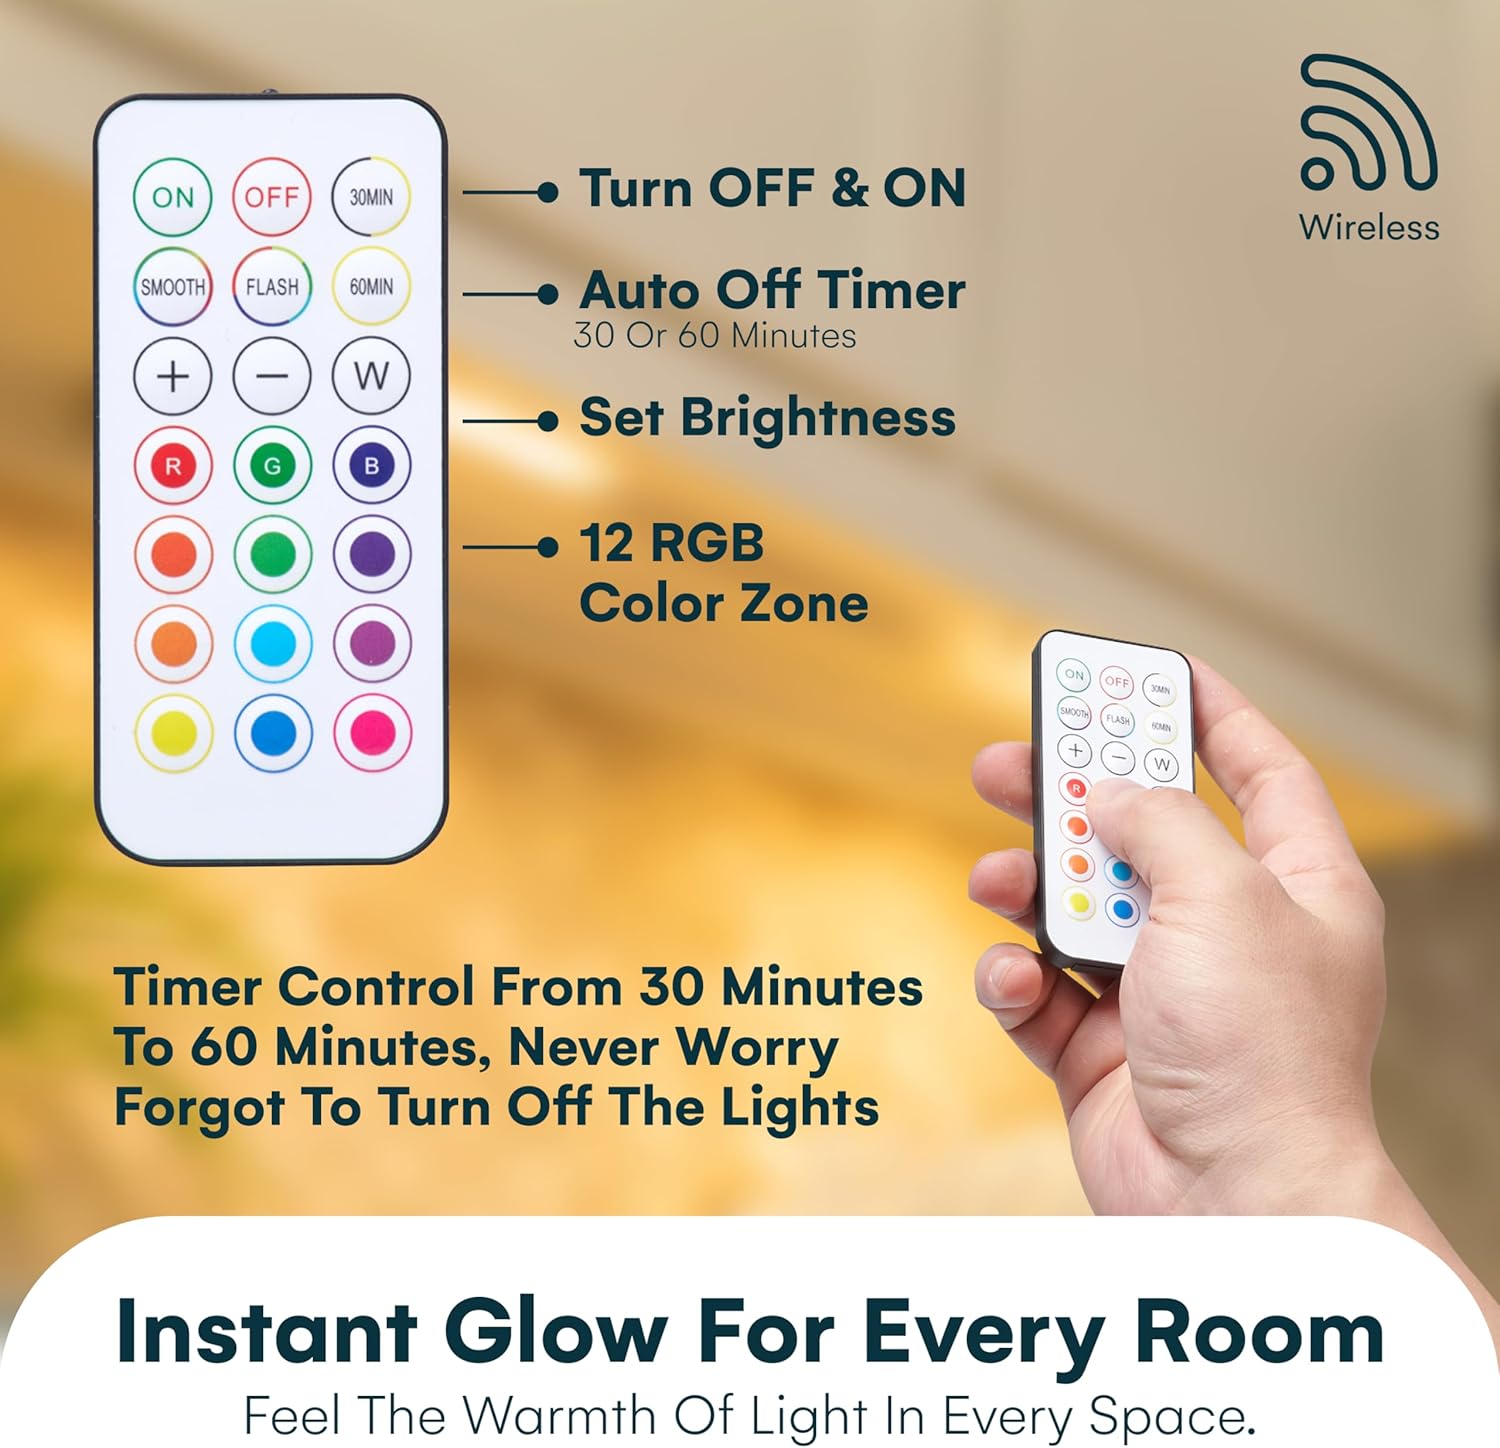
Figure 6.1 : Disposition et fonctions de la télécommande.

Figure 6.2: Using the remote control.
6.1 Fonctions de base
- MARCHE/ARRÊT : Appuyez sur le ON bouton pour allumer les lumières, et le DÉSACTIVÉ bouton pour les éteindre.
- Réglage de la luminosité : Utilisez le + et - buttons to increase or decrease the light brightness.
- Lumière blanche : Appuyez sur le W button to switch to white light mode.
6.2 Contrôle des couleurs
- Couleurs RVB : Select from a variety of pre-set RGB colors by pressing the corresponding color buttons on the remote (e.g., R for Red, G for Green, B for Blue, and other color circles).
- Mode lisse : Presse LISSE for a gradual transition between colors.
- Mode flash: Presse ÉCLAIR for a rapid cycling through colors.
6.3 Fonction minuterie
Programmez l'extinction automatique des lumières après une durée spécifiée :
- Presse 30MIN to set the lights to turn off after 30 minutes.
- Presse 60MIN to set the lights to turn off after 60 minutes.

Figure 6.3: Demonstrating the smart auto-off timer function.
7. Entretien
7.1 Nettoyage
To clean the light units and remote control, gently wipe with a soft, dry cloth. Do not use abrasive cleaners, solvents, or immerse in water.
7.2 Remplacement de la batterie
When the lights begin to dim or the remote control becomes unresponsive, it is time to replace the batteries. Follow the battery installation steps in Section 5.1.
8. Dépannage
- Les lumières ne s'allument pas : Check battery polarity and ensure batteries are fresh. Verify the remote control has working batteries.
- La télécommande ne fonctionne pas: Ensure there are no obstructions between the remote and the light unit's infrared receiver. Check remote battery. Ensure you are within the 15ft remote range.
- Lights dimming prematurely: This indicates low battery power. Replace all batteries in the affected light unit.
- Lights falling off: Ensure the mounting surface is clean and smooth. Apply firm pressure to the adhesive discs during installation. Consider using stronger adhesive if necessary for rough or porous surfaces.
9. Spécifications
| Fonctionnalité | Spécification |
|---|---|
| Marque | Évolution brillante |
| Nom du modèle | PXBR-000069-FBA |
| Couleur | Blanc |
| Matériel | Plastique |
| Style | Remote Control - Color Lights |
| Dimensions du produit | 8.5"L x 2"l x 0.5"H |
| Source d'énergie | Alimenté par piles (AAA) |
| Type de source lumineuse | DIRIGÉ |
| Nombre de sources lumineuses | 6 LEDs per light bar |
| Angle du faisceau | 120° |
| Rendement lumineux | 50 lumens |
| Méthode de contrôle | Télécommande |
| Portée à distance | 15 pieds |
| Fonctions de minuterie | 30 / 60 minutes auto-off |
| Utilisation intérieure/extérieure | Intérieur |
| Niveau de résistance à l'eau | Non résistant à l'eau |
| Poids de l'article | 8.1 ounces (total for 2 pack) |
| Code UPC | 810031588770 |

Figure 9.1: Versatile applications of the LED lights.
10. Garantie et assistance
Pour obtenir des informations sur la garantie ou une assistance technique, veuillez vous référer au site officiel du fabricant. webConsultez leur site web ou contactez leur service client. Conservez votre reçu d'achat comme preuve d'achat.