1. Introduction
This manual provides detailed instructions for the installation, operation, and maintenance of your Reobiux D20-1P 2K Outdoor Surveillance Camera. Please read this manual thoroughly before using the product to ensure proper functionality and safety.
2. Contenu du colis
Veuillez vérifier que tous les articles listés ci-dessous sont inclus dans votre colis. Si un article est manquant ou endommagé, veuillez contacter le service client.
- 1x Reobiux D20-1P Solar PTZ Camera
- 1x Solar Collector
- 1x Manuel d'utilisation
- 1x socle de montage
- 1x Power Supply (for initial charging)
- 1 sachet de vis (pour l'installation)
- 1x Type-C Charging Line
3. Produit terminéview
The Reobiux D20-1P is a 2K outdoor surveillance camera designed for comprehensive home security. It features dual lenses, 360° Pan-Tilt-Zoom (PTZ) capabilities, and operates wirelessly via Wi-Fi. Key features include PIR motion detection, color night vision, two-way audio, and an IP66 weatherproof rating, powered by a solar panel and rechargeable battery.
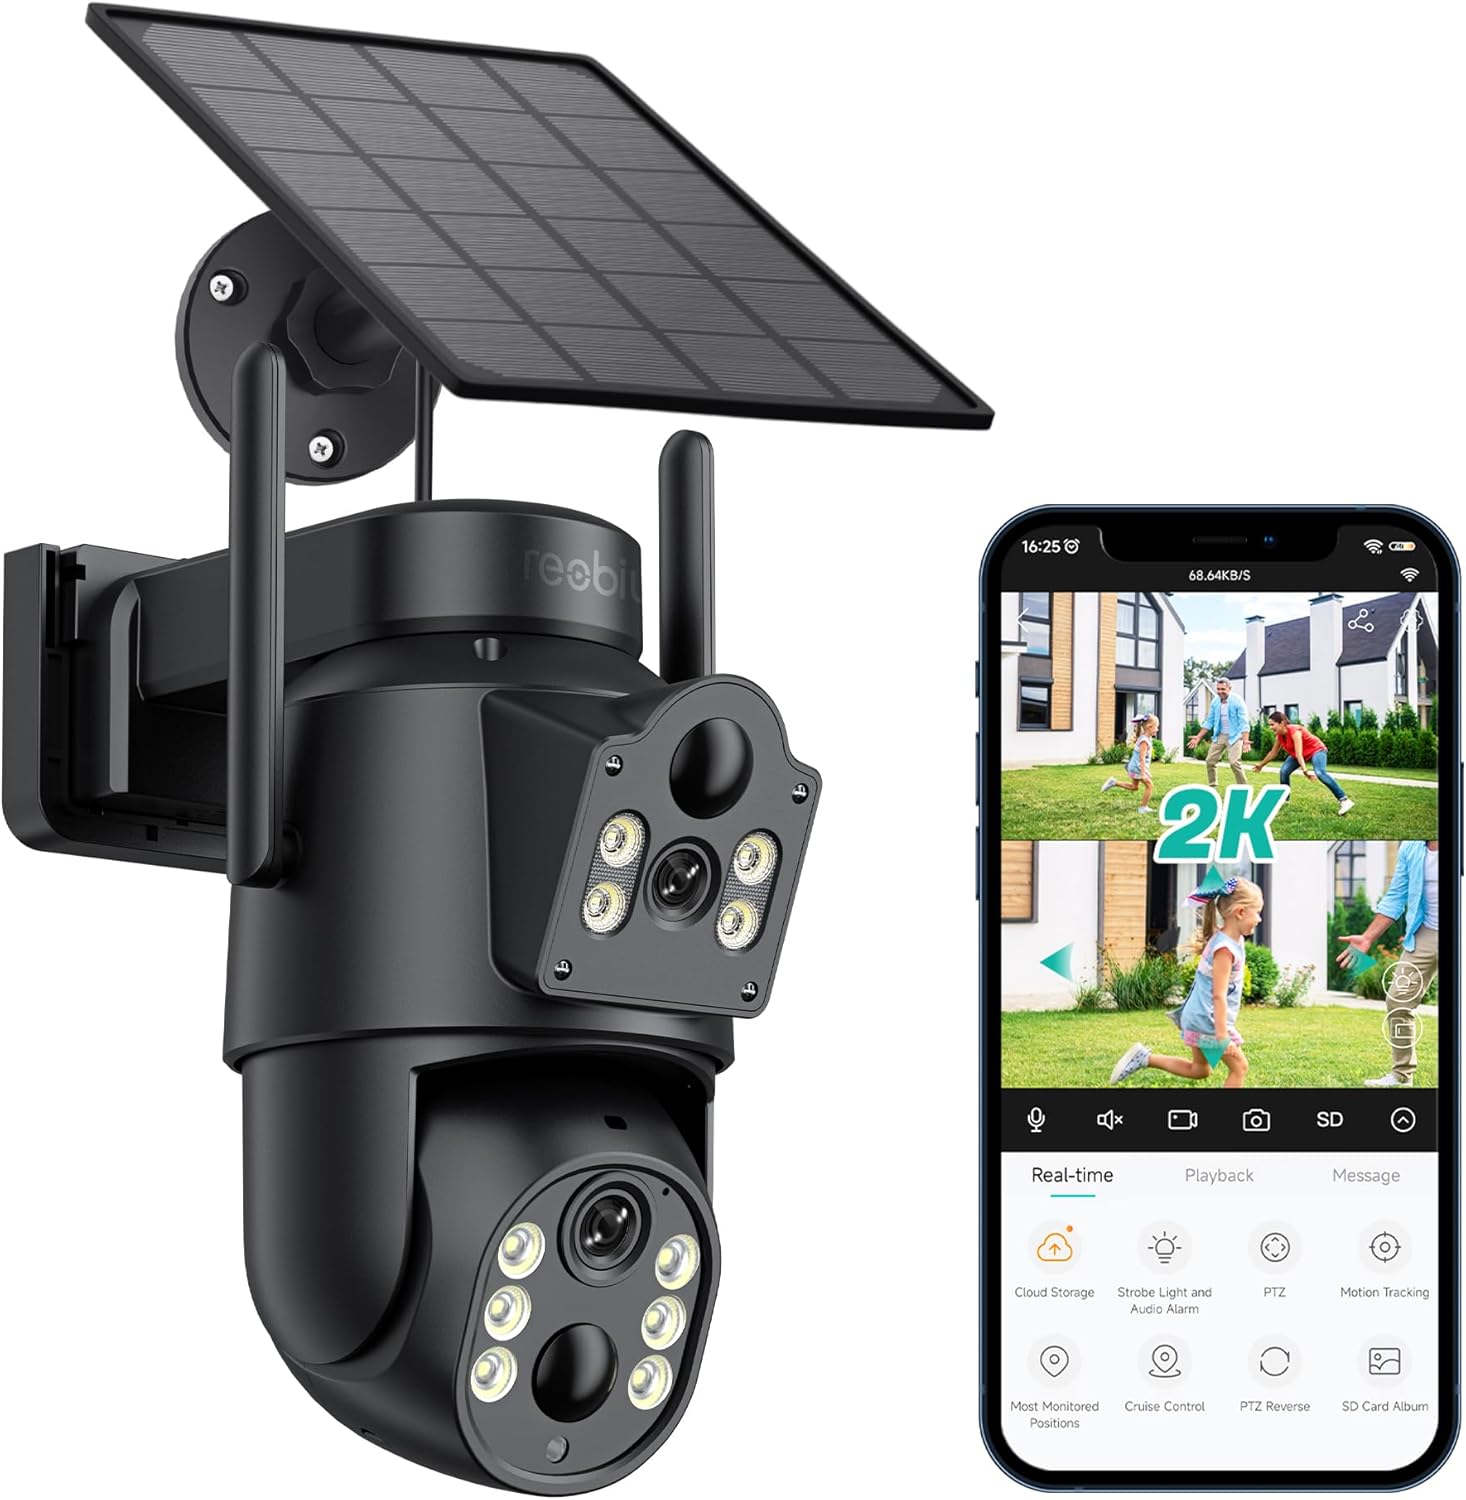
Figure 3.1 : Reobiux D20-1P Solar PTZ Camera and its mobile application interface showing real-time monitoring, playback, and various control options.
Caractéristiques principales :
- 2K QHD High Resolution: Fournit des vidéos claires et détailléestage.
- Conception à double objectif : Combines a fixed lens with a rotating lens for comprehensive coverage.
- Fonctionnalité PTZ à 360° : Allows remote control of pan, tilt, and zoom for flexible viewangles d'inclinaison.
- Solar Powered with Rechargeable Battery: Ensures continuous operation with minimal manual charging.
- Détection de mouvement PIR: Intelligently detects human movement to reduce false alarms.
- Vision nocturne couleur: Offers full-color video even in low-light conditions, alongside infrared night vision.
- Audio bidirectionnel: Enables communication with visitors or deterrence of intruders.
- IP66 résistant aux intempéries : Conçu pour résister aux différentes conditions météorologiques extérieures.
- Wireless Wi-Fi Connectivity: Easy setup and remote access via smartphone.
4. Guide de configuration
4.1 Charge initiale
Before first use, fully charge the camera's internal battery using the provided Type-C charging line and power supply. This ensures the camera has sufficient power for initial setup and operation, especially if solar charging conditions are not optimal immediately after installation.
4.2 Installation de l'application et création du compte
- Téléchargez le iCVoir application depuis la boutique d'applications de votre smartphone (App Store iOS ou Google Play Store).
- Installez l'application et ouvrez-la.
- Suivez les instructions à l'écran pour créer un nouveau compte ou vous connecter si vous en avez déjà un.
4.3 Connexion de la caméra au Wi-Fi
- Assurez-vous que votre appareil photo est allumé.
- Dans l'application iCSee, appuyez sur l'icône « + » pour ajouter un nouvel appareil.
- Select the option for "Wi-Fi Camera" or "Add Device by AP Hotspot" (refer to app for exact wording).
- Follow the app's instructions to connect the camera to your 2.4GHz Wi-Fi network. You may need to scan a QR code displayed on your phone with the camera, or listen for a sound prompt.
- Une fois la connexion établie, vous pouvez nommer votre caméra et commencer la surveillance.
4.4 Montage de la caméra
Choose a location that provides optimal surveillance coverage and receives direct sunlight for the solar panel. Ensure the camera is within range of your Wi-Fi network.
- Sélectionnez l'emplacement: Identify a suitable wall or surface for mounting. Consider the camera's viewing angle (355° pan, 90° tilt) and the solar panel's exposure to sunlight.
- Points de forage marqués : Use the mounting base as a template to mark the screw holes on the wall.
- Trous de forage : Percez des avant-trous aux emplacements marqués. Insérez des chevilles si nécessaire.
- Fixez la base de montage : Fixez la base de montage au mur à l'aide des vis fournies.
- Attacher la caméra : Fixez la caméra sur la base sécurisée.
- Ajuster le panneau solaire : Positionnez le panneau solaire de manière à maximiser son exposition à la lumière du soleil tout au long de la journée.

Figure 4.1 : Illustration of the camera mounted with its solar panel, highlighting the fixed and rotating lenses and the benefit of continuous solar power.
5. Mode d'emploi
5.1 En direct View et lecture
Open the iCSee app and select your camera to access the live viewÀ partir d'ici, vous pouvez :
- Surveillance en temps réel: View Flux vidéo en direct.
- Contrôle PTZ: Use the on-screen joystick to pan (355°) and tilt (90°) the camera.
- Zoom numérique : Pinch to zoom on the live feed.
- Lecture: Accéder aux photos enregistréestage stored on the SD card or cloud storage.

Figure 5.1 : Demonstrates the superior clarity of 2K QHD resolution compared to 1080P, providing more details for monitoring.
5.2 Détection de mouvement et alertes
The camera utilizes PIR (Passive Infrared) intelligent detection to identify human movement, minimizing false alarms from pets or swaying branches.
- Activer/Désactiver : Activez ou désactivez la détection de mouvement dans les paramètres de l'application.
- Réglage de la sensibilité : Adjust the PIR sensor's sensitivity to suit your environment.
- Notifications d'alarme : Recevez des notifications push instantanées sur votre smartphone lorsqu'un mouvement est détecté.
- Alarme sonore et lumineuse : Configure the camera to trigger a strobe light and audible alarm upon detection.

Figure 5.2 : The camera's PIR intelligent detection distinguishes human movement from other objects, reducing unnecessary alerts.

Figure 5.3 : When motion is detected, the camera can send real-time push notifications and activate a sound and light alarm to deter intruders.
5.3 Modes de vision nocturne
The camera offers two night vision modes for clear visibility in the dark:
- Spotlight Full Color Night Vision: Utilise des projecteurs intégrés pour fournir une vidéo en couleur même dans des conditions de faible luminosité.
- Spotlight Infrared Night Vision: Uses infrared LEDs for black-and-white video in complete darkness, with a range of up to 30 meters.
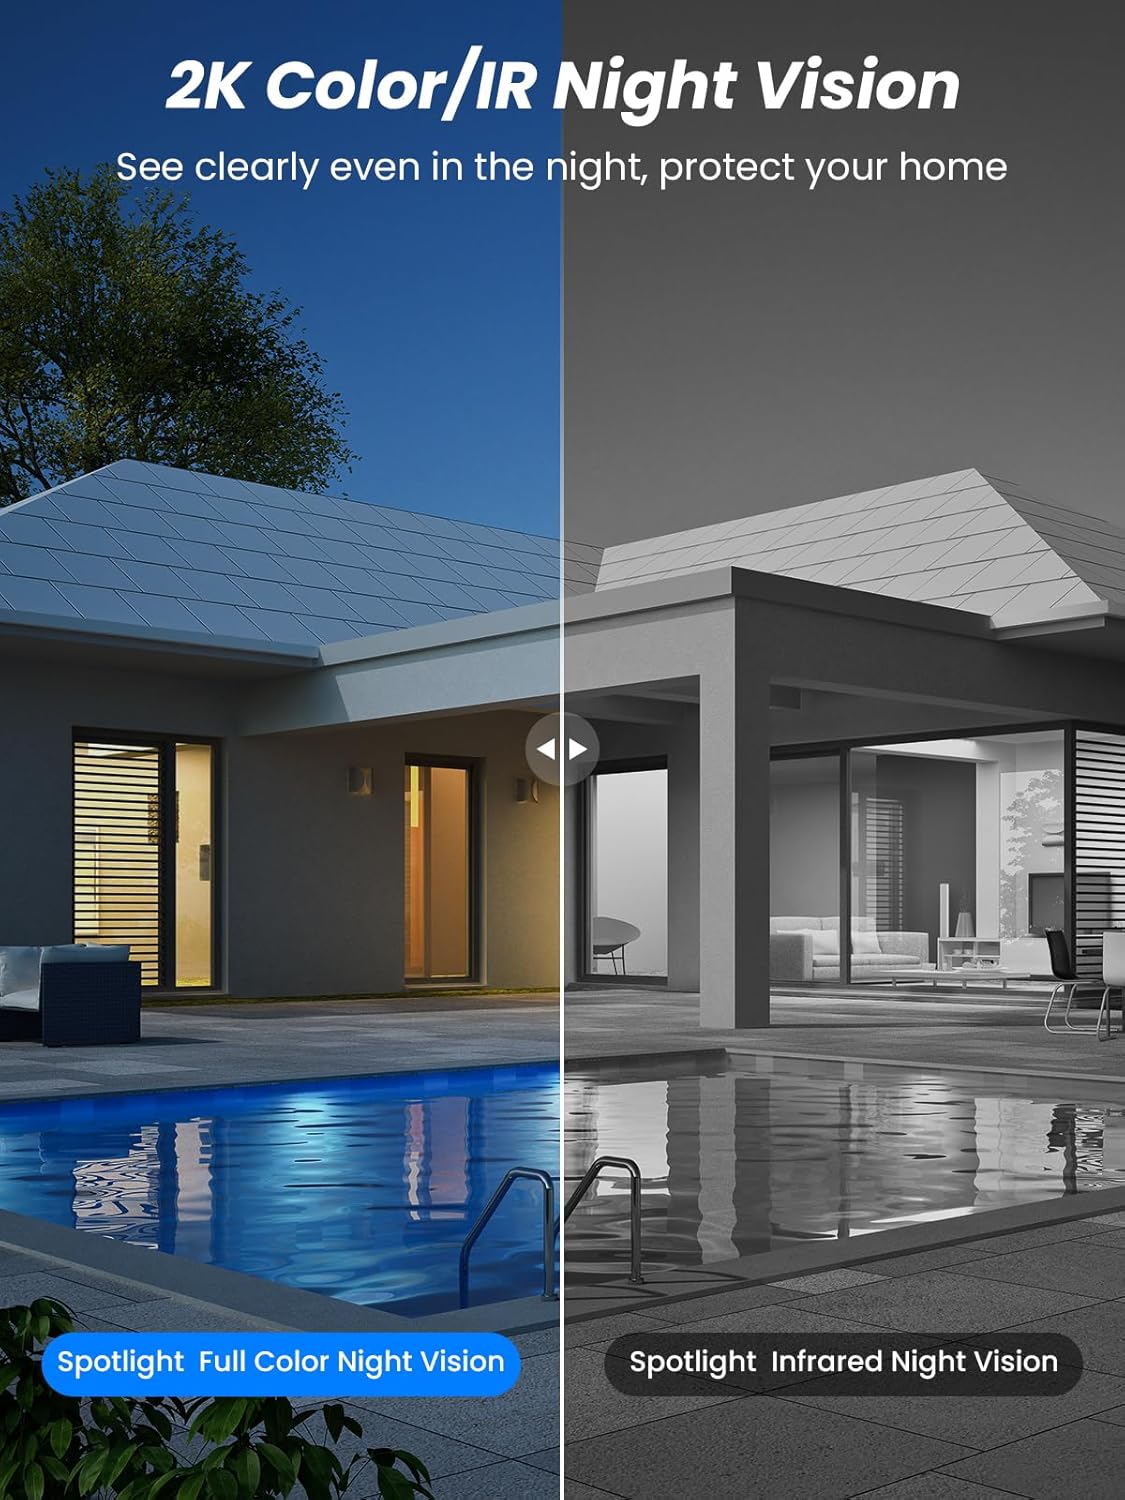
Figure 5.4 : Illustrates the difference between full-color night vision, enabled by spotlights, and traditional infrared night vision.
5.4 Audio bidirectionnel
The integrated microphone and speaker allow for two-way communication.
- Parler: Appuyez sur l'icône du microphone dans l'application pour parler via le haut-parleur de la caméra.
- Écouter: Le microphone de la caméra capte les sons de son environnement.

Figure 5.5 : The two-way audio function allows for direct communication through the camera, useful for interacting with visitors or delivery personnel.
6. Entretien
- Nettoyage: Nettoyez régulièrement l'objectif de l'appareil photo et le panneau solaire avec un chiffon doux et sec.amp Utilisez un chiffon doux pour garantir des performances optimales et une image nette. Évitez les nettoyants abrasifs.
- État de la batterie : While solar-powered, extreme weather or prolonged periods of low sunlight may require manual charging. Monitor battery levels via the app.
- Mises à jour du micrologiciel : Check the iCSee app regularly for available firmware updates to ensure your camera has the latest features and security enhancements.
- Protection contre les intempéries : The camera is IP66 weatherproof, designed to withstand rain, snow, and sun. However, ensure all connections are secure to maintain water resistance.

Figure 6.1 : The IP66 rating ensures the camera's durability and functionality in various outdoor weather conditions, including snow, rain, and direct sunlight.
7. Dépannage
- La caméra ne se connecte pas au Wi-Fi :
- Ensure the camera is within range of your 2.4GHz Wi-Fi network. 5GHz networks are not supported.
- Vérifiez que votre mot de passe Wi-Fi est correct.
- Redémarrez votre routeur et votre caméra.
- If issues persist, try resetting the camera (refer to app or product for reset button location).
- La batterie ne se charge pas ou se décharge rapidement :
- Veillez à ce que le panneau solaire soit propre et reçoive la lumière directe du soleil pendant plusieurs heures par jour.
- Vérifiez la connexion entre le panneau solaire et la caméra.
- If in a low-light environment, manually charge the camera using the Type-C cable.
- Événements fréquents de détection de mouvement ou en direct view streaming can consume battery faster. Adjust settings if needed.
- False motion detection alarms:
- Adjust the PIR motion detection sensitivity in the iCSee app.
- Ensure the camera is not pointed at areas with constant movement (e.g., busy roads, swaying trees) if not intended for monitoring.
- Mauvaise qualité d'image :
- Nettoyez l'objectif de l'appareil photo.
- Ensure sufficient lighting for optimal image capture, especially at night.
- Check your Wi-Fi signal strength; a weak signal can affect video streaming quality.
8. Spécifications
| Fonctionnalité | Détail |
|---|---|
| Nom du modèle | D20-1P |
| Résolution de capture vidéo | 2.5K |
| Résolution vidéo efficace | 2K QHD |
| Technologie de communication sans fil | Wi-Fi (2.4 GHz) |
| Facteur de forme | Dôme |
| ViewAngle d'attaque | 355 degrés (panoramique), 90 degrés (inclinaison) |
| Type d'installation | Fixation murale |
| Gamme de vision nocturne | 30 mètres |
| Fréquence d'images | 25 images par seconde |
| Matériel | Plastique |
| Voltage | 12 volts (CC) |
| Quoitage | 5 watts |
| Source d'énergie | Alimenté par batterie, alimenté par énergie solaire |
| Piles | 3 pile lithium-ion (incluse) |
| Protocole de connectivité | Wifi |
| Type de contrôleur | Application iCSee |
| Caractéristiques spéciales | Night Vision (Color/IR), PIR Motion Detection, Two-Way Audio, IP66 Weatherproof |
| Poids de l'article | 1.06 kg |
| Dimensions du colis | 21.7 x 19.5 x 13.8 cm |
9. Garantie et assistance
Reobiux offers a Garantie de 1 ans for this product. For any issues or inquiries, please do not hesitate to reach out to our customer service. We provide 20 hours of online service to assist you.
For support, please refer to the contact information provided with your purchase or within the iCSee application.