AXNEN HQ3
AXNEN HQ3 3-Axis Cell Phone Stabilizer User Manual
Model: HQ3 | Brand: AXNEN
Introduction
This manual provides comprehensive instructions for the safe and effective use of your AXNEN HQ3 3-Axis Cell Phone Stabilizer. Please read this manual thoroughly before operating the device to ensure optimal performance and to prevent damage.
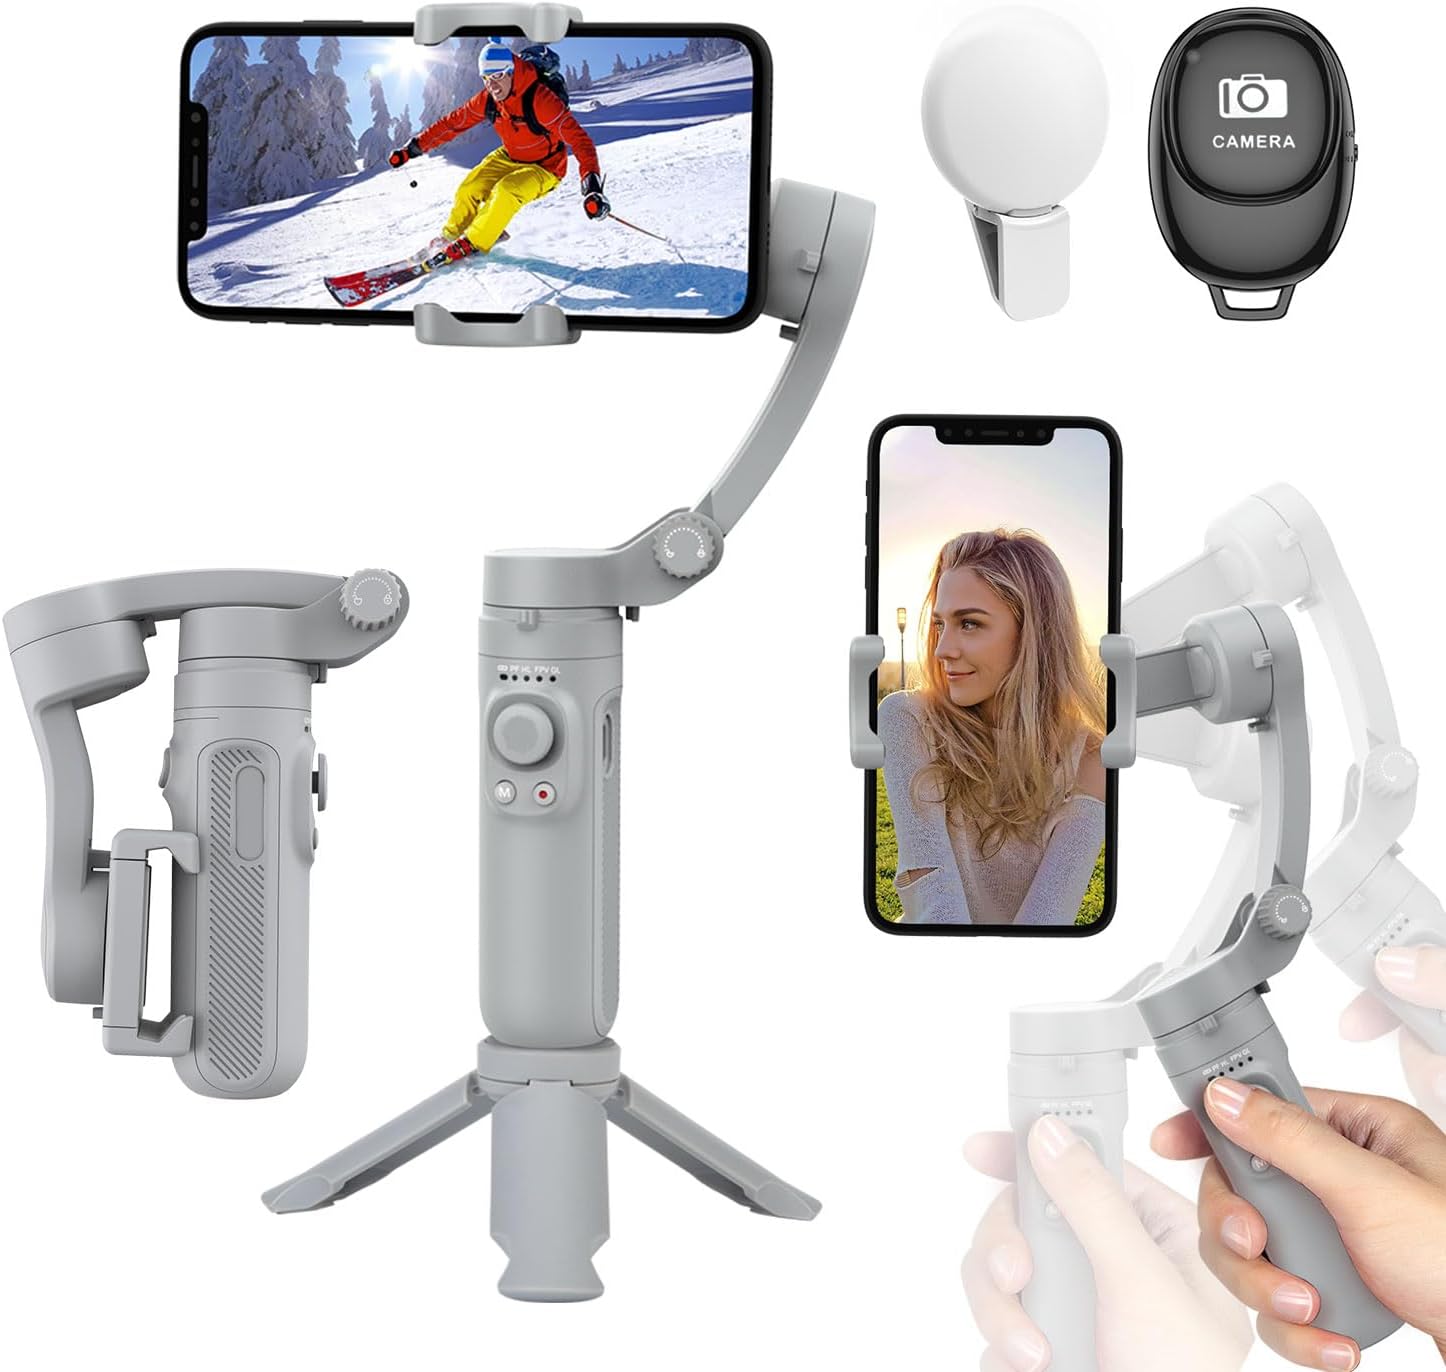
Figure 1: AXNEN HQ3 3-Axis Cell Phone Stabilizer with included accessories.
Produit terminéview
The AXNEN HQ3 is a portable and foldable 3-axis cell phone stabilizer designed to provide smooth and stable video footage and photos. It features multiple stabilization modes, a built-in fill light, and a detachable Bluetooth remote control.

Figure 2: Key features of the AXNEN HQ3 Gimbal.
Composants:
- Gimbal Body with Integrated Handle and Controls
- Téléphone Clamp
- Mini Tripod (integrated/detachable base)
- Télécommande Bluetooth détachable
- Lumière d'appoint intégrée
- Câble de chargement USB
Installation
1. Chargement du stabilisateur :
Before first use, fully charge the gimbal. Connect the USB charging cable to the gimbal's charging port and a power source. The battery indicator lights will show charging status. A full charge provides up to 8 hours of continuous use.
2. Unfolding the Gimbal:
Gently unfold the gimbal from its compact, folded state. Ensure all axes are unlocked and can move freely before powering on.

Figure 3: The compact and foldable design of the gimbal, along with phone compatibility guidelines.
3. Mounting Your Smartphone:
- Prolongez la durée du téléphoneamp and carefully insert your smartphone.
- Ensure the phone is centered and balanced within the clamp. The gimbal supports phones between 5.5 cm and 8.5 cm wide, with a maximum weight of 280 g.
- For optimal performance, balance your phone before powering on the gimbal. If the phone is significantly off-center, the gimbal may vibrate or not stabilize correctly.
4. Mise sous tension et couplage Bluetooth :
- Press and hold the power button on the gimbal until the indicator lights illuminate. The gimbal will automatically perform self-calibration.
- Activez le Bluetooth sur votre smartphone.
- Rechercher "HQ3" or a similar device name in your phone's Bluetooth settings and pair with it.
- Once paired, you can control your phone's camera functions (shutter, video recording) using the gimbal's buttons and the detachable remote.
Utilisation du cardan
Stabilization Technology:
The AXNEN HQ3 utilizes a high-precision 3-axis stabilization system to keep your footage smooth and steady, even during movement. This significantly reduces camera shake and blur.

Figure 4: Visual demonstration of stabilization effect.

Figure 5: Understanding the 3-axis movement.
Modes de fonctionnement :
The gimbal features four distinct operating modes to suit various shooting scenarios:
- Mode de suivi panoramique (PF) : The tilt and roll axes are locked, and the pan axis follows the direction of the handle. Ideal for smooth horizontal tracking shots.
- Horizontal Lock Mode (HL): The roll axis remains horizontal, and the pan axis follows the direction of the handle.
- Première personne View (FPV) : All three axes follow the direction of the handle, allowing for dynamic, immersive shots that simulate the user's perspective.
- Global Lock (GL): All three axes are locked, keeping the camera pointed in a fixed direction regardless of gimbal movement. To enter Global Lock, press and hold the trigger button.
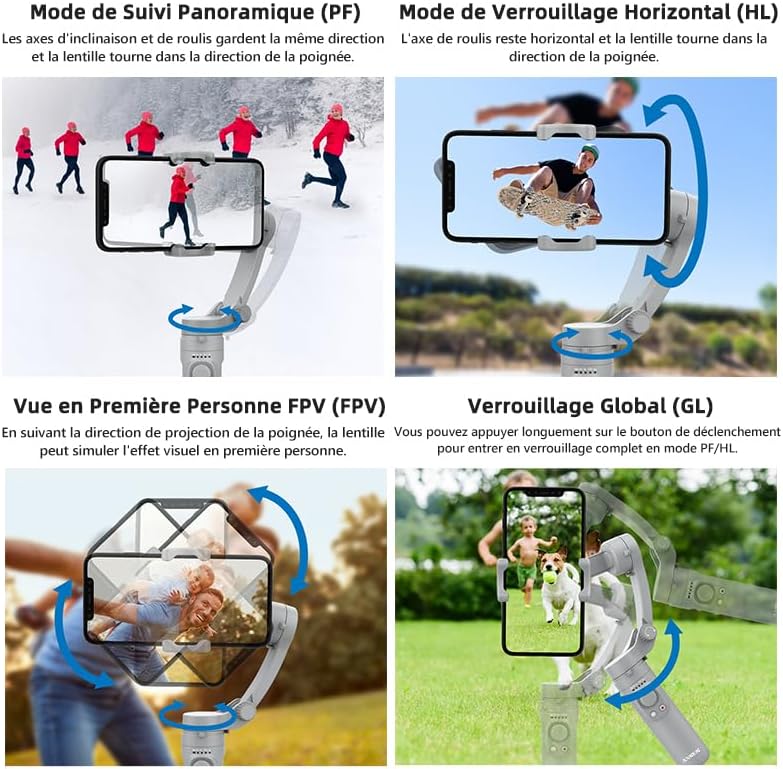
Figure 6: Visual representation of gimbal operating modes.
Switching Between Horizontal and Vertical Shooting:
The gimbal allows for easy switching between horizontal (landscape) and vertical (portrait) shooting orientations, catering to different video platforms and content needs.

Figure 7: Horizontal and Vertical Shooting, and Manual Lock feature.
Utilisation de la lumière d'appoint :
The integrated fill light can be activated to provide additional illumination for your subjects, especially in low-light conditions. Refer to the gimbal's controls for light activation and brightness adjustment.
Entretien
- Nettoyage: Utilisez un chiffon doux et sec pour nettoyer le stabilisateur. N'utilisez pas de nettoyants liquides ni de solvants.
- Stockage: When not in use, fold the gimbal into its compact form and store it in a cool, dry place, away from direct sunlight and extreme temperatures.
- Entretien de la batterie: To prolong battery life, avoid fully discharging the battery frequently. Charge the gimbal regularly, even if not in use for extended periods.
- Évitez la surcharge : Do not mount phones heavier than the specified maximum weight (280g) to prevent damage to the motors.
Dépannage
| Problème | Cause possible | Solution |
|---|---|---|
| Gimbal vibrates or does not stabilize. | Phone is not balanced or too heavy. Gimbal not powered on correctly. | Ensure phone is centered and within weight limits (max 280g). Power off and restart the gimbal. |
| Impossible de se connecter via Bluetooth. | Bluetooth not enabled on phone. Gimbal not in pairing mode. Interference. | Ensure phone Bluetooth is on. Restart gimbal and phone. Move closer to the gimbal. |
| Le stabilisateur ne s'allume pas. | Batterie faible. | Chargez complètement le stabilisateur. |
| La télécommande ne fonctionne pas. | Remote battery low. Not paired. | Check remote battery (if replaceable, otherwise assume integrated). Re-pair the remote with the gimbal. |
Caractéristiques
- Modèle: HQ3
- Marque: AXNEN
- Stabilisation: 3 axes
- Largeur de téléphone compatible : 5.5 cm - 8.5 cm (2.17 po - 3.35 po)
- Maximum Phone Weight: 280 g (0.62 lb)
- Gimbal Weight: 295 g (0.65 lb)
- Dimensions pliées : 21.9 x 4.2 x 9.9 cm (8.62 x 1.65 x 3.9 in)
- Capacité de la batterie : 2200mAh
- Durée de fonctionnement : Jusqu'à 8 XNUMX heures
- Connectivité : Bluetooth
- Caractéristiques: Integrated Fill Light, Detachable Bluetooth Remote, Foldable Design
Garantie et assistance
For any issues or inquiries regarding your AXNEN HQ3 stabilizer, please contact AXNEN customer service. As per product information, if you encounter any problems after receiving this phone stabilizer, please contact us immediately. We will reply and solve any problems within 12 hours.
Conseil utile : Scan the QR code on the manual (physical manual) to watch instruction videos, which will make your use more convenient. For digital support, please visit the official AXNEN webconsultez le site ou contactez leurs services d'assistance.
Veuillez conserver votre preuve d'achat pour les réclamations au titre de la garantie.
Documents connexes - HQ3
 |
Guide d'utilisation du stabilisateur de cardan AOCHUAN Smart X Guide d'utilisation complet du stabilisateur de smartphone AOCHUAN Smart X : fonctionnalités, installation, utilisation, intégration avec une application et spécifications techniques. Découvrez comment déplier, replier, charger et utiliser les différents modes et fonctions de votre stabilisateur pour réaliser des vidéos et des photos de qualité professionnelle. |
 |
Manuel d'utilisation du cardan pour smartphone à 3 axes Hohem iSteadyMobile+ V1.0 Manuel d'utilisation complet du stabilisateur pour smartphone Hohem iSteadyMobile+ à 3 axes, comprenant la liste des produits, l'introduction, la batterie et le chargement, le téléchargement de l'application, la première utilisation, les modes, le fonctionnement, les spécifications, les avertissements et la garantie. |
 |
Manuel d'utilisation du stabilisateur de cardan à 3 axes pour smartphone AOCHUAN Smart S2 Guide complet du stabilisateur de cardan à 3 axes pour smartphone AOCHUAN Smart S2, couvrant les caractéristiques du produit, son fonctionnement, les instructions du microphone, le chargement, les spécifications et la garantie. |
 |
Manuel d'utilisation et informations produit du stabilisateur AOCHUAN Smart XE Guide complet du stabilisateur pour smartphone AOCHUAN Smart XE : fonctionnalités, installation, utilisation, chargement, spécifications et garantie. Découvrez comment déplier, replier et utiliser le stabilisateur pour des enregistrements vidéo stables. |
 |
Manuel d'utilisation du Hohem iSteady X2 : Caractéristiques, fonctionnement et spécifications Manuel d'utilisation complet du stabilisateur de smartphone Hohem iSteady X2. Découvrez l'installation, le fonctionnement, les fonctions des boutons, les modes de fonctionnement, les caractéristiques techniques et la garantie. |
 |
Manuel d'utilisation du stabilisateur de cardan KOSCHEAL Q09 : Caractéristiques, fonctionnement et spécifications Manuel d'utilisation complet du stabilisateur KOSCHEAL Q09. Découvrez ses fonctionnalités, la connexion Bluetooth, l'éclairage d'appoint, la télécommande, le chargement et les spécifications pour une photographie et une vidéographie optimales avec votre smartphone. |
Ask a question about this manual
Ask about setup, troubleshooting, compatibility, parts, safety, or missing instructions. Manuals+ will review the question and use this page’s manual context to help answer it.