
1. Introduction
This manual provides detailed instructions for the setup, operation, and maintenance of your Abovsare F800 Digital LED Alarm Clock. Please read this manual thoroughly before using the product to ensure proper function and longevity.

Image 1.1: The Abovsare F800 Digital LED Alarm Clock, showcasing its large, multi-color display and ambient lighting.
2. Produit terminéview
2.1 Contenu du paquet
Vérifiez que tous les éléments sont présents dans le colis :
- Abovsare F800 Digital LED Alarm Clock
- Télécommande
- Câble d'alimentation USB
- CR2032 Battery (for memory function)
- Manuel d'instructions
- Wall Mounting Accessories (guide, screws)

Image 2.1: Included components: clock unit, remote, USB cable, CR2032 battery, and mounting hardware.
2.2 Principales caractéristiques
- Grand écran LED : High-definition, 13-inch LED screen for clear visibility.
- 12 RGB Digit Colors: Customize the display digits with 12 different color options via remote control.
- Veilleuse d'ambiance : Features 14 distinct color ambient lights at the base, usable as a night light.
- Luminosité réglable : Five levels of brightness can be set manually, plus an automatic dimming function.
- Time & Calendar Alternation: Option to cycle between time display (10 seconds) and calendar display (5 seconds).
- Fonction mémoire : Built-in memory retains time data even if power is disconnected (requires CR2032 battery).
- Options de montage : Can be wall-mounted or placed on a desktop using the folding bracket.
- Fonction d'alarme : Fonction réveil intégrée.
3. Instructions de configuration
3.1 Connexion d'alimentation
The Abovsare F800 Digital LED Alarm Clock is powered by a corded electric connection. It is not battery operated for its primary functions and must be plugged in to work.
- Connect the provided USB power cable to the clock's USB port.
- Connect the other end of the USB cable to a 5V/1A or 5V/2A USB adapter (not included, unless specified as "adapter include" in your purchase) or a compatible USB port.
- Ensure the connection is secure. The clock display should illuminate.
3.2 Memory Battery Installation
A CR2032 battery is required for the memory function, which preserves time settings during power outagou lorsque l'horloge est débranchée.
- Localisez le compartiment à piles à l'arrière de l'horloge.
- Insérez une pile CR2032 en veillant à respecter la polarité (+/-).
- Fermez soigneusement le compartiment à piles.
3.3 options de montage
The clock offers both wall-mounting and desktop placement options.
- Emplacement sur le bureau : Extend the folding bracket located on the back of the clock to stand it upright on any flat surface.
- Montage mural : Use the integrated wall hanging holes and the provided mounting accessories (screws, guide) to securely attach the clock to a wall.

Image 3.1 : Arrière view illustrating the wall hanging holes and the folding bracket for versatile placement.
4. Mode d'emploi
All primary settings and adjustments are performed using the included remote control.
4.1 Réglage de l'heure et de la date
- Press the "SET" button on the remote control to enter time setting mode.
- Use the directional arrows (Up/Down) to adjust the hour, and (Left/Right) to move between hour, minute, year, month, and day settings.
- Appuyez de nouveau sur « SET » pour confirmer chaque réglage et passer au suivant.
- Pour basculer entre le format 12 heures et le format 24 heures, appuyez sur le bouton « 12/24H » de la télécommande.

Image 4.1 : Example of the clock displaying time in both 12-hour (AM/PM) and 24-hour formats.
4.2 Réglage de l'alarme
- Appuyez sur le bouton « ALARME » de la télécommande.
- Use the directional arrows to set the desired alarm time.
- Appuyez de nouveau sur « ALARME » pour confirmer.
- To activate or deactivate the alarm, press the "ALARM ON/OFF" button. An alarm icon will appear on the display when active.

Image 4.2: The alarm bell icon indicates that the alarm function is currently active.
4.3 Réglage de la luminosité de l'écran
The clock offers five levels of manual brightness adjustment and an automatic dimming feature.
- Réglage manuel : Press the "BRIGHTNESS" button on the remote control repeatedly to cycle through the five brightness levels (100%, 70%, 50%, 20%, Off).
- Gradation automatique : The clock automatically adjusts its brightness based on the time of day:
- AM 7:00 - PM 6:59: High Brightness
- PM 7:00 - PM 10:59: Medium Brightness
- PM 11:00 - AM 6:59: Low Brightness
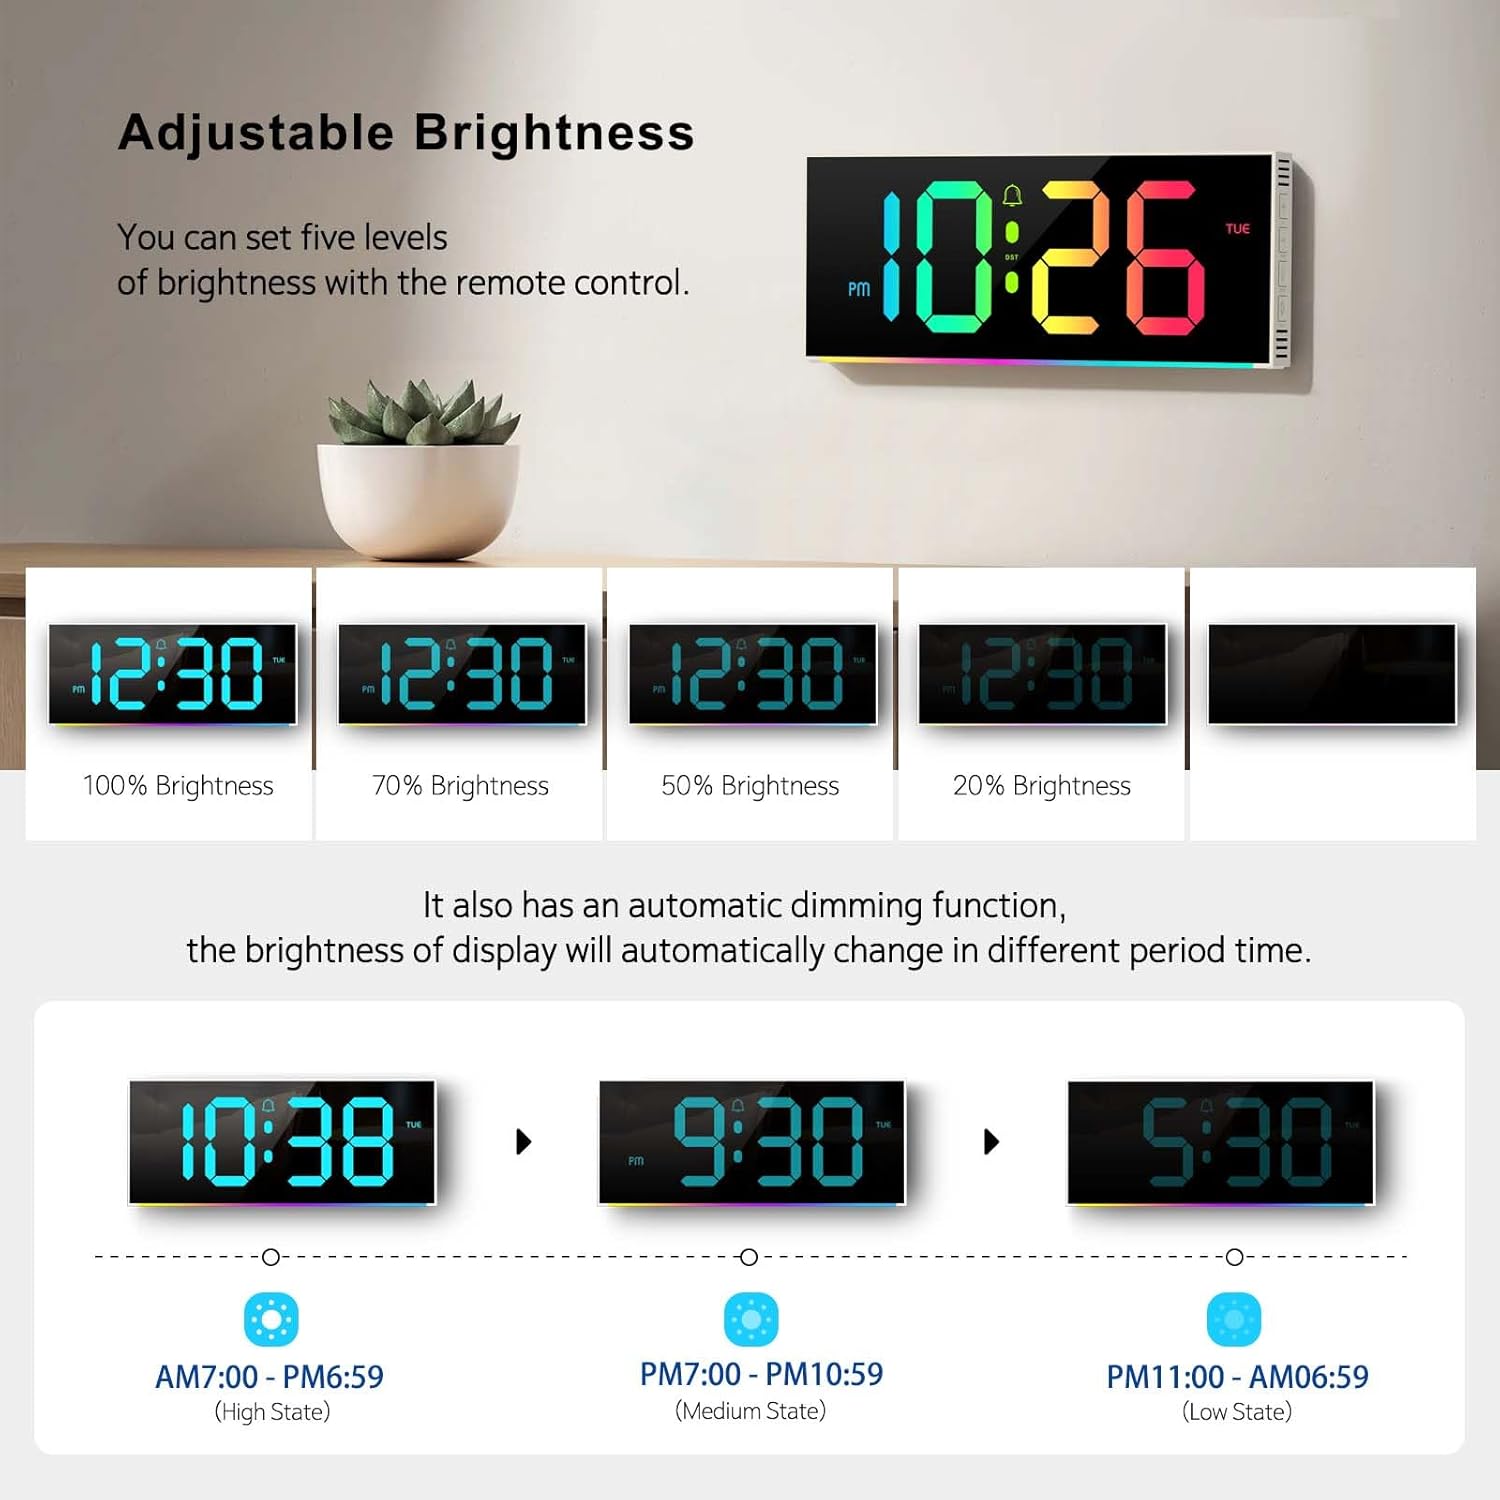
Image 4.3: Visual representation of the five brightness levels and the automatic dimming schedule.

Image 4.4: Detailed diagram of the clock's automatic dimming function based on time periods.
4.4 Changing Digit Colors
The clock digits can be displayed in 12 different RGB colors.
- Press the "COLOR" button on the remote control to cycle through the available digit colors.
- Select your preferred color.

Image 4.5 : Examples of the 12 different RGB digit colors that can be selected using the remote control.
4.5 Controlling Ambient Night Light
The clock features 14 different ambient light colors at its base.
- Press the "AMBIENT LIGHT" button on the remote control to turn the ambient light on/off or cycle through the colors.
- Select your desired ambient light color.
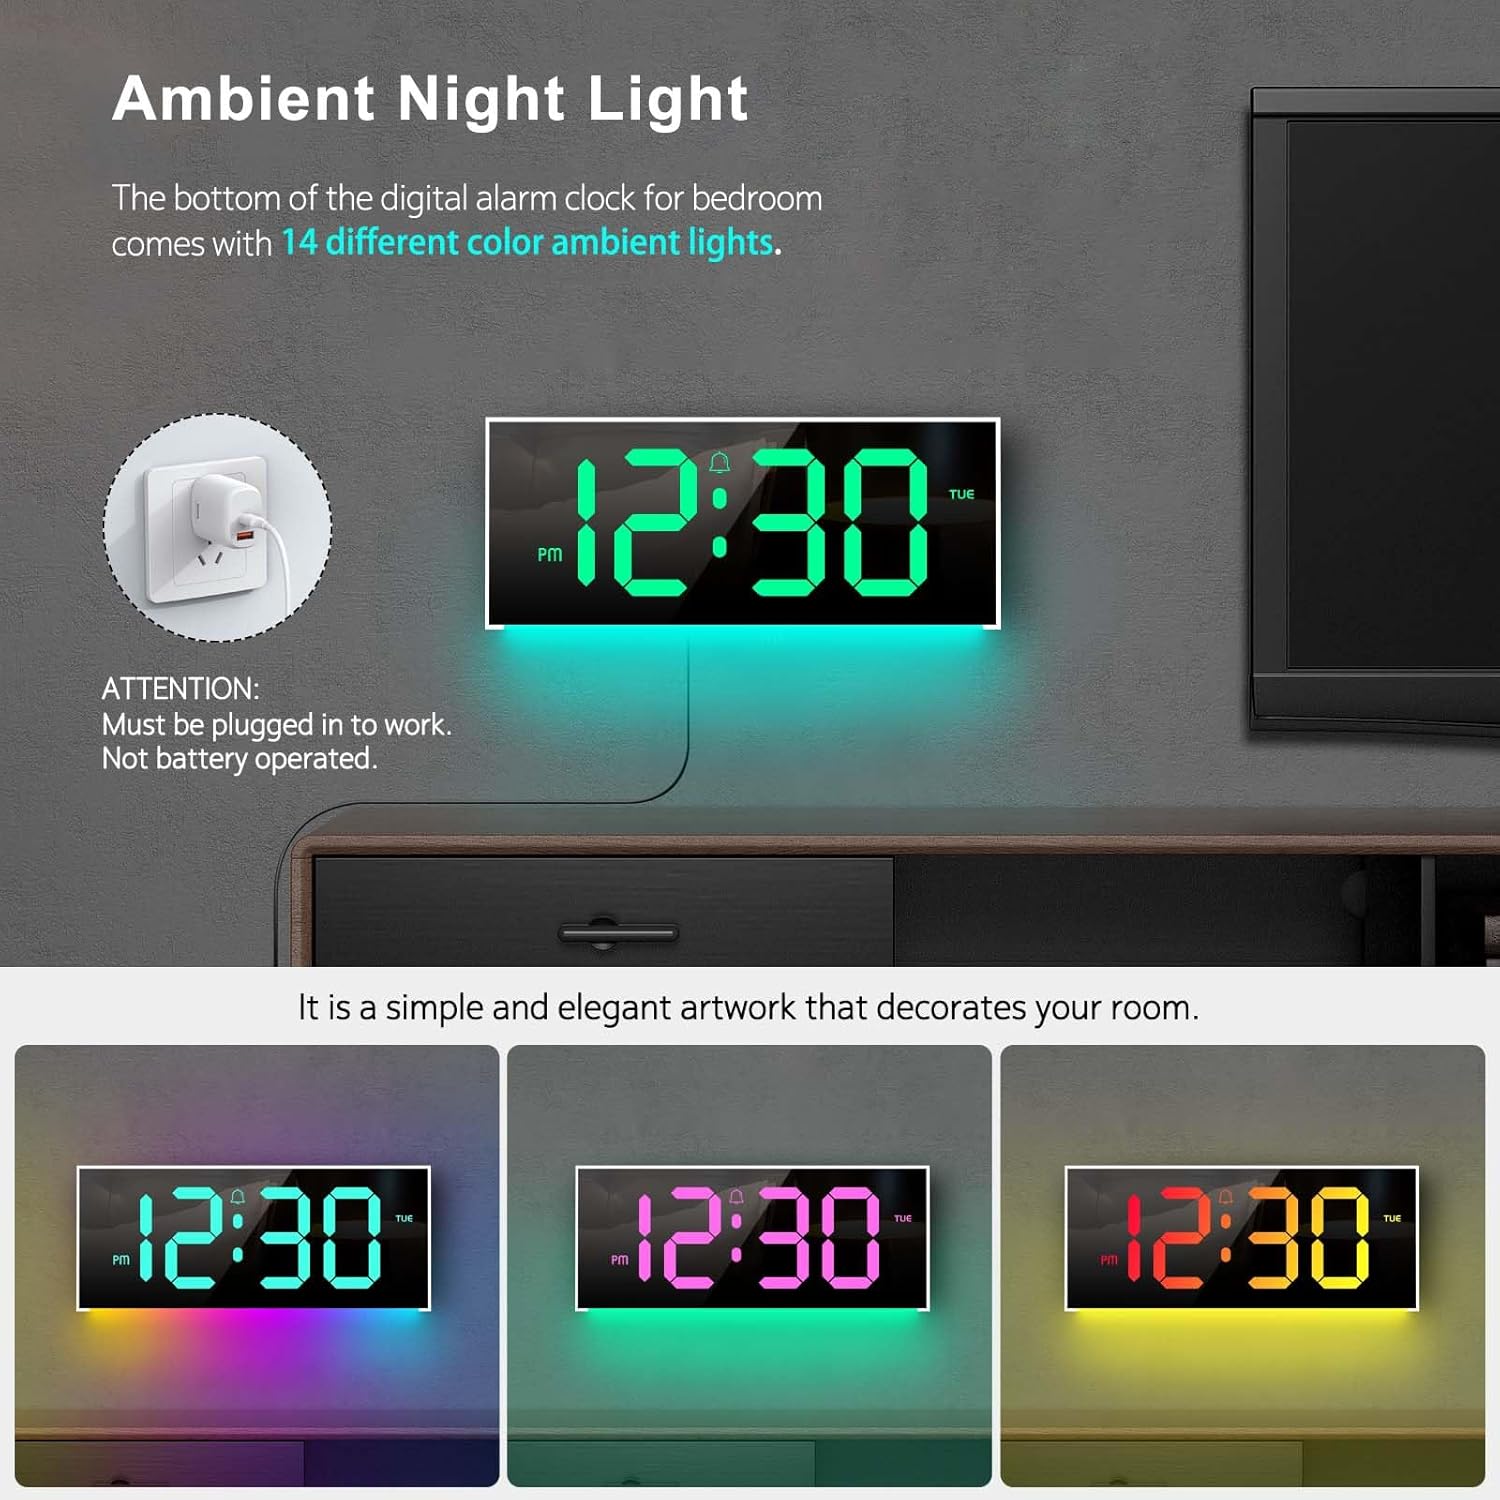
Image 4.6: The clock's ambient night light feature, displaying different color options in a room environment.

Image 4.7: The ambient night light feature providing subtle illumination, with exampdes couleurs différentes.
4.6 Time and Calendar Alternation
The clock can be set to alternate between displaying the time and the calendar.
- Press the "ALT" button on the remote control to activate or deactivate the alternation mode.
- When active, the display will show the time for 10 seconds, then switch to the calendar for 5 seconds, and continuously cycle.

Image 4.8: The clock demonstrating the alternation between time display and calendar display.
5. Entretien
To ensure the longevity and optimal performance of your Abovsare F800 Digital LED Alarm Clock, follow these maintenance guidelines:
- Nettoyage: Use a soft, dry cloth to gently wipe the display and exterior surfaces. Avoid abrasive cleaners, solvents, or spray directly onto the clock.
- Pouvoir: Always use a 5V/1A or 5V/2A adapter. Using an incorrect power source may damage the device.
- Environnement: Conservez l'horloge à l'abri de la lumière directe du soleil, des températures extrêmes et d'une forte humidité.
- Remplacement de la batterie : Replace the CR2032 memory battery annually or if you notice the clock losing time settings after a power disconnection.
6. Dépannage
| Problème | Cause possible | Solution |
|---|---|---|
| L'horloge ne s'allume pas. | Pas de connexion électrique ou adaptateur défectueux. | Ensure the USB cable is securely connected and the power adapter (5V/1A or 5V/2A) is functioning. Try a different USB port or adapter. |
| Clock loses time settings after unplugging. | La pile mémoire CR2032 est déchargée ou n'est pas installée. | Install or replace the CR2032 battery, ensuring correct polarity. |
| La télécommande ne fonctionne pas. | Remote battery is dead or obstructed signal. | Replace the remote control battery. Ensure there are no obstructions between the remote and the clock's sensor. |
| Display brightness is too low/high. | Manual brightness setting or automatic dimming. | Press the "BRIGHTNESS" button on the remote to adjust manually. Note the automatic dimming schedule (Section 4.3). |
| Clock randomly shuts off. | Intermittent power supply or loose connection. | Check the USB cable and adapter for secure connection. Try a different power outlet or adapter. If the issue persists, contact customer support. |
7. Spécifications
- Marque: Au-dessus
- Modèle: F800
- Type d'affichage : DIRIGÉ
- Dimensions du produit : 11.6 po L x 4.8 po H
- Source d'alimentation : Corded Electric (USB, requires 5V/1A or 5V/2A adapter)
- Batterie mémoire : 1 x CR2032 (obligatoires)
- Matériau du cadre : Plastique
- Type de montage : Sur table ou mural
- Caractéristiques spéciales : Adjustable Brightness, Alarm, Ambient Night Light, Large LED display, Remote Control, Time & Calendar Alternation
- Poids de l'article : 1.23 livres
8. Garantie et assistance
Abovsare provides a Garantie sans souci de 12 mois pour ce produit, en garantissant la qualité et la satisfaction du client.
Pour toute question, préoccupation ou besoin d'assistance, veuillez contacter notre service client. Nous proposons Service client 24h/XNUMX pour vous aider.
Méthode de contact : Please reach out to us via the buyer-seller message system on the platform where you purchased the product.