

1. Introduction
The JoFomp Digital Wall Clock is designed to provide clear and comprehensive timekeeping, environmental monitoring, and alarm functions for various indoor settings. Its large 9-inch LED display ensures excellent visibility, day or night. This manual provides detailed instructions for setup, operation, and maintenance of your new digital clock.

Image: The digital clock shown with its dimensions (8.98" / 22.8cm length, 2.95" / 7.5cm height, 1.38" / 3.5cm depth) and icons representing its multiple functions: Dual Alarm, Temperature, Week, Brightness Control, Drowsiness (Snooze), Humidness, Memory Function, and Date.
2. Contenu du colis
- JoFomp Digital Wall Clock (Model: 5503)
- Câble d'alimentation USB
- Adaptateur secteur
- Mounting Nails (x2)
- Manuel de l'utilisateur (ce document)
3. Consignes de sécurité
- Vérifiez que l'adaptateur secteur et le câble ne sont pas endommagés avant utilisation.
- N’exposez pas l’appareil à des températures extrêmes, à la lumière directe du soleil ou à une forte humidité.
- Tenir hors de portée des enfants.
- N’essayez pas de démonter ou de réparer l’horloge vous-même. Confiez toute réparation à un technicien qualifié.
- Use only the provided USB cable and adapter, or a compatible 5V/1A power source.
- Jetez les piles de manière responsable, conformément à la réglementation locale.
4. Installation
4.1 Connexion d'alimentation
- Connect the USB power cable to the clock's USB port (located on the back).
- Branchez l'autre extrémité du câble USB à l'adaptateur secteur fourni.
- Branchez l'adaptateur secteur dans une prise murale standard. L'affichage de l'horloge s'illuminera.
4.2 Memory Battery Installation (Optional but Recommended)
The clock requires a constant power supply to operate. A memory battery ensures that time data is retained during power outages, preventing the need to reset the time. Two 1.5V AAA batteries are required (not included).
- Localisez le compartiment à piles à l'arrière de l'horloge.
- Ouvrez le couvercle du compartiment à piles.
- Insérez deux piles AAA de 1.5 V en respectant la polarité (+/-).
- Fermez soigneusement le couvercle du compartiment à piles.
4.3 options de montage
The JoFomp Digital Wall Clock can be placed on a desk or mounted on a wall.
- Emplacement du bureau : Simply place the clock on any flat, stable surface.
- Montage mural : Use the two provided mounting nails. Insert the nails into the wall at the desired location, ensuring they are level and spaced correctly to fit the hanging holes on the back of the clock. Carefully hang the clock onto the nails.

Image: The back panel of the clock, highlighting the "SET", "UP", and "DOWN" buttons, the memory battery storage compartment, the wall hanging hole, and the USB power outlet.

Image: Two illustrations demonstrating the clock's versatility: one showing it hung on a wall, and another showing it placed on a desktop.
5. Mode d'emploi
5.1 Réglage de l'heure et de la date
- Appuyez et maintenez la touche "ENSEMBLE" button on the back of the clock to enter time setting mode.
- Utilisez le "UP" et "VERS LE BAS" buttons to adjust the hour. Press "ENSEMBLE" to confirm and move to minutes.
- Repeat the process to set minutes, year, month, and day.
- After setting the date, press "ENSEMBLE" to exit the setting mode.
5.2 Commutation du format 12/24 heures
In normal time display mode, short press the "UP" button to switch between 12-hour (with AM/PM indicator) and 24-hour formats.
Video: Demonstration of the JoFomp digital clock's features, including switching between 12-hour and 24-hour time formats, changing temperature units, and showing timer and countdown functions. This video highlights the clock's versatility and ease of use.
5.3 Fonction de passage à l'heure d'été (DST)
To enable or disable DST, short press the "VERS LE BAS" button in the time display state. The clock will automatically adjust the time by one hour forward or backward as appropriate.

Image: The clock display illustrating the Daylight Saving Time (DST) function, showing how the time shifts by one hour when DST is enabled or disabled, along with visual cues for "Spring Forward" and "Fall Back".
5.4 Contrôle de la luminosité
The clock features automatic and manual brightness adjustment modes.
- Luminosité automatique : The built-in light sensor adjusts display brightness based on ambient light.
- Luminosité manuelle : You can manually set the brightness level to your preference.
- Mode veille: A light-sensitive sleep mode is available for minimal disturbance during rest.

Image: The clock display showing different brightness settings: "L-AU" (Third Gear Auto-Brightness), "L-SL" (Fourth Gear Sleep Mode Auto-Brightness), "L-01" (Low light level), "L-02" (Medium brightness), and "L-03" (High brightness).

Image: A side-by-side comparison of the clock's display brightness during the day (bright) and at night (dimmed), demonstrating its automatic brightness adjustment feature for optimal visibility.
5.5 Fonction de double alarme
L'horloge prend en charge deux alarmes indépendantes.
- Appuyez sur le "ENSEMBLE" button repeatedly until "AL1" or "AL2" appears on the display.
- Press and hold "ENSEMBLE" to enter alarm setting mode.
- Utiliser "UP" et "VERS LE BAS" to set the alarm hour and minutes.
- Presse "ENSEMBLE" to confirm each step.
- To activate/deactivate an alarm, short press the "UP" ou "VERS LE BAS" button when "AL1" or "AL2" is displayed. An alarm icon will appear when active.
- When an alarm sounds, press any button to activate snooze, or press and hold "ENSEMBLE" to turn off the alarm.

Image: The clock display showing two alarm icons, indicating the dual alarm function. The image also depicts scenarios like "Wake Up Time" and "Exercise Time" to illustrate practical uses of the dual alarms.

Image: A visual representation of the dual alarm feature, showing the clock in two different environments (a kitchen and a gym), suggesting its utility for setting multiple reminders for various daily activities.
5.6 Affichage de la température et de l'humidité
The clock continuously displays temperature in Celsius (°C) or Fahrenheit (°F) and relative humidity (%).
- To switch between °C and °F, short press the "VERS LE BAS" button when the temperature is displayed.
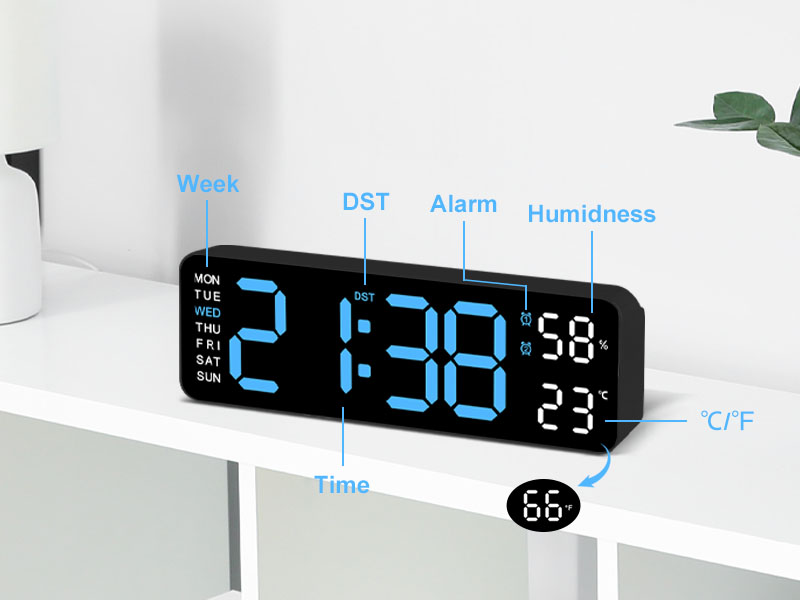
Image : Une image détaillée view of the clock's display, with labels pointing to the Week, DST, Alarm, Humidness, Temperature (°C/°F), and Time indicators, along with a small icon for the temperature sensor.
6. Entretien
- Nettoyez l'horloge avec un chiffon doux et sec. N'utilisez pas de produits nettoyants abrasifs ni de solvants.
- Avoid placing the clock in areas with excessive dust or moisture.
- If not in use for an extended period, disconnect the power and remove the memory batteries.
7. Dépannage
| Problème | Cause possible | Solution |
|---|---|---|
| L'affichage de l'horloge est éteint. | Pas d'alimentation électrique. | Vérifiez que le câble USB est correctement connecté et que l'adaptateur secteur est branché sur une prise de courant fonctionnelle. |
| La date et l'heure se réinitialisent après une coupure de courant.tage. | Memory batteries not installed or depleted. | Install two new 1.5V AAA batteries in the memory compartment. |
| Temperature/Humidity reading seems inaccurate. | Horloge placée près d'une source de chaleur/froid ou en plein soleil. | Relocate the clock to an area with stable ambient temperature and humidity. Allow time for readings to stabilize. |
| L'alarme ne sonne pas. | Alarm not activated or volume too low (if applicable). | Ensure the alarm is set and activated (alarm icon visible). Check if there's a volume setting (refer to specific alarm setting instructions). |
8. Spécifications
| Fonctionnalité | Détail |
|---|---|
| Marque | JoFomp |
| Numéro de modèle | 5503 |
| Type d'affichage | LED numérique |
| Taille de l'écran | 9 pouces |
| Dimensions du produit | 11.8 po L x 4 po H (environ 22.8 cm x 7.5 cm x 3.5 cm) |
| Source d'énergie | Corded Electric (USB 5V/1A) |
| Batterie mémoire | 2 piles AAA 1.5 V (non incluses) |
| Caractéristiques spéciales | Dual Alarm, Adjustable Brightness (Auto/Manual), Calendar, Large Display, Temperature (°C/°F), Humidity, DST, 12/24H Format, Snooze |
| Type de montage | Wall Mount or Desk Placement |
| Matériel | Acrylonitrile Butadiène Styrène (Plastique) |
| Utilisation intérieure/extérieure | Uniquement en intérieur |
9. Garantie et assistance
JoFomp products are manufactured with high-quality standards. For any issues or inquiries regarding your digital wall clock, please contact JoFomp customer support through the retailer's platform or the official JoFomp website.
Please retain your purchase receipt for warranty claims. Specific warranty terms and conditions may vary by region and retailer.
Pour obtenir de l'aide supplémentaire, visitez le JoFomp Store on Amazon.


