ROMJ E99 A14
ROMJ E99 A14 Foldable Drone User Manual
Guide complet d'utilisation et d'entretien
1. Produit terminéview
The ROMJ E99 A14 is a compact and foldable drone designed for both adults and beginners, featuring a 4K/1080P HD camera for high-quality aerial photography and videography. Its intelligent functions like auto-return and one-touch take-off/landing make it user-friendly. The drone's foldable design ensures portability and easy storage, making it an ideal companion for outdoor adventures.
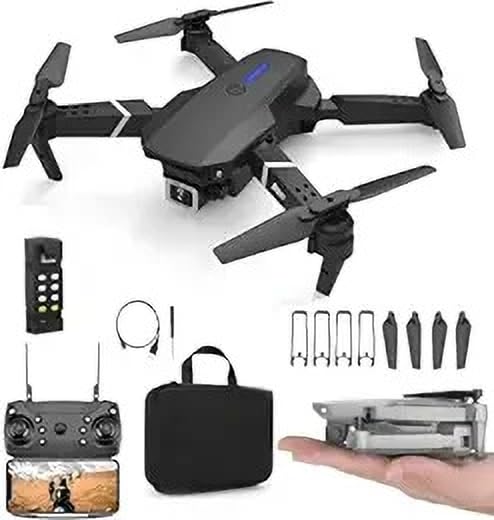
Image: The ROMJ E99 A14 drone, remote control, spare propellers, USB charging cable, and a carrying bag are shown. The drone is black with four propellers and an integrated camera. A smaller image shows the drone folded and held in a hand, highlighting its compact size.
2. Contenu du colis
Veuillez vérifier que tous les articles énumérés ci-dessous sont présents dans votre colis :
- ROMJ E99 A14 Foldable Drone
- Télécommande
- Battery (Lithium Polymer)
- Hélices (jeu de rechange inclus)
- Chargeur USB
- Storage Bag (as shown in images)
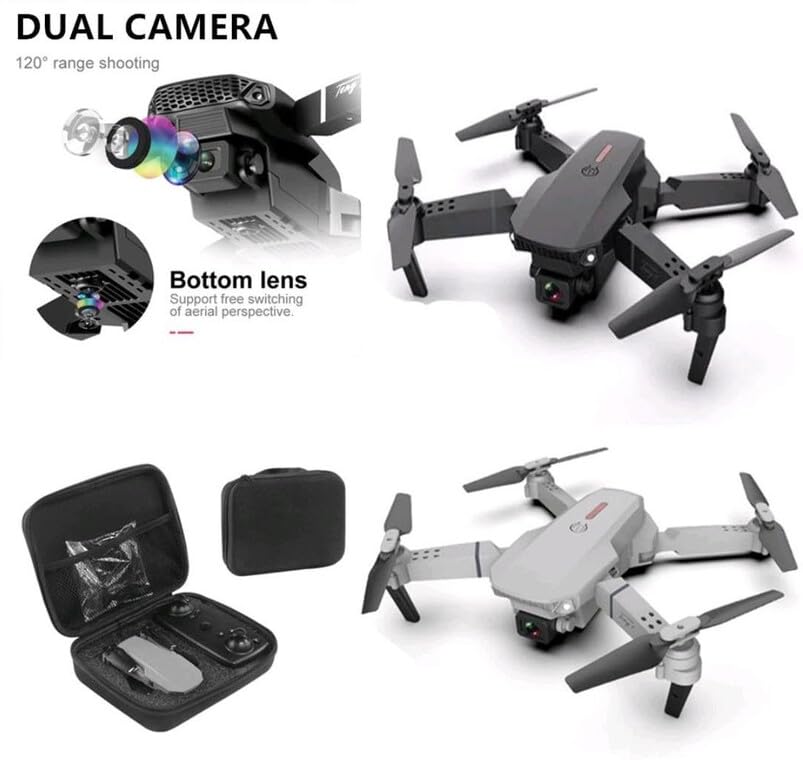
Image: An open black travel storage bag for the drone, showing the drone and remote control neatly fitted inside. The bag is designed for convenient and light travel.
3. Consignes de sécurité
Piloter un drone exige de la responsabilité. Respectez les consignes de sécurité suivantes pour une expérience de vol sûre et agréable :
- Vérification avant vol : Inspectez toujours le drone, les hélices et la batterie avant chaque vol.
- Sensibilisation à l'environnement: Volez dans des zones dégagées, loin des personnes, des animaux, des bâtiments et des lignes électriques. Évitez de voler par vents forts ou par conditions météorologiques défavorables.
- Ligne de mire: Maintenez un contact visuel permanent avec le drone.
- Sécurité des batteries : Utilisez uniquement le chargeur et la batterie fournis. Ne surchargez pas les batteries et ne les percez pas. Cessez l'utilisation si les batteries sont endommagées ou gonflées.
- Sécurité de l'hélice : Tenez vos mains, votre visage et vos vêtements amples éloignés des hélices en rotation.
- Conformité légale : Prenez connaissance et respectez la réglementation locale relative aux drones et les restrictions d'espace aérien.
- Recommandation d'âge : This product is not a toy and is recommended for users of appropriate age and skill level.
4. Installation
4.1 Dépliage du drone
- Gently pull out each of the four propeller arms until they lock into place.
- Assurez-vous que tous les bras sont complètement déployés et stables avant le vol.

Image: The ROMJ E99 A14 drone in its folded state, showcasing its compact design. The front lights are illuminated, indicating power or readiness.
4.2 Installation et charge de la batterie
- Batterie de drone: Insert the fully charged Lithium Polymer battery into the battery compartment on the drone's rear until it clicks into place.
- Pile de la télécommande : Open the battery cover on the back of the remote control and insert the required batteries (not specified, assume AA/AAA, user should check remote). Close the cover.
- Chargement : Connect the USB charger to the drone's battery (or directly to the drone if integrated charging) and then to a USB power source. The indicator light will show charging status (refer to charger's specific light indications).
4.3 Installation de l'hélice (si nécessaire)
The drone typically comes with propellers pre-installed. If replacement is needed:
- Identify the correct propeller type (A or B) for each motor arm. Propellers are usually marked.
- Align the propeller with the motor shaft and press down firmly until it is securely attached. Ensure it spins freely without wobbling.
5. Mode d'emploi
5.1 Télécommande surview
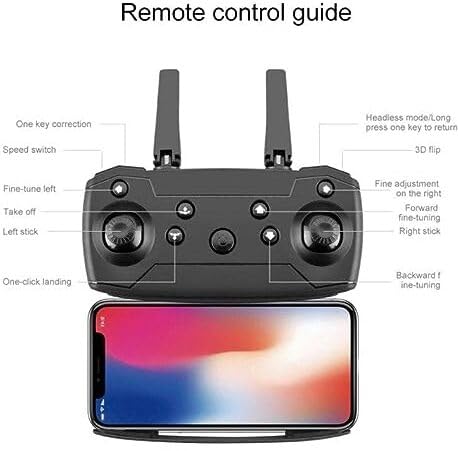
Image: A detailed diagram of the drone's remote control, labeling various buttons and joysticks. Key functions include One Key Correction, Speed Switch, Fine-tune Left, Take off, Left Stick, One-click Landing, Headless Mode/Long press one key to return, 3D Flip, Fine adjustment on the right, Forward fine-tuning, Right Stick, and Backward fine-tuning. A smartphone is shown mounted below the remote, indicating app connectivity.
- Stick gauche: Contrôle l'altitude (haut/bas) et la rotation (gauche/droite).
- Stick droit: Permet de contrôler les déplacements avant/arrière et gauche/droite.
- Décollage/Atterrissage en une seule étape : Appuyez pour décoller ou atterrir automatiquement.
- Commutateur de vitesse : Permet de régler la vitesse de vol (par exemple, faible, moyenne, élevée).
- Mode sans tête : Simplifie le vol en orientant le drone par rapport au pilote, quelle que soit la direction de l'avant du drone.
- Retour à une seule touche : Initiates an automatic return to the take-off point (requires calibration).
- Retournement 3D : Executes an acrobatic flip (ensure sufficient altitude).
- Boutons de réglage fin : Used to trim the drone's flight to correct drift.
5.2 Appairage du drone
- Placez le drone sur une surface plane et de niveau.
- Mettez le drone sous tension. Les voyants clignoteront.
- Allumez la télécommande.
- Push the left joystick up to the maximum position, then pull it down to the minimum position. The drone lights will stop flashing and become solid, indicating successful pairing.
5.3 Décollage et atterrissage
- One-Touch Take-off: After pairing, press the "Take off" button on the remote control. The drone will automatically ascend to a stable hovering height.
- Décollage manuel : After pairing, push both joysticks simultaneously to the bottom-outer corners to arm the motors. Then, slowly push the left joystick up to ascend.
- Atterrissage en une seule touche : Press the "One-click Landing" button. The drone will slowly descend and land.
- Atterrissage manuel : Slowly pull the left joystick down to descend. Once landed, pull both joysticks to the bottom-outer corners again to disarm the motors.
5.4 Fonctionnement de la caméra
The ROMJ E99 A14 features an integrated 1080p HD camera and a bottom lens for diverse aerial perspectives.
Image : Un gros plan view of the drone's front, highlighting its dual camera system. The main camera is visible at the front, and a secondary bottom lens is shown, indicating support for free switching of aerial perspectives.
- Photo/Vidéo : Use the dedicated buttons on the remote control (or via the companion app) to capture photos or start/stop video recording.
- Connectivité de l'application : For live video feed and advanced camera controls, download the official ROMJ drone app (check manual for QR code or app store name) and connect your smartphone via Wi-Fi to the drone's network.
5.5 Fonctions de vol spéciales
- 360° Tumbling Stunt: Press the 3D Flip button and then move the right joystick in the desired direction to perform a flip. Ensure sufficient altitude (at least 2-3 meters) for this maneuver.
- Mode sans tête : Activate Headless Mode before take-off. In this mode, the drone's forward direction is always the direction the pilot is facing when Headless Mode was activated, simplifying control.
- Retour à une seule touche : Long press the One Key Return button. The drone will fly back towards its take-off position. This function works best after proper compass calibration.
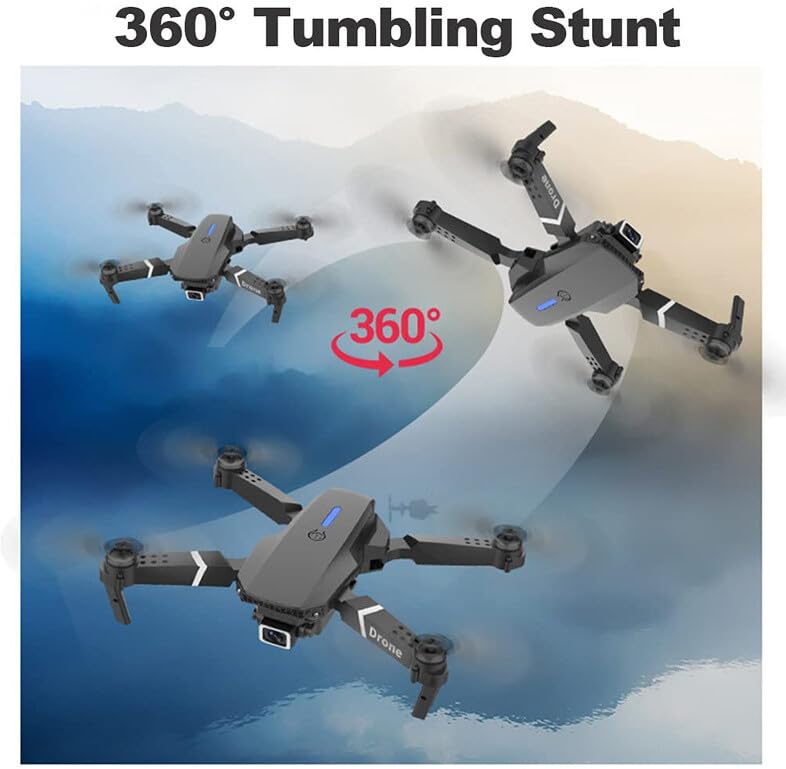
Image: Three instances of the ROMJ E99 A14 drone in mid-air, illustrating a 360-degree tumbling stunt. The drone is shown at different angles during the flip, with an arrow indicating the circular motion.
6. Entretien
- Nettoyage: Utilisez un chiffon doux et sec pour nettoyer le boîtier du drone et l'objectif de la caméra. Évitez d'utiliser des liquides ou des solvants.
- Inspection de l'hélice : Vérifiez régulièrement l'état des hélices (fissures, déformations, dommages). Remplacez immédiatement toute hélice endommagée à l'aide des pièces de rechange fournies.
- Entretien de la batterie: Conservez les piles dans un endroit frais et sec. Ne stockez pas des piles complètement chargées ou déchargées pendant une période prolongée. Chargez-les à environ 50-60 % pour un stockage de longue durée.
- Entretien du moteur : Maintenez les moteurs exempts de poussière et de débris. Ne tentez pas de lubrifier les moteurs.
- Stockage: When not in use, fold the drone and store it in its original packaging or the provided storage bag to protect it from dust and physical damage.
7. Dépannage
| Problème | Cause possible | Solution |
|---|---|---|
| Le drone ne s'allume pas. | La batterie n'est pas chargée ou n'est pas installée correctement. | Assurez-vous que la batterie est complètement chargée et correctement insérée. |
| La télécommande ne se connecte pas au drone. | Not paired correctly; interference. | Repeat pairing procedure (Section 5.2). Ensure no strong Wi-Fi interference. |
| Le drone dérive en vol. | Not calibrated; wind interference. | Perform gyroscope calibration (refer to app/remote instructions for specific steps). Use fine-tuning buttons. Fly in calm conditions. |
| La caméra n'enregistre pas ou la qualité est médiocre. | SD card issues (if applicable); lens dirty; app not connected. | Ensure SD card is inserted and formatted (if applicable). Clean camera lens. Verify app connection. |
| Temps de vol court. | Batterie incomplètement chargée ; batterie ancienne ; pilotage agressif. | Assurez-vous que la batterie est complètement chargée. Envisagez de remplacer les batteries usagées. Adoptez une conduite plus prudente. |
8. Spécifications
| Fonctionnalité | Détail |
|---|---|
| Marque | ROMJ |
| Nom du modèle | E99A14 |
| Caractéristiques spéciales | Compact, Foldable, Integrated Camera |
| Résolution de capture vidéo | 1080p |
| Technologie de connectivité | USB, Wi-Fi |
| Composants inclus | Battery, Propeller, USB Charger |
| Niveau de compétence | Tous |
| Matériel | Acrylonitrile Butadiène Styrène, Plastique |
| Composition des cellules de batterie | Lithium Polymère |
| Télécommande incluse ? | Oui |
9. Garantie et assistance
ROMJ products are manufactured to high-quality standards. For any issues, technical support, or warranty inquiries, please contact your retailer or the official ROMJ customer service channel. Please retain your proof of purchase for warranty claims.
For the most up-to-date support information, please visit the official ROMJ website ou consultez les coordonnées fournies avec votre achat.
Ask a question about this manual
Ask about setup, troubleshooting, compatibility, parts, safety, or missing instructions. Manuals+ will review the question and use this page’s manual context to help answer it.