1. Introduction
This manual provides detailed instructions for the safe and effective operation of your ZHDBD 5012H Digital Oscilloscope. Please read this manual thoroughly before using the device to ensure proper functionality and to prevent damage. Keep this manual for future reference.
2. Produit terminéview
2.1 Principales caractéristiques
- Intelligent anti-burn protection.
- Afterglow display technology for clear waveform visualization.
- 2.4-inch color display screen (320*240 resolution).
- 100MHz analog bandwidth with a 500MS/s samptaux de ling (1X = 5 MHz, 10X = 100 MHz).
- One-button waveform storage with built-in 64M storage space, capable of storing up to 2000 waveform images.
- Powerful waveform file manager supporting thumbnail browsing, viewing, detail viewing, flipping, and deletion.
- Waveform display pause function.
- One-button AUTO function for quick waveform display without complex adjustments.
- Complete triggering functions: Single, Normal, Automatic.
- Built-in 3000mAh rechargeable lithium battery, providing up to 8 hours of continuous use on a full charge.
- Luminosité de l'écran réglable.
- Memory compression technology for flicker-free waveform refresh.
- Anti-slip and anti-drop silicone sleeve for enhanced durability.
- Conception compacte et portable.
2.2 Composants et accessoires
The ZHDBD 5012H Digital Oscilloscope comes with the following components and accessories:
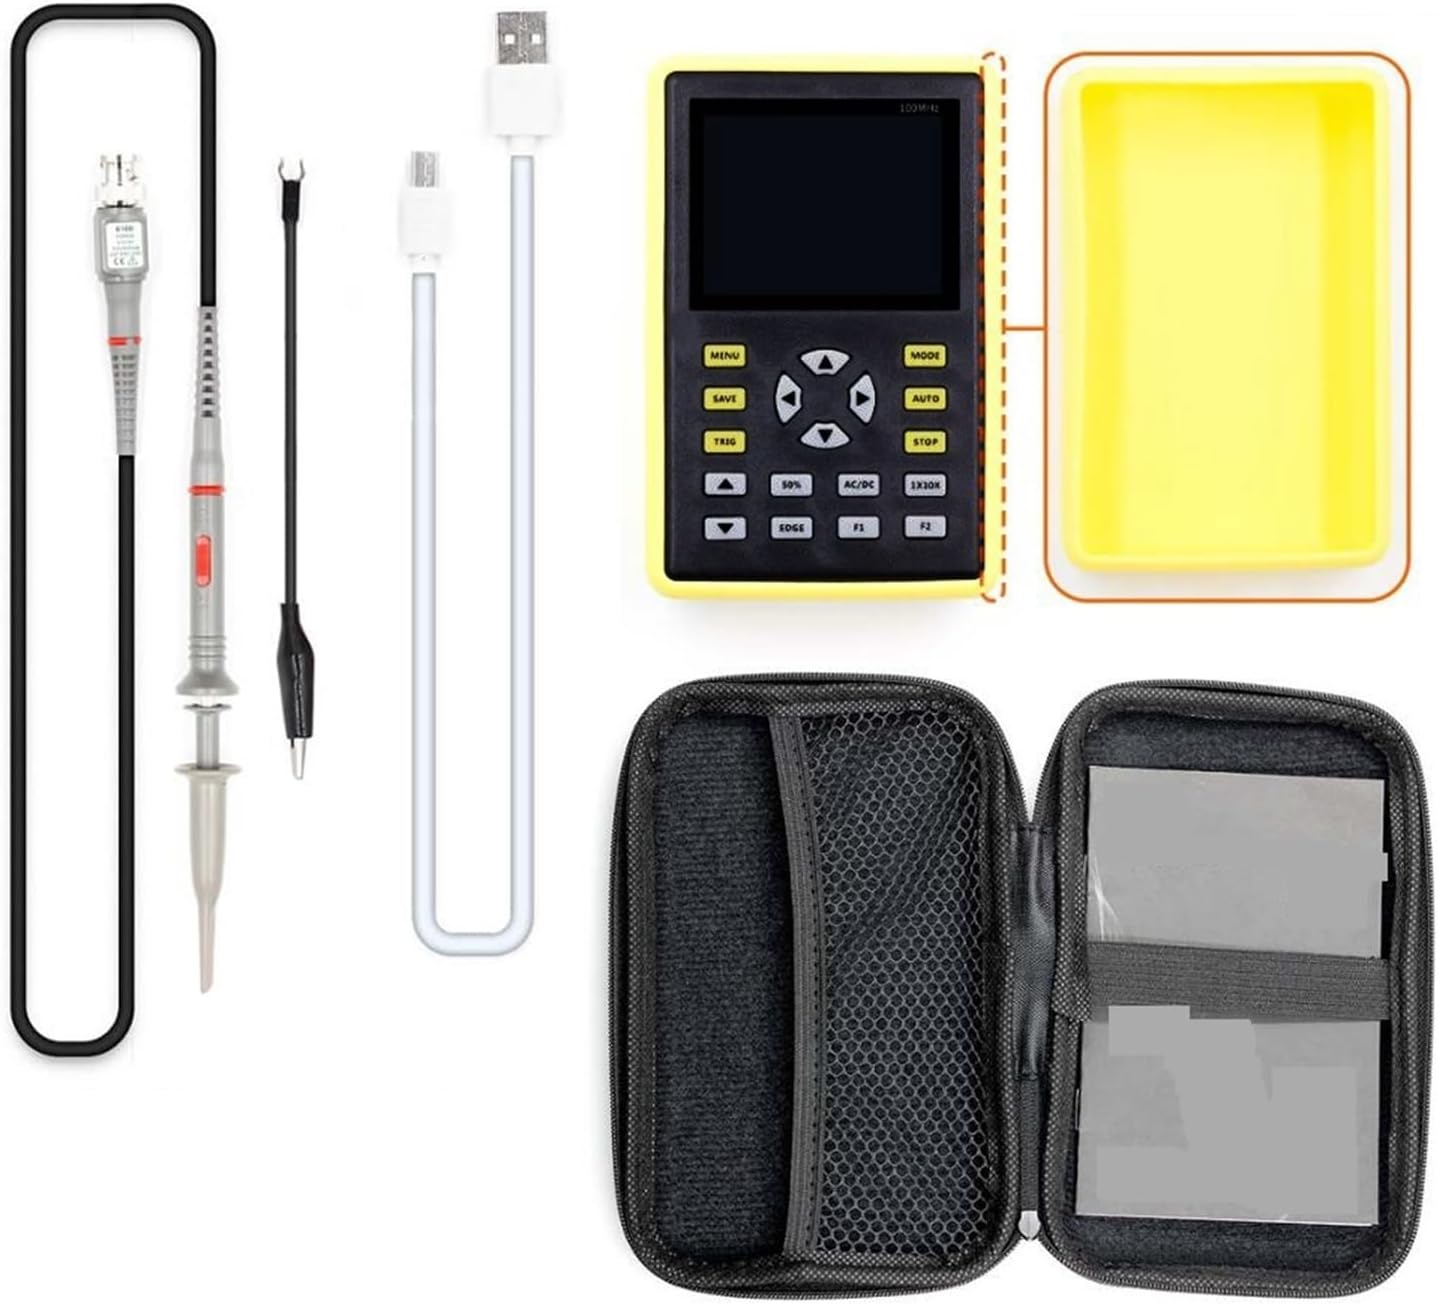
Figure 2.2.1 : The ZHDBD 5012H Digital Oscilloscope package includes the main unit, a probe, a USB cable for charging and data transfer, and a protective carrying case.
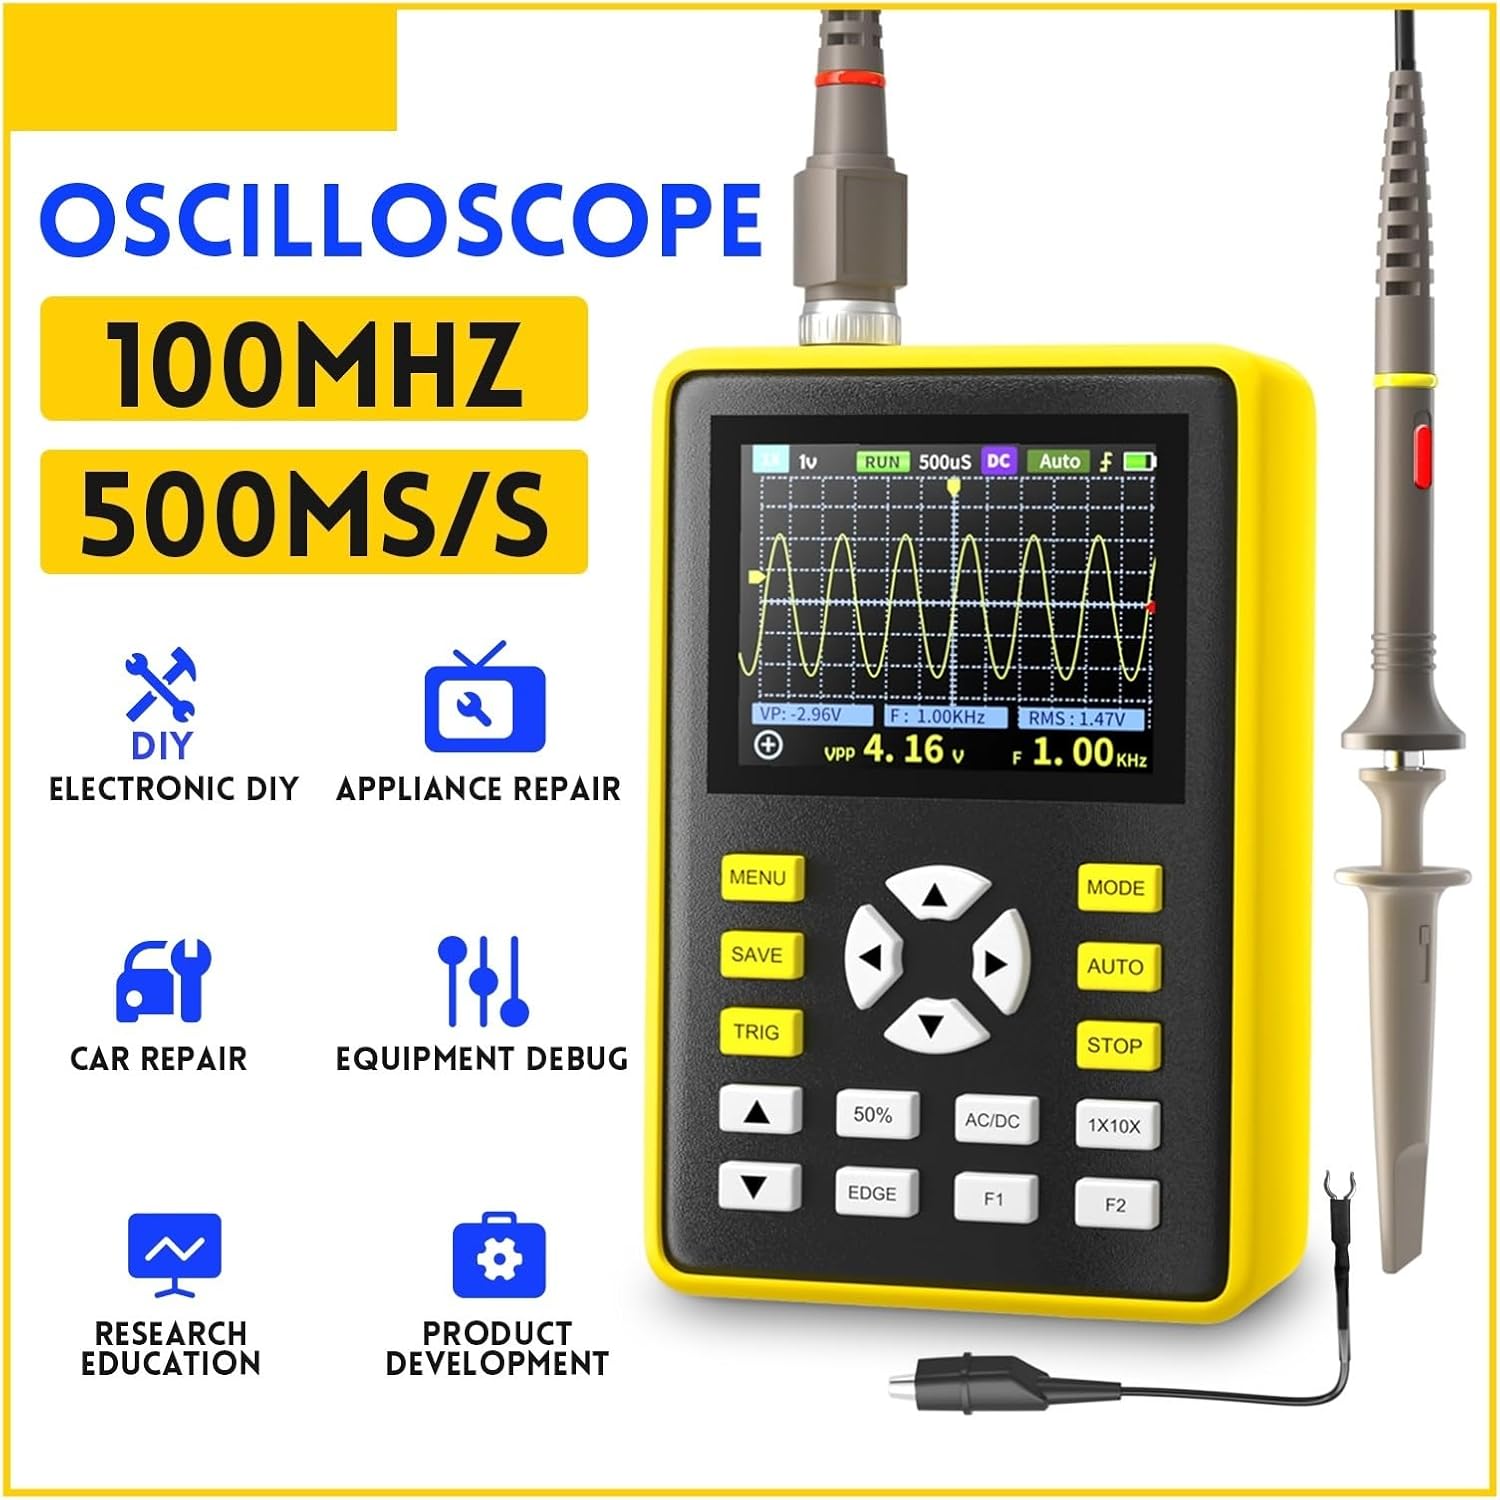
Figure 2.2.2 : Devant view of the oscilloscope, highlighting the 2.4-inch display, navigation buttons, and function keys (MENU, MODE, SAVE, AUTO, TRIG, STOP, 50%, AC/DC, EDGE, F1, F2).
3. Installation
3.1 Chargement de l'appareil
- Connect the provided USB cable to the oscilloscope's charging port.
- Connectez l'autre extrémité du câble USB à un adaptateur secteur USB standard (non inclus) ou au port USB d'un ordinateur.
- The charging indicator will illuminate. A full charge typically takes several hours and provides up to 8 hours of continuous operation.
3.2 Connexion de la sonde
- Ensure the oscilloscope is powered off before connecting the probe.
- Connect the BNC connector of the oscilloscope probe to the input BNC port on the oscilloscope.
- Attach the ground clip of the probe to the ground point of the circuit under test.
- Select the appropriate attenuation setting (1X or 10X) on the probe based on the expected signal voltage. For higher voltages, use 10X.
- Important: When using the 10X attenuation setting on the probe, ensure the oscilloscope's input setting is also configured for 10X to obtain accurate readings. Failure to do so may result in incorrect measurements or potential damage if high voltage is applied with a 1X setting.
4. Mode d'emploi
4.1 Mise sous/hors tension
- Pour allumer l'appareil, maintenez le bouton d'alimentation enfoncé jusqu'à ce que l'écran s'allume.
- Pour éteindre l'appareil, maintenez le bouton d'alimentation enfoncé jusqu'à ce que l'écran s'éteigne.
4.2 Mesure automatique (AUTO)
The one-button AUTO function automatically adjusts the vertical, horizontal, and trigger settings to display a stable waveform. This is useful for quickly viewinterprétant un signal inconnu.
- Appuyez sur le AUTO button. The oscilloscope will attempt to automatically detect and display the input waveform.
4.3 Triggering Functions
Triggering stabilizes repetitive waveforms and captures single-shot events. Press the TRIGONOMÉTRIE bouton permettant d'accéder aux paramètres de déclenchement.
- Auto Trigger: The oscilloscope triggers automatically, even without a stable signal. Suitable for most general-purpose measurements.
- Normal Trigger: The oscilloscope triggers only when the signal meets the specified trigger conditions. If no trigger event occurs, the display remains unchanged. Useful for capturing specific events.
- Déclencheur unique : The oscilloscope waits for a single trigger event, captures one waveform, and then stops. Ideal for capturing non-repetitive or transient events.
- Bord de déclenchement : Utilisez le BORD button to select between rising edge or falling edge triggering.
4.4 Stockage et gestion des formes d'onde
The device allows for easy storage and management of waveform images.
- Enregistrer la forme d'onde : Appuyez sur le SAUVEGARDER button to instantly store the current waveform displayed on the screen. The device has 64M storage, capable of holding up to 2000 images.
- Waveform Manager: Access the waveform file manager through the MENU button. This allows for thumbnail browsing, viewing, detailed inspection, page turning, and deletion of stored waveforms.
4.5 Adjusting Display and Settings
- Sensibilité verticale (Volts/Div) : Use the up/down arrow buttons to adjust the vertical scale, changing the voltage represented by each vertical division on the grid.
- Base de temps horizontale (sec/div) : Use the left/right arrow buttons to adjust the horizontal scale, changing the time represented by each horizontal division on the grid.
- Couplage AC/DC : Appuyez sur le CA/CC button to toggle between AC and DC coupling. AC coupling blocks the DC component of the signal, showing only the AC variations. DC coupling shows the entire signal, including both AC and DC components.
- Luminosité de l'écran : Adjust screen brightness through the MENU réglages pour un fonctionnement optimal viewdans diverses conditions d'éclairage.
5. Entretien
5.1 Nettoyage
- Power off the device and disconnect all probes and cables before cleaning.
- Use a soft, dry cloth to wipe the exterior of the oscilloscope.
- Pour les saletés tenaces, appliquez légèrementampNettoyez le chiffon avec de l'eau ou un nettoyant doux non abrasif. Évitez d'utiliser des produits chimiques agressifs ou des solvants.
- Ne laissez aucun liquide pénétrer dans l'appareil.
5.2 Entretien de la batterie
- Pour prolonger la durée de vie de la batterie, évitez de la décharger complètement et fréquemment.
- If storing the device for an extended period, charge the battery to approximately 50% and store it in a cool, dry place. Recharge every few months to prevent deep discharge.
- Utilisez uniquement le câble USB fourni pour le chargement.
5.3 Stockage
- Rangez l'oscilloscope dans son étui de protection lorsqu'il n'est pas utilisé afin d'éviter tout dommage physique.
- Keep the device away from extreme temperatures, high humidity, and direct sunlight.
6. Dépannage
If you encounter issues with your ZHDBD 5012H Digital Oscilloscope, refer to the following common problems and solutions:
| Problème | Cause possible | Solution |
|---|---|---|
| L'appareil ne s'allume pas. | Batterie faible ou bouton d'alimentation mal enfoncé. | Charge the device fully. Ensure the power button is pressed and held for a few seconds. |
| Aucune forme d'onde affichée. | Probe not connected, signal too weak/strong, incorrect trigger settings, or incorrect time/voltage échelle. | Check probe connection. Use the AUTO button. Adjust vertical (Volts/Div) and horizontal (Sec/Div) scales. Check trigger mode and level. |
| Forme d'onde instable. | Incorrect trigger settings or trigger level. | Adjust the trigger level. Try different trigger modes (Auto, Normal, Single). Ensure the probe ground clip is securely connected. |
| Vol incorrecttage lectures. | Probe attenuation mismatch (1X/10X). | Ensure the probe's attenuation setting (e.g., 10X) matches the oscilloscope's input setting. |
Si le problème persiste après avoir essayé ces solutions, veuillez contacter le service client.
7. Spécifications
| Paramètre | Valeur |
|---|---|
| Bande passante analogique | 100 MHz |
| S en temps réel maximumampTaux de ling | 500 MS / s |
| Plage de base de temps horizontale | 50S/div ~ 6nS/div |
| Profondeur de stockage | 128 Ko |
| Résistance d'entrée | 1 MΩ |
| Précision du CAN | 8 bits |
| Mode de couplage | CA/CC |
| Mode de déclenchement | Simple, Normal, Auto |
| Bord de déclenchement | Ascending/Descending edge |
| Afficher | 2.4 inch - 320*240 color display |
| Alimentation électrique | Batterie au lithium de 3000 mAh |
8. Garantie et assistance
The ZHDBD 5012H Digital Oscilloscope is designed for reliability and performance. For specific warranty information, please refer to the documentation provided with your purchase or contact the retailer.
For technical support, troubleshooting assistance beyond what is covered in this manual, or inquiries regarding parts and service, please contact ZHDBD customer service through their official channels.