1. Introduction
This manual provides essential information for the safe and effective operation, setup, and maintenance of your Senco TN51P1P 15 Gauge Pneumatic Finish Nailer. Please read all instructions carefully before using the tool to ensure proper function and user safety. This tool is designed for professional finish carpentry applications, including installing casing, paneling, cabinetry, and various other finish applications.

Image : Avant view of the Senco TN51P1P 15 Gauge Pneumatic Finish Nailer.
2. Consignes de sécurité
Respectez toujours les consignes de sécurité de base afin de réduire les risques de blessures et d'endommagement de l'outil. Le non-respect de ces instructions peut entraîner des blessures graves.
- Lire le manuel : Veuillez prendre connaissance de toutes les instructions et avertissements avant utilisation.
- Portez une protection pour les yeux : Portez toujours des lunettes de sécurité homologuées ANSI Z87.1 avec protections latérales.
- Portez une protection auditive : Une exposition prolongée au bruit peut endommager l'ouïe.
- Portez des vêtements appropriés : Ne portez pas de vêtements amples ni de bijoux qui pourraient se coincer dans les pièces mobiles.
- Débrancher l'alimentation en air : Always disconnect the air supply before loading fasteners, performing maintenance, clearing jams, or when the tool is not in use.
- Ne pointez jamais les gens du doigt : Ne pointez jamais l’outil vers vous-même ou vers d’autres personnes.
- Utilisez la pression d'air correcte : Do not exceed the recommended operating pressure (70-120 PSI).
- Sécuriser la pièce à travailler : Assurez-vous que la pièce est stable et bien fixée avant de la fixer.
- Garder un bon appui : Work in a well-lit area and maintain proper balance.
- Tenir les enfants à l’écart : Ne laissez pas des enfants ou des personnes non formées utiliser cet outil.
3. caractéristiques du produit
The Senco TN51P1P Finish Nailer is equipped with several features designed for efficiency and durability:

Image: Detailed diagram highlighting key features of the Senco TN51P1P nailer.
- Conception sans huile : Eliminates the need for routine lubrication, saving time on daily maintenance.
- Dry Fire Lockout: Prevents the tool from firing when the magazine is empty, reducing wear and indicating when to reload.
- Déclencheur sélectionnable : Allows easy switching between contact actuation (bump fire) and sequential actuation modes for different applications.
- Quick Clear Latch: Provides a tool-free method to quickly clear nail jams or misfeeds.
- Réglage de la profondeur sans outil : Enables quick and easy adjustment of nail depth for consistent flush or countersunk drives.
- 360 Degree Adjustable Exhaust: Directs exhaust air away from the operator or the work surface.
- Rotatable Belt Hook: Offers convenient access and storage, allowing for right or left-hand use.
- Ergonomic Overmolded Grip: Designed to reduce user fatigue and enhance control during operation.
- Aluminum Main Body: Ensures durability while maintaining a lightweight design.
- Prise pivotante : Enhances maneuverability by allowing the air hose to move freely.
- No-Mar Pad: Protects delicate work surfaces from scratches or damage during use.
4. Installation
4.1 Raccordement à l'alimentation en air
- Assurez-vous que le compresseur d'air est éteint et que le tuyau d'air est débranché du compresseur.
- Connect the air hose to the tool's swivel plug.
- Set the air compressor pressure between 70-120 PSI (4.8-8.3 bar). Do not exceed 120 PSI.
- Connect the air hose to the compressor and turn on the compressor.
- Check for air leaks. If leaks are present, disconnect the air supply and tighten connections.
4.2 Fixations de chargement
The TN51P1P uses 15 gauge angled finish nails, ranging from 1-1/4" to 2-1/2" in length.
- Débrancher l'arrivée d'air de l'outil.
- Tirez le poussoir vers l'arrière jusqu'à ce qu'il se verrouille en place.
- Insert a strip of 15 gauge angled finish nails into the magazine, ensuring the nail points are facing down and the collation angle matches the tool's magazine.
- Release the pusher assembly, allowing it to push the nails forward until they are seated correctly.
- Rebranchez l'alimentation en air.
4.3 Réglage de la profondeur d'enfoncement
Cet outil est doté d'un mécanisme de réglage de profondeur sans outil.
- Débrancher l'arrivée d'air de l'outil.
- Locate the depth adjustment dial or lever near the nose of the tool.
- Rotate the dial or move the lever to increase or decrease the depth of the nail drive. Test on a scrap piece of material to achieve the desired depth.
- Rebranchez l'alimentation en air.
4.4 Sélection du mode de tir
The selectable trigger allows you to choose between two firing modes:
- Actionnement séquentiel : The trigger must be pressed for each fastener. The contact element must be depressed against the workpiece before the trigger is pulled. This mode offers precise fastener placement.
- Actionnement par contact (déclenchement par percussion) : The tool will fire a fastener each time the contact element is depressed against the workpiece while the trigger is held down. This mode is suitable for rapid fastening.
To switch modes, locate the selector switch on the trigger assembly and move it to the desired position.
5. Mode d'emploi
- Ensure all safety precautions are followed and the tool is properly set up.
- Tenez fermement l’outil avec les deux mains.
- Placez fermement le nez de l'outil contre la pièce à usiner à l'endroit où la fixation doit être enfoncée.
- For sequential mode, depress the contact element against the workpiece, then pull the trigger. For contact mode, hold the trigger and depress the contact element against the workpiece.
- After driving a fastener, lift the tool from the workpiece.
5.1 Verrouillage en cas de tir à sec
The dry fire lockout feature prevents the tool from operating when the magazine is empty. This protects the tool from unnecessary wear. When the tool stops firing, it indicates that the magazine needs to be reloaded with fasteners.
5.2 Élimination des bourrages
If a fastener jam occurs:
- Immediately disconnect the air supply de l'outil.
- Locate the quick clear latch near the nose of the tool.
- Open the latch to expose the fastener channel.
- Carefully remove the jammed fastener using pliers if necessary. Do not force it.
- Close the quick clear latch securely.
- Reconnect the air supply and test the tool on a scrap piece.
6. Entretien
Proper maintenance ensures the longevity and optimal performance of your Senco TN51P1P nailer.
- Conception sans huile : This tool features an oil-less design, meaning routine lubrication of the internal components is not required. Do not add oil to the air inlet.
- Nettoyage quotidien : Keep the tool clean and free of debris. Wipe down the exterior with a clean, dry cloth.
- Inspecter le filtre à air : Periodically check the air inlet filter for clogs and clean if necessary.
- Check Fastener Channel: Ensure the fastener channel is clear of any residue or small debris that could cause jams.
- Conserver correctement : When not in use, store the tool in a dry, secure location, disconnected from the air supply.
7. Dépannage
If you encounter issues with your Senco TN51P1P nailer, refer to the following common troubleshooting steps:
- Outil ne fonctionnant pas :
- Check air supply connection and pressure (70-120 PSI).
- Ensure magazine is loaded with fasteners (dry fire lockout engaged if empty).
- Verify the contact element is fully depressed against the workpiece.
- Check for jammed fasteners.
- Clous non enfoncés complètement :
- Increase air pressure within the recommended range.
- Adjust the depth of drive setting.
- Ensure the correct length and gauge of fasteners are being used.
- Nails Jamming Frequently:
- Ensure fasteners are loaded correctly and are not damaged.
- Check for debris in the fastener channel.
- Verify the correct fastener type for the tool.
- Fuites d'air :
- Serrez tous les raccords d'air.
- Vérifiez que les joints toriques et les joints d'étanchéité ne sont pas endommagés.
If problems persist after following these steps, contact Senco customer support or an authorized service center.
8. Spécifications
Key specifications for the Senco TN51P1P 15 Gauge Pneumatic Finish Nailer:
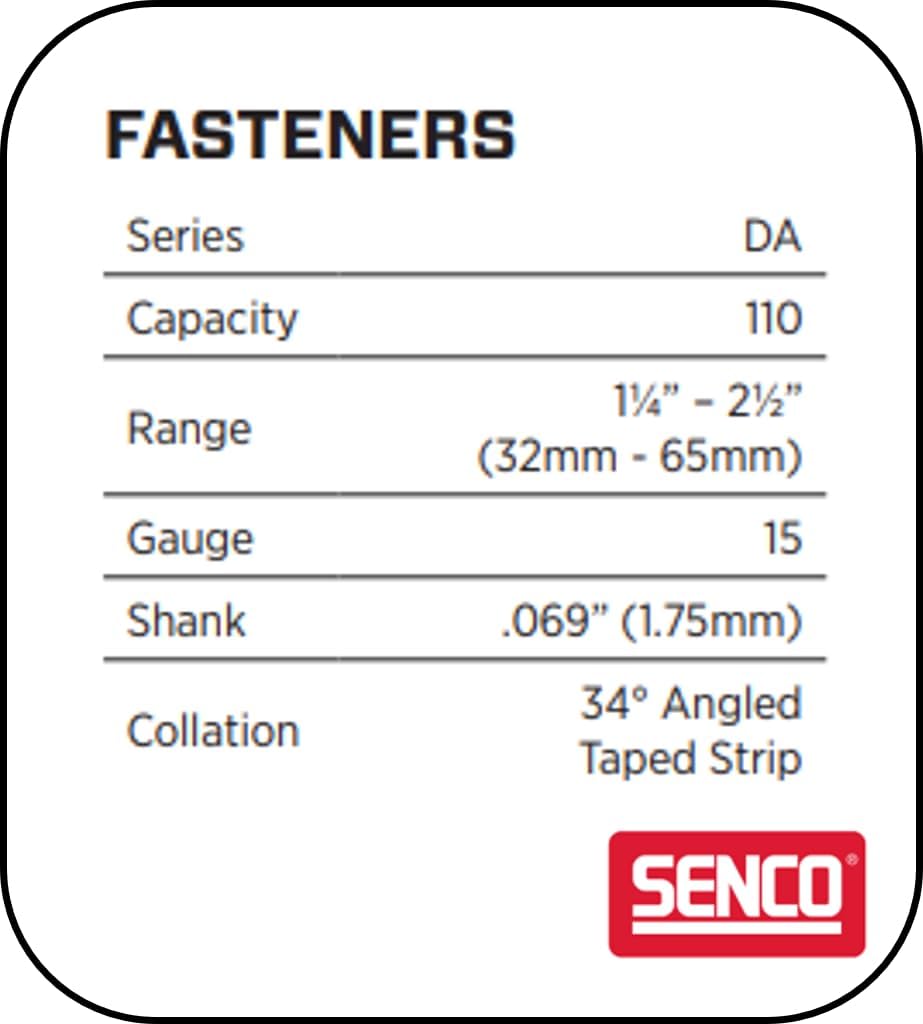
Image: Tool specifications for the Senco TN51P1P.

Image: Fastener specifications for the Senco TN51P1P.
| Fonctionnalité | Valeur |
|---|---|
| Déclenchement | Sélectionnable |
| Pression de service | 70 - 120 PSI (4.8 - 8.3 bar) |
| Air Consumption (60 CPM) | 3.2 scfm |
| Entrée d'air | 1/4" NPT |
| Poids | 4.5 livres (2.0 kg) |
| Hauteur | 12.25" (311 mm) |
| Longueur | 13" (330 mm) |
| Largeur | 3.5" (89 mm) |
| Matériau du corps principal | Aluminium |
| Fonctionnalité | Valeur |
|---|---|
| Série | DA |
| Capacité | 110 attaches |
| Gamme | 1-1/4" - 2-1/2" (32 mm - 65 mm) |
| Jauge | Calibre 15 |
| Diamètre de la tige | 0.069" (1.75 mm) |
| Collation | 34° Angled Taped Strip |
9. Garantie et assistance
The Senco TN51P1P Finish Nailer comes with a manufacturer's warranty. For specific warranty details, please refer to the warranty documentation included with your product or visit the official Senco website. The product description mentions a general "Warranty" without further specifics.
For technical assistance, parts, or service, please contact Senco customer support. Always provide your tool's model number (TN51P1P) and serial number when seeking support.
Optional protection plans may be available for purchase separately, offering extended coverage beyond the manufacturer's warranty.