voominhtec PSL-400W4P
Manuel d'utilisation du panneau solaire portable Voominhtec 400W
Model: PSL-400W4P
1. Introduction
Thank you for choosing the Voominhtec 400W Portable Solar Panel. This high-efficiency, foldable solar charger is designed to provide reliable power for your off-grid adventures, power stations, and various outdoor applications. Featuring monocrystalline ETFE technology, it offers excellent conversion rates and durability. Please read this manual thoroughly before use to ensure proper operation and maximize the lifespan of your solar panel.

Image 1.1: The Voominhtec 400W Portable Solar Panel in its unfolded, ready-to-use configuration, showcasing its four panels and integrated kickstand.
2. Consignes de sécurité
- Do not attempt to disassemble or modify the solar panel.
- Avoid dropping or subjecting the panel to severe impacts.
- Keep the panel away from open flames, heat sources, and corrosive materials.
- Avant toute utilisation, assurez-vous que toutes les connexions sont bien fixées et correctes.
- Do not immerse the panel in water, despite its IP65 rating, to prevent damage to connectors.
- Handle with care, especially when folding or unfolding, to avoid pinching fingers.
3. Composants du produit
The Voominhtec 400W Portable Solar Panel package includes the following items:
- 1 x Voominhtec 400W Portable Solar Panel
- 1 x Multi-connector cable (MC4 to various DC adapters)
- 8 x Carabiners (for securing the panel)
Image 3.1: The complete package contents, including the folded solar panel, the multi-connector cable with various adapters, and eight carabiners for versatile mounting.

Image 3.2 : Détail view of the folded solar panel, highlighting the integrated handle, accessory pocket, and the robust kickstand mechanism.
4. Spécifications
| Paramètre | Valeur |
|---|---|
| Puissance de crête (Pmax) | 400 W |
| Vol de puissance maximaletage (Vmp) | 40V |
| Courant de puissance maximal (Imp) | 10A |
| Vol en circuit ouverttage VOC) | 48V |
| Courant de court-circuit (Isc) | 11A |
| Matériel | ETFE, Monocrystalline Silicon, Aluminum |
| Efficacité | Jusqu'à 24% |
| Indice d'étanchéité | IP65 |
| Dimensions pliées (L x l) | 27.3 x 30.7 pouces |
| Dimensions dépliées (L x l) | 111 x 30.7 pouces |
| Poids de l'article | 27.7 livre (environ 12.5 kg) |
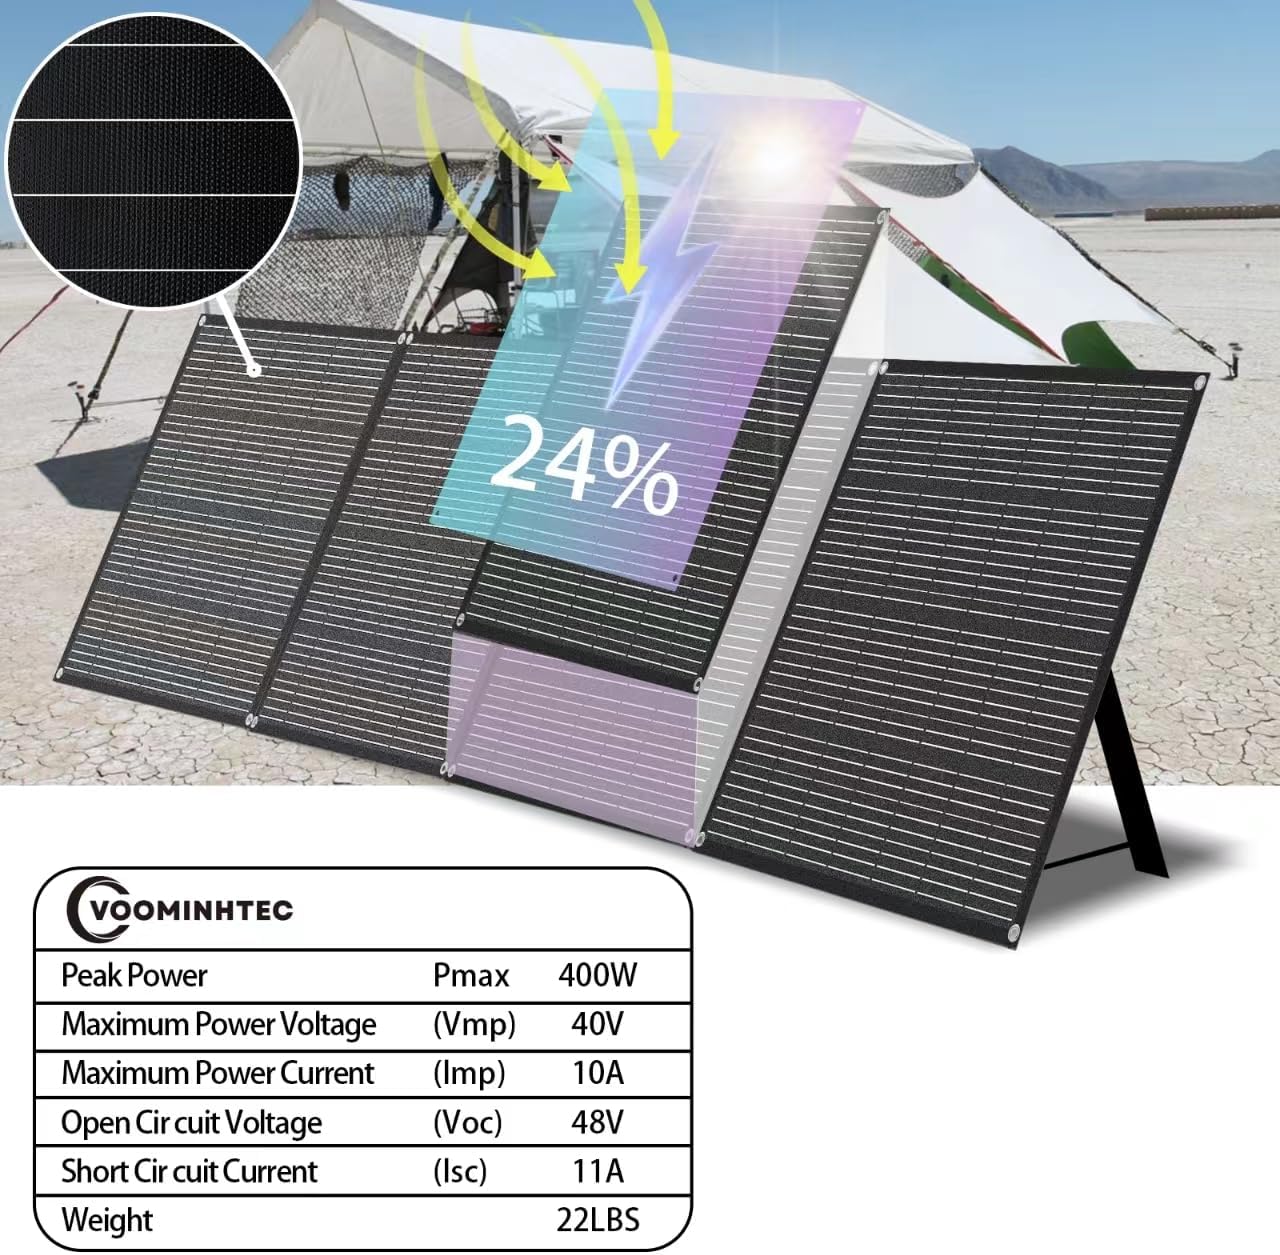
Image 4.1: A visual representation of the solar panel with key electrical specifications overlaid, including Peak Power, Voltage, and Current ratings.

Image 4.2: Diagram illustrating the precise dimensions of the solar panel when folded and fully unfolded, including the optimal kickstand angle of 70 degrees.
5. Installation
- Dépliez le panneau : Dépliez soigneusement le panneau solaire complètement sur une surface plane et stable.
- Position the Kickstand: Extend the integrated kickstand at the back of the panel. Adjust it to achieve an optimal angle (approximately 70 degrees from the ground) to face the sun directly. This angle maximizes solar energy absorption.
- Sécuriser le panneau (facultatif) : For windy conditions or uneven terrain, use the provided carabiners to secure the panel through its grommets to stakes, ropes, or other stable anchors.
- Connectez-vous à l'appareil : Locate the MC4 connectors on the solar panel. Use the included multi-connector cable to connect the solar panel to your portable power station, solar generator, or 12V/24V battery system. Ensure the correct adapter is used for your device.

Image 5.1: The solar panel set up next to an RV, demonstrating the use of the kickstand to achieve the recommended 70-degree angle for optimal sun exposure.
6. Mode d'emploi
Once set up, the solar panel will begin converting sunlight into electrical energy. The charging process will vary depending on the connected device (power station, battery, etc.) and its specific charging requirements.
- Exposition au soleil : Ensure the solar panel is positioned in direct sunlight with no shadows obstructing the panels. Even partial shading can significantly reduce efficiency.
- Frais de surveillance : Monitor the charging status on your connected power station or solar charge controller.
- Compatibilité: The panel is designed for wide compatibility, including various portable power stations and 12V/24V battery systems. It includes a 4-in-1 universal connector (MC4, DC5525, DC7909/8mm, Anderson, TX60) to support most devices.

Image 6.1: An illustration showing the solar panel connected via MC4 connectors and various adapters to a portable power station, demonstrating its broad compatibility.

Image 6.2: A detailed diagram illustrating the various output connectors (DC5525, DC7909/8mm, Anderson, TX60) that allow the solar panel to connect to a wide range of portable power stations.
7. Entretien
- Nettoyage: Essuyez régulièrement la surface des panneaux solaires avec un chiffon doux et sec.amp cloth to remove dust, dirt, or debris. A clean surface ensures maximum light absorption and efficiency. Do not use harsh chemicals or abrasive materials.
- Inspection: Periodically inspect the panel for any physical damage, such as cracks, dents, or frayed cables. Ensure all connectors are clean and free of corrosion.
- Stockage: When not in use, fold the solar panel and store it in a dry, cool place away from direct sunlight and extreme temperatures. Use the integrated handle for easy transport.

Image 7.1: The solar panel shown in a rainy environment, highlighting its IP65 waterproof rating, which indicates protection against dust and low-pressure water jets.
8. Dépannage
| Problème | Cause possible | Solution |
|---|---|---|
| No power output / Low charging speed | Ensoleillement insuffisant Panel partially shaded Angle incorrect Surface du panneau sale Connexion lâche ou incorrecte Météo Couverte | Déplacez le panneau vers la lumière directe du soleil Retirez tous les obstacles Adjust panel angle towards the sun Nettoyer la surface du panneau Vérifiez toutes les connexions de câble Charging efficiency will be reduced in cloudy conditions |
| Panel not recognized by device | Adaptateur incompatible Câble défectueux Device input limit exceeded | Ensure correct adapter is used Try a different cable if available Verify your device's input specifications |
| Physical damage to panel | Impact ou mauvaise manipulation | Contactez le service client pour obtenir de l'aide. N'essayez pas de réparer l'appareil. |
9. Garantie et assistance
The Voominhtec 400W Portable Solar Panel is covered by a standard manufacturer's warranty. Please refer to the warranty card included with your purchase or visit the official Voominhtec webConsultez le site pour connaître les conditions générales de garantie détaillées.
For technical support, troubleshooting assistance, or warranty claims, please contact Voominhtec customer service through the contact information provided on the official brand website ou votre plateforme d'achat.
Voominhtec Official Store: Visit the Voominhtec Store on Amazon
Ask a question about this manual
Ask about setup, troubleshooting, compatibility, parts, safety, or missing instructions. Manuals+ will review the question and use this page’s manual context to help answer it.